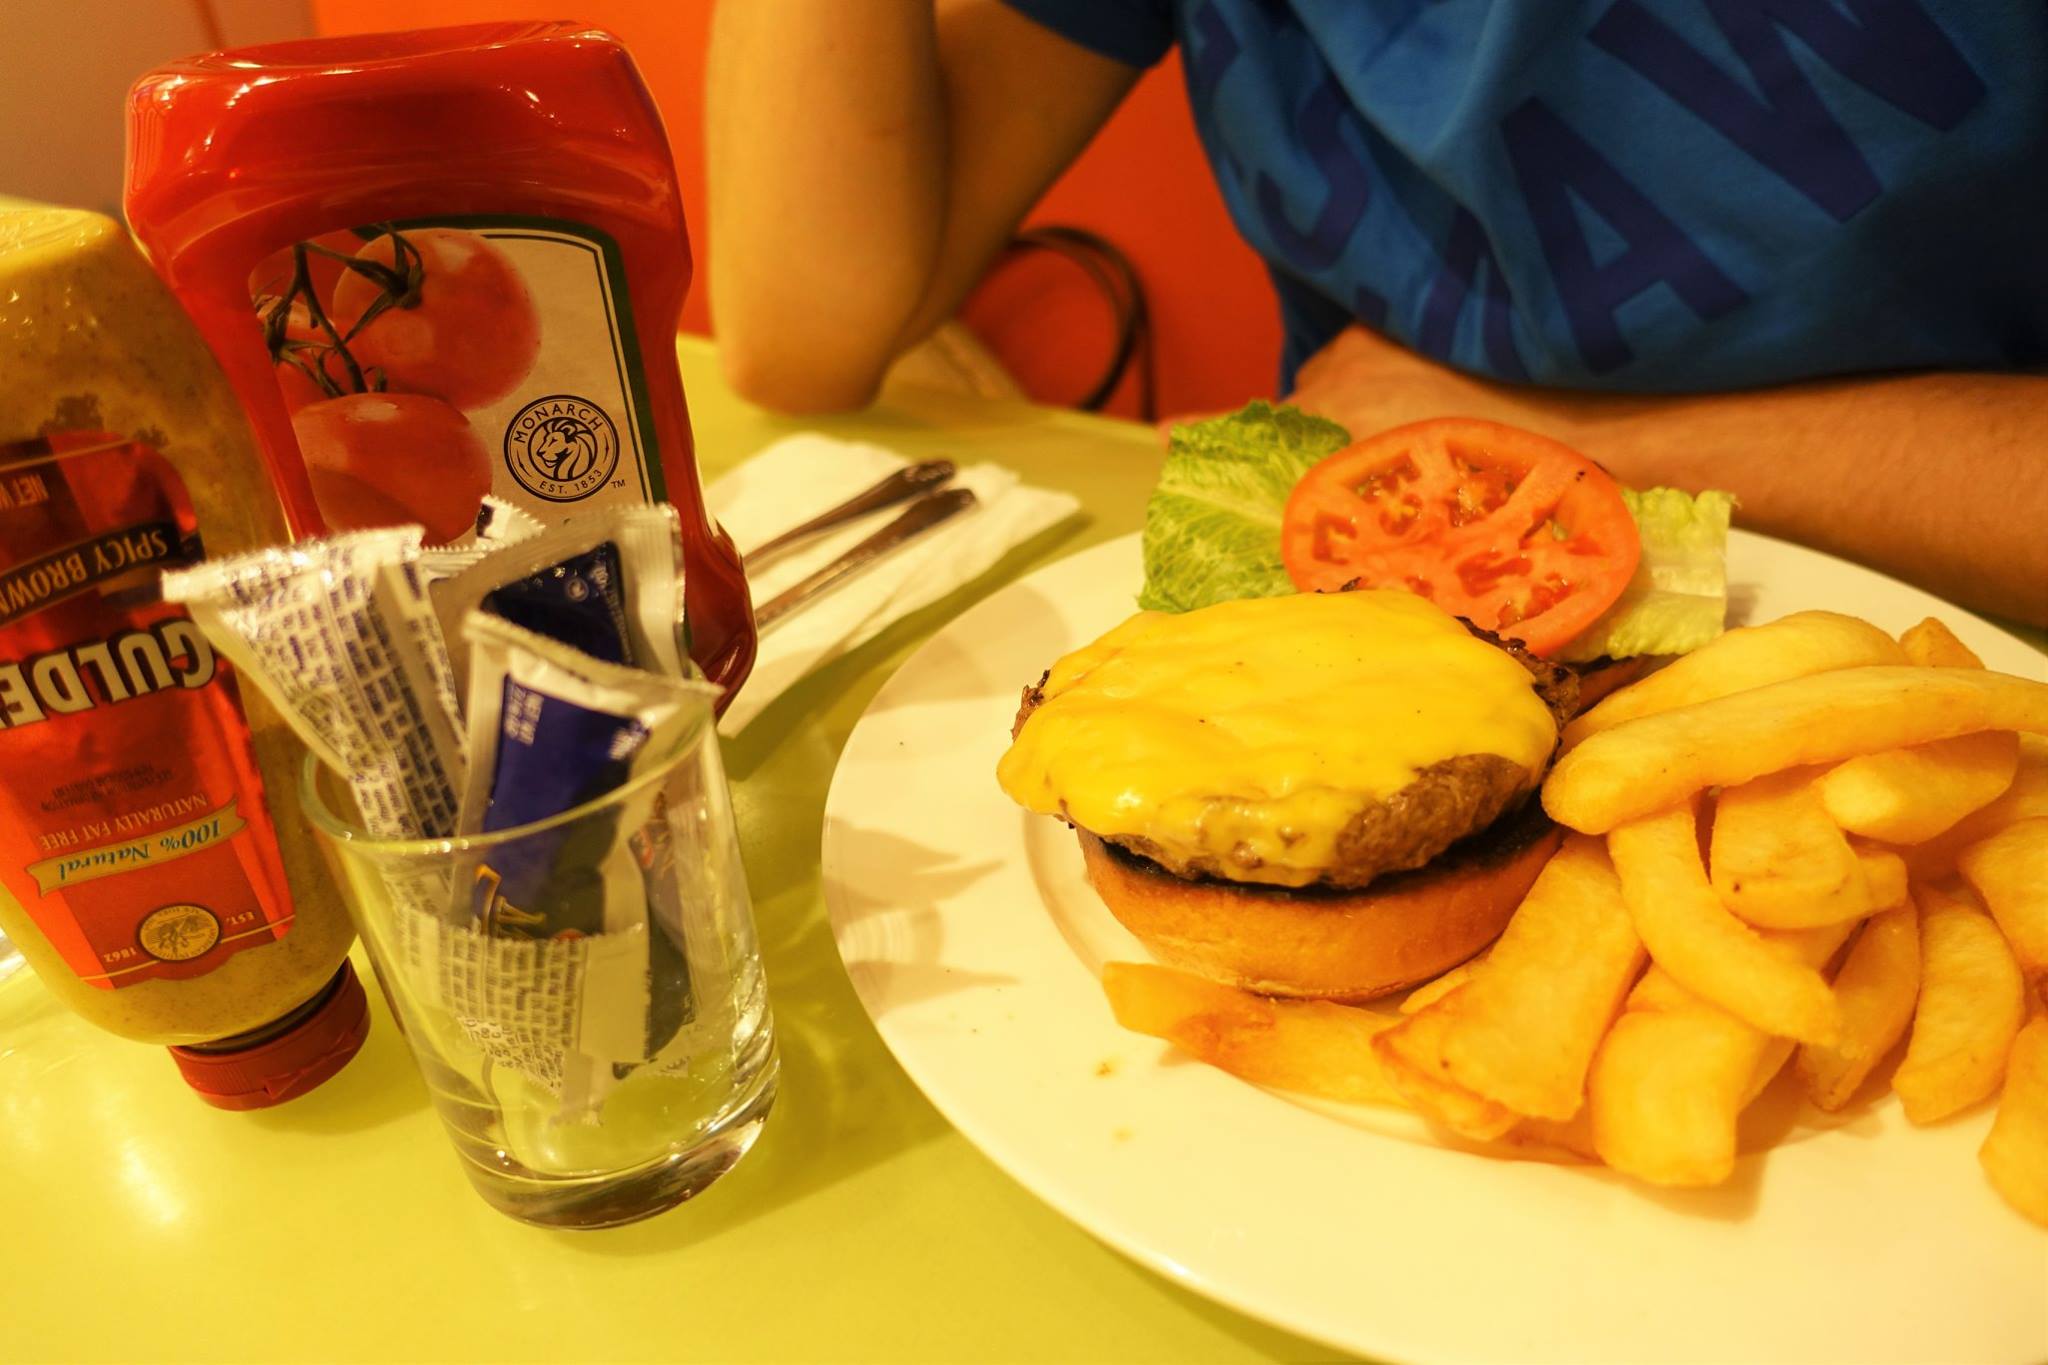
I didn’t expect to be posting a recipe today, since I been so busy with the baby. The last thing on my mind has been recipe creation. However, I whipped this up earlier today and it was pretty darn good, so I just had to share.
I love coconut rice and I haven’t yet perfected it at home. Occasionally I order it from my local Thai takeaway. It’s just so decadent and delicious. Last night had a night alone with the baby and picked up a Veggie Green Curry with Coconut rice to compliment. I only had the rice left, so today used it to make this quick and easy lunch for Marco and I, with some ingredients I had on hand.
For this dish, you can add any vegetables you like. I would probably have added more if I had anything left in my fridge. If you not a fan of coriander, I do recommend still trying it in this recipe. My partner hates it and he didn’t notice it. Its also kid’friendly, if you omit Sriracha sauce and use less ginger if they are sensitive. I only had half a container of coconut rice for this recipe, but if you have more feel free to double the recipe.
Ingredients:
coconut or avocado oil
2 garlic cloves, diced
1 knob of ginger, diced
1/2 green capscium, chopped
big handful of green beans, chopped
handful of cashews
2 large eggs
1-2 tbsp chopped coriander, more to serve
1 cup leftover coconut rice
1 tbsp of tamari or more to taste
Sriracha sauce to serve
Method:
Heat a nonstick pan or wok on medium heat with 1 tablespoon of oil. Then add the garlic, ginger and green capsicum. Saute for a couple of minutes until start to brown.
Add the green beans and pinch of sea salt. Continue to saute for a few minutes, until they are tender. Add splash of water if they stick to much to the pan and let it evaporate.
Add the cashews and saute for another couple of minutes, so that they are toasted. Turn off the stove and remove all the ingredients from the pan and put in a bowl the side.
In a small bowl, beat two eggs, add chopped corriander and pinch of sea salt.
Heat pan on medium heat and add another tablespoon of oil. Then add the beaten eggs. Fold the eggs until they are scrambled and cooked. This should only take a couple of minutes. Then remove the eggs from pan and place on top of the vegetables you have on the side.
Now add the leftover coconut rice to the pan on a medium heat. Gently break any large pieces with your wooden spoon if its a bit sticky. Add a splash of water if it sticks too much. When its nearly finished heating through add the vegetables, eggs and tamari, so that its all combined.
Serve fried rice with more chopped coriander and sriracha sauce.
Hi all, it has been a while since my last post. Life has been so busy the past few months. Like most parents, I was homeschooling my daughter in the first term of this year. I was anxious about having a baby during this turbulent time and how I would continue to home school at the same time. However, the situation improved in my state of Queensland. So my preppy got to return to school for Term 2 and my baby decided to come early as well. We are now at the end of second term holidays and the past 2 months have been a bit of a blur.
I would like to introduce you to my new baby boy, Lucius Maximus. He is currently 13 weeks, but these photos were taken when he was 26 days old. They were taken by the amazing photographer Kelley of Rule of Thirds Photography.
Lucius is a lot larger now and is doing really well. He originally was meant to arrive at the end of May, but he decided to move out of his breach position the night before my scheduled ECV at 37 weeks and 5 days. My early labour contractions started the next morning, but things didn’t get serious until the afternoon. I was later rushed to the hospital and he made his way out around 9 pm that night. It was a relevantly quick but extremely painful natural birth. Partly because I didn’t know how bad late-stage labour could be, but also apparently because quicker births can be a bit scarier. Luckily all was well, so we were able to go home after only 6 hours after his birth. He’s been a pretty good baby for the most part. Definitely more easier to manage than my first child. As long as he eats and his held constantly hes relatively happy and will sleep. He has been colicky at night, so I learning how important getting all that gas out of his system has been, to avoid hours-long crying.
Having a newborn 5 years after having my first has not been entirely easy as I thought it would be. Breastfeeding was still painful and difficult. Sleep is a constant war than can never be won. And having the patience to soothe a screaming baby when you having sleep isn’t easy. But I also have much more confidence that things will be ok and can only get better, which is what I hold onto when I feel like I may lose my mind. What I wasn’t expecting was that my first love would go from a sweet little girl to an unruly, defiant little person. I am not sure if it because there is a new person taking up my attention or because shes grown up so fast in her first year of school. I have less patience, but I have to remind myself that she’s still a little girl trying to navigate her own emotions.
Even before Lucius arrived I did find it difficult to blog, colour, read or multitask in general. I found the closer I get to my due date the more my brain feels scrabbled and unmotivated. The only thing I have been interested in doing is cooking large batches of food, cleaning my kitchen and watching other people prepare food and organised their kitchen. Since he arrived, I haven’t had then time to do much for myself, since he’s always attached to me. But as my sleep is improving I found time to do a bit more reading and make more contact with the outside world.
I have a couple of colouring book reviews to put together, more Tasmania travel posts and some recommendations of some great food and mummy Youtube channels I discovered during lockdown to recommend. So please be patient with me and I will try to get focused and find someone to hold this baby. Typing with one hand is a lot more difficult then you think. Catch up with you soon!
Our next destination on our Tasmania road trip is the historical town of Queenstown. This was probably one of our longest journeys on this road trip. Under normal circumstances, it would have taken about 3 hrs and 45 minutes to drive. However, we did hit a bit of snag in our last hour due to car sickness. So we did arrive a little late, but we still managed to do quite a bit on our first day. We did have to leave early the next day, so I have been able to give you a snapshot of what you can do for free.
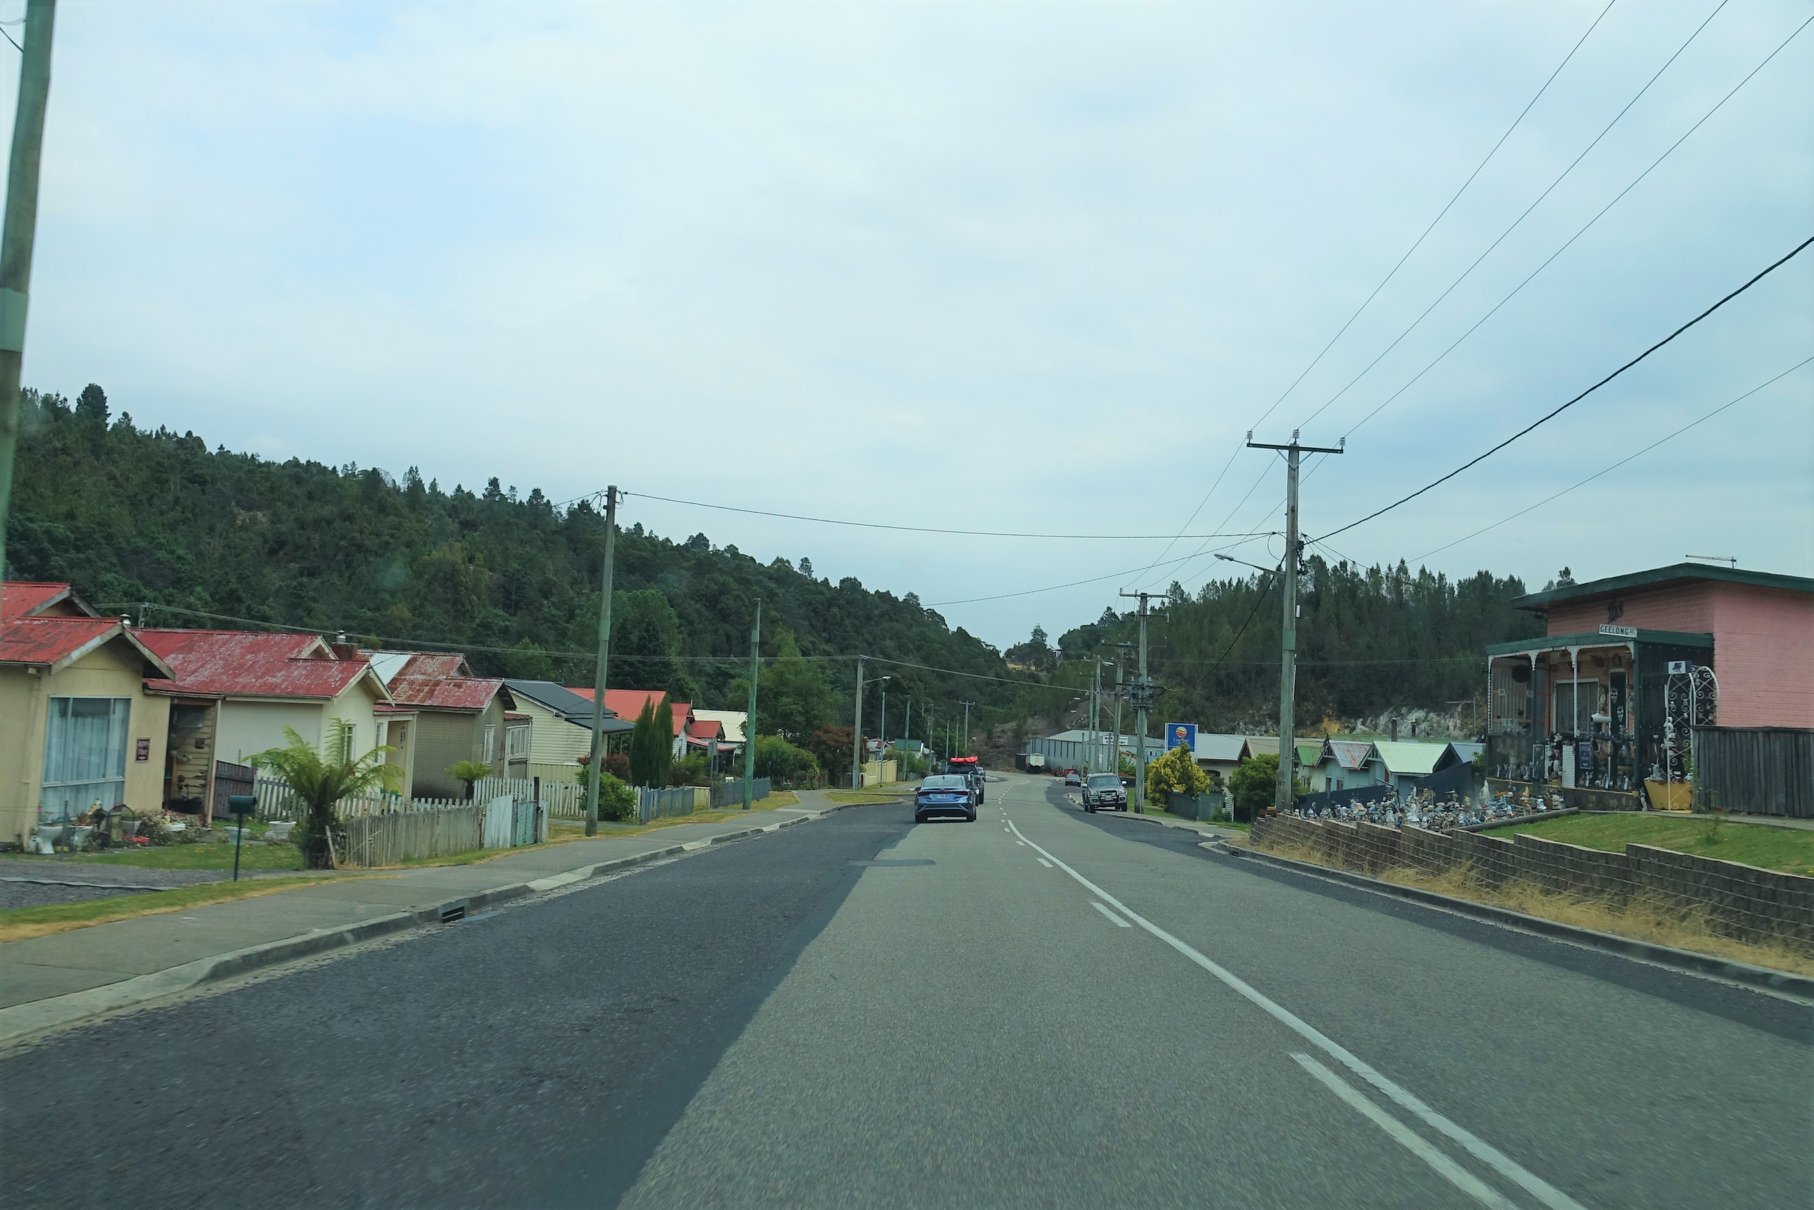
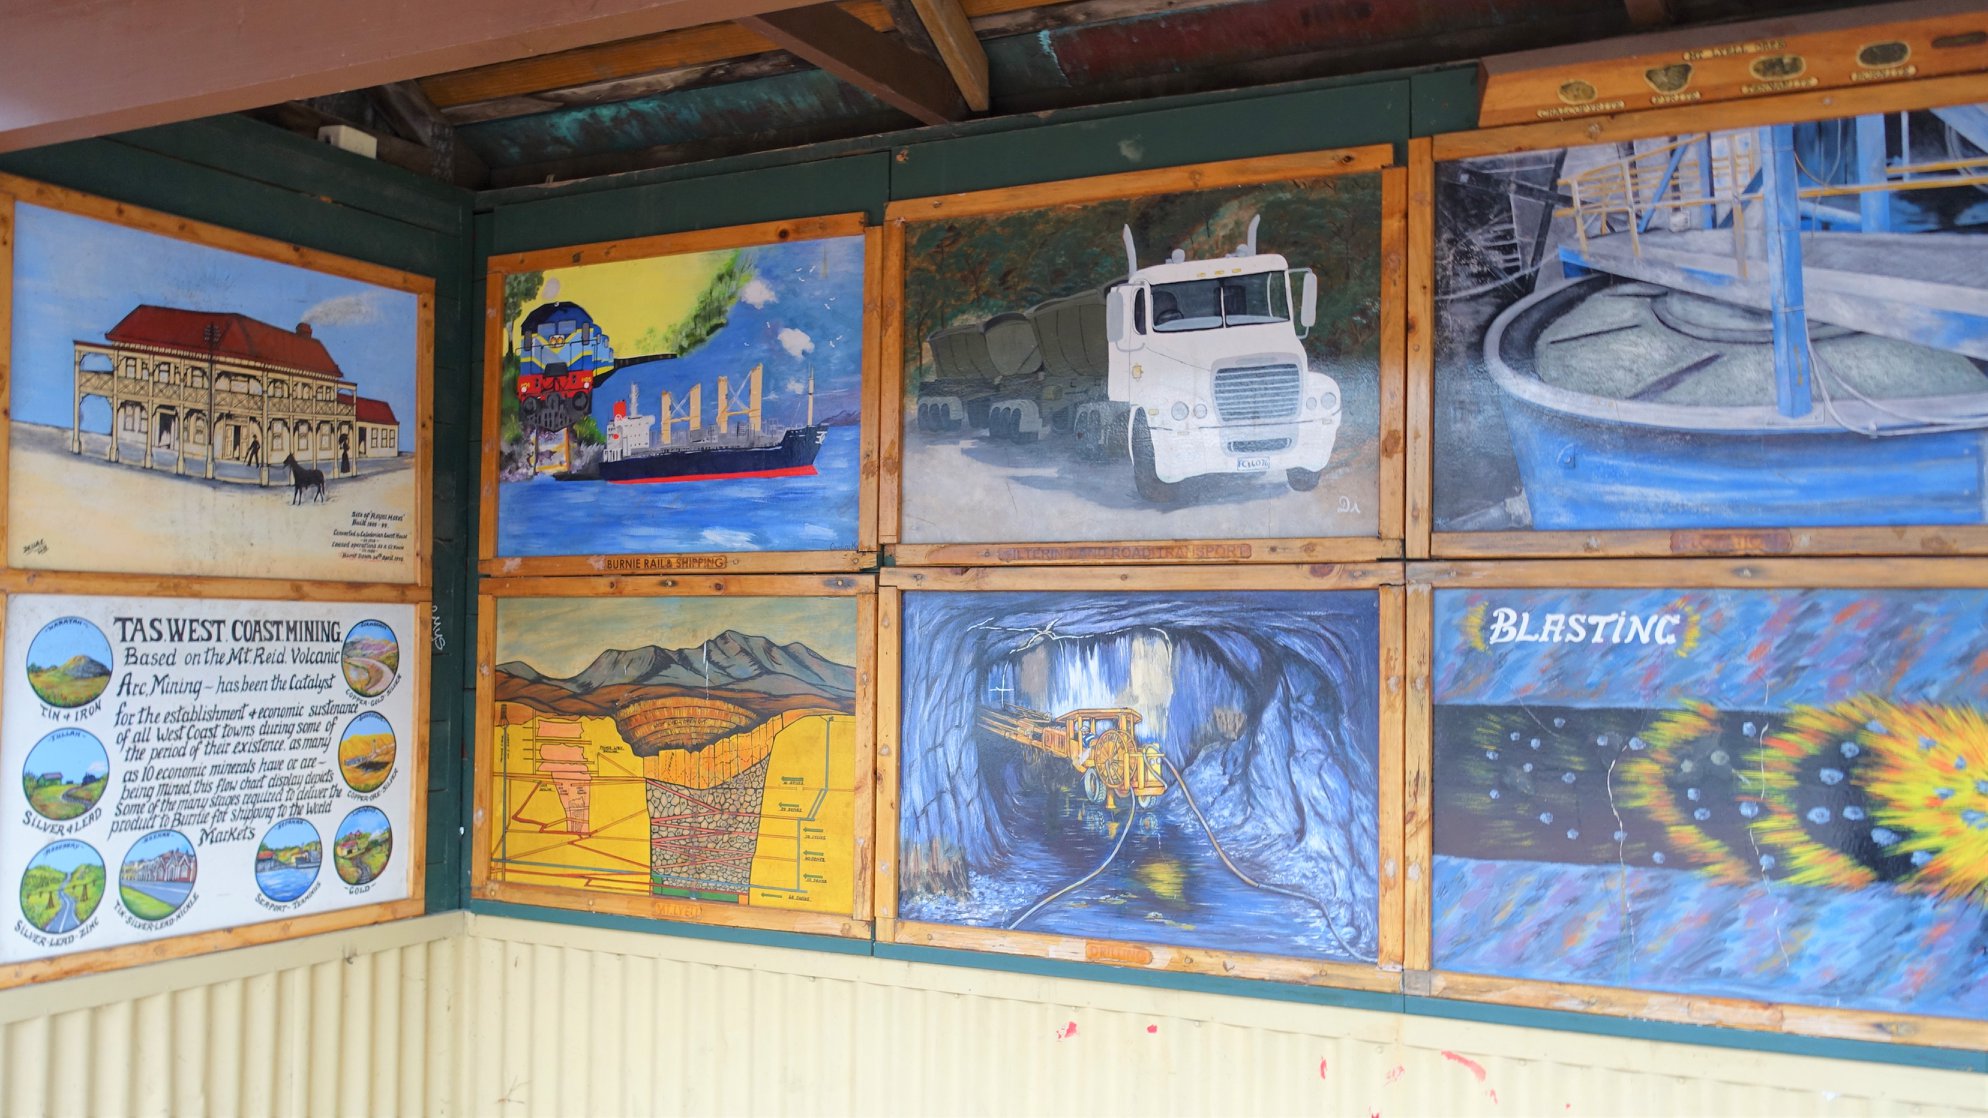
Queenstown is a small country town with a rich mining history. In the early 1900s, it was the third-largest town in Tasmania and had 14 hotels. However, today the population has dwindled and it has become quite a sleepy town. It does offer quite a few historical attractions, has an amazing street art scene and there are various nearby natural attractions to explore. Queenstown was probably one of the highlights of this trip and I was surprised how much I enjoyed our stop here.
Along the way to Queenstown, we made a rest stop at the Tarraleah Power Station on Nive River. It is located near the Tarraleah Falls and takes just under two hours from Hobart to reach. It is a great place to stop and stretch your legs, use a bathroom and learn a bit of history. This hydroelectrical power station was the largest when it was built in 1938. It played a significant part in expanding the Tasmanian industry after WWII and gave labour opportunities to migrant workers from Germany and Japan. It later also employed many migrants from other countries, such as Poland, Italy, Scandinavia, Eastern Europe, which in turn brought new foods and cultural influences to the region.
So after our rest stop, we had just under two hours drive to go. On the way, we travelled on some incredibly winding dirt roads. Our daughter was getting restless, so we thought we would let her use the Ipad and didn’t attach it to the back of the headrest. This was the biggest mistake we could make because all of that looking down it made her car sick. She didn’t say anything and then all of a sudden threw up all over herself. We had to stop, change her clothing and wipe down seat beat. We thought she would be ok after that and she had a bit of a nap, but about an hour later she threw up again. This time it was even worse and it got all over the car seat, car interior and on the Ipad. So again we had to change her and wipe everything down. Now if your parents you may have had this happen many times. We, however have not. Our daughter has never thrown up in the car and only twice at home on the tiles. So we were not expecting or prepared for this. We were also driving a rental car and praying we would find a washing machine at our accommodation and a car detailing service. Although since we were heading away from the main cities we were unlikely to find anyone to clean the car professionally. By the end of the trip it all worked out, but from here we would spend the rest of the week trying to fix our smelly car and stressing how much we would be charged by the rental company.
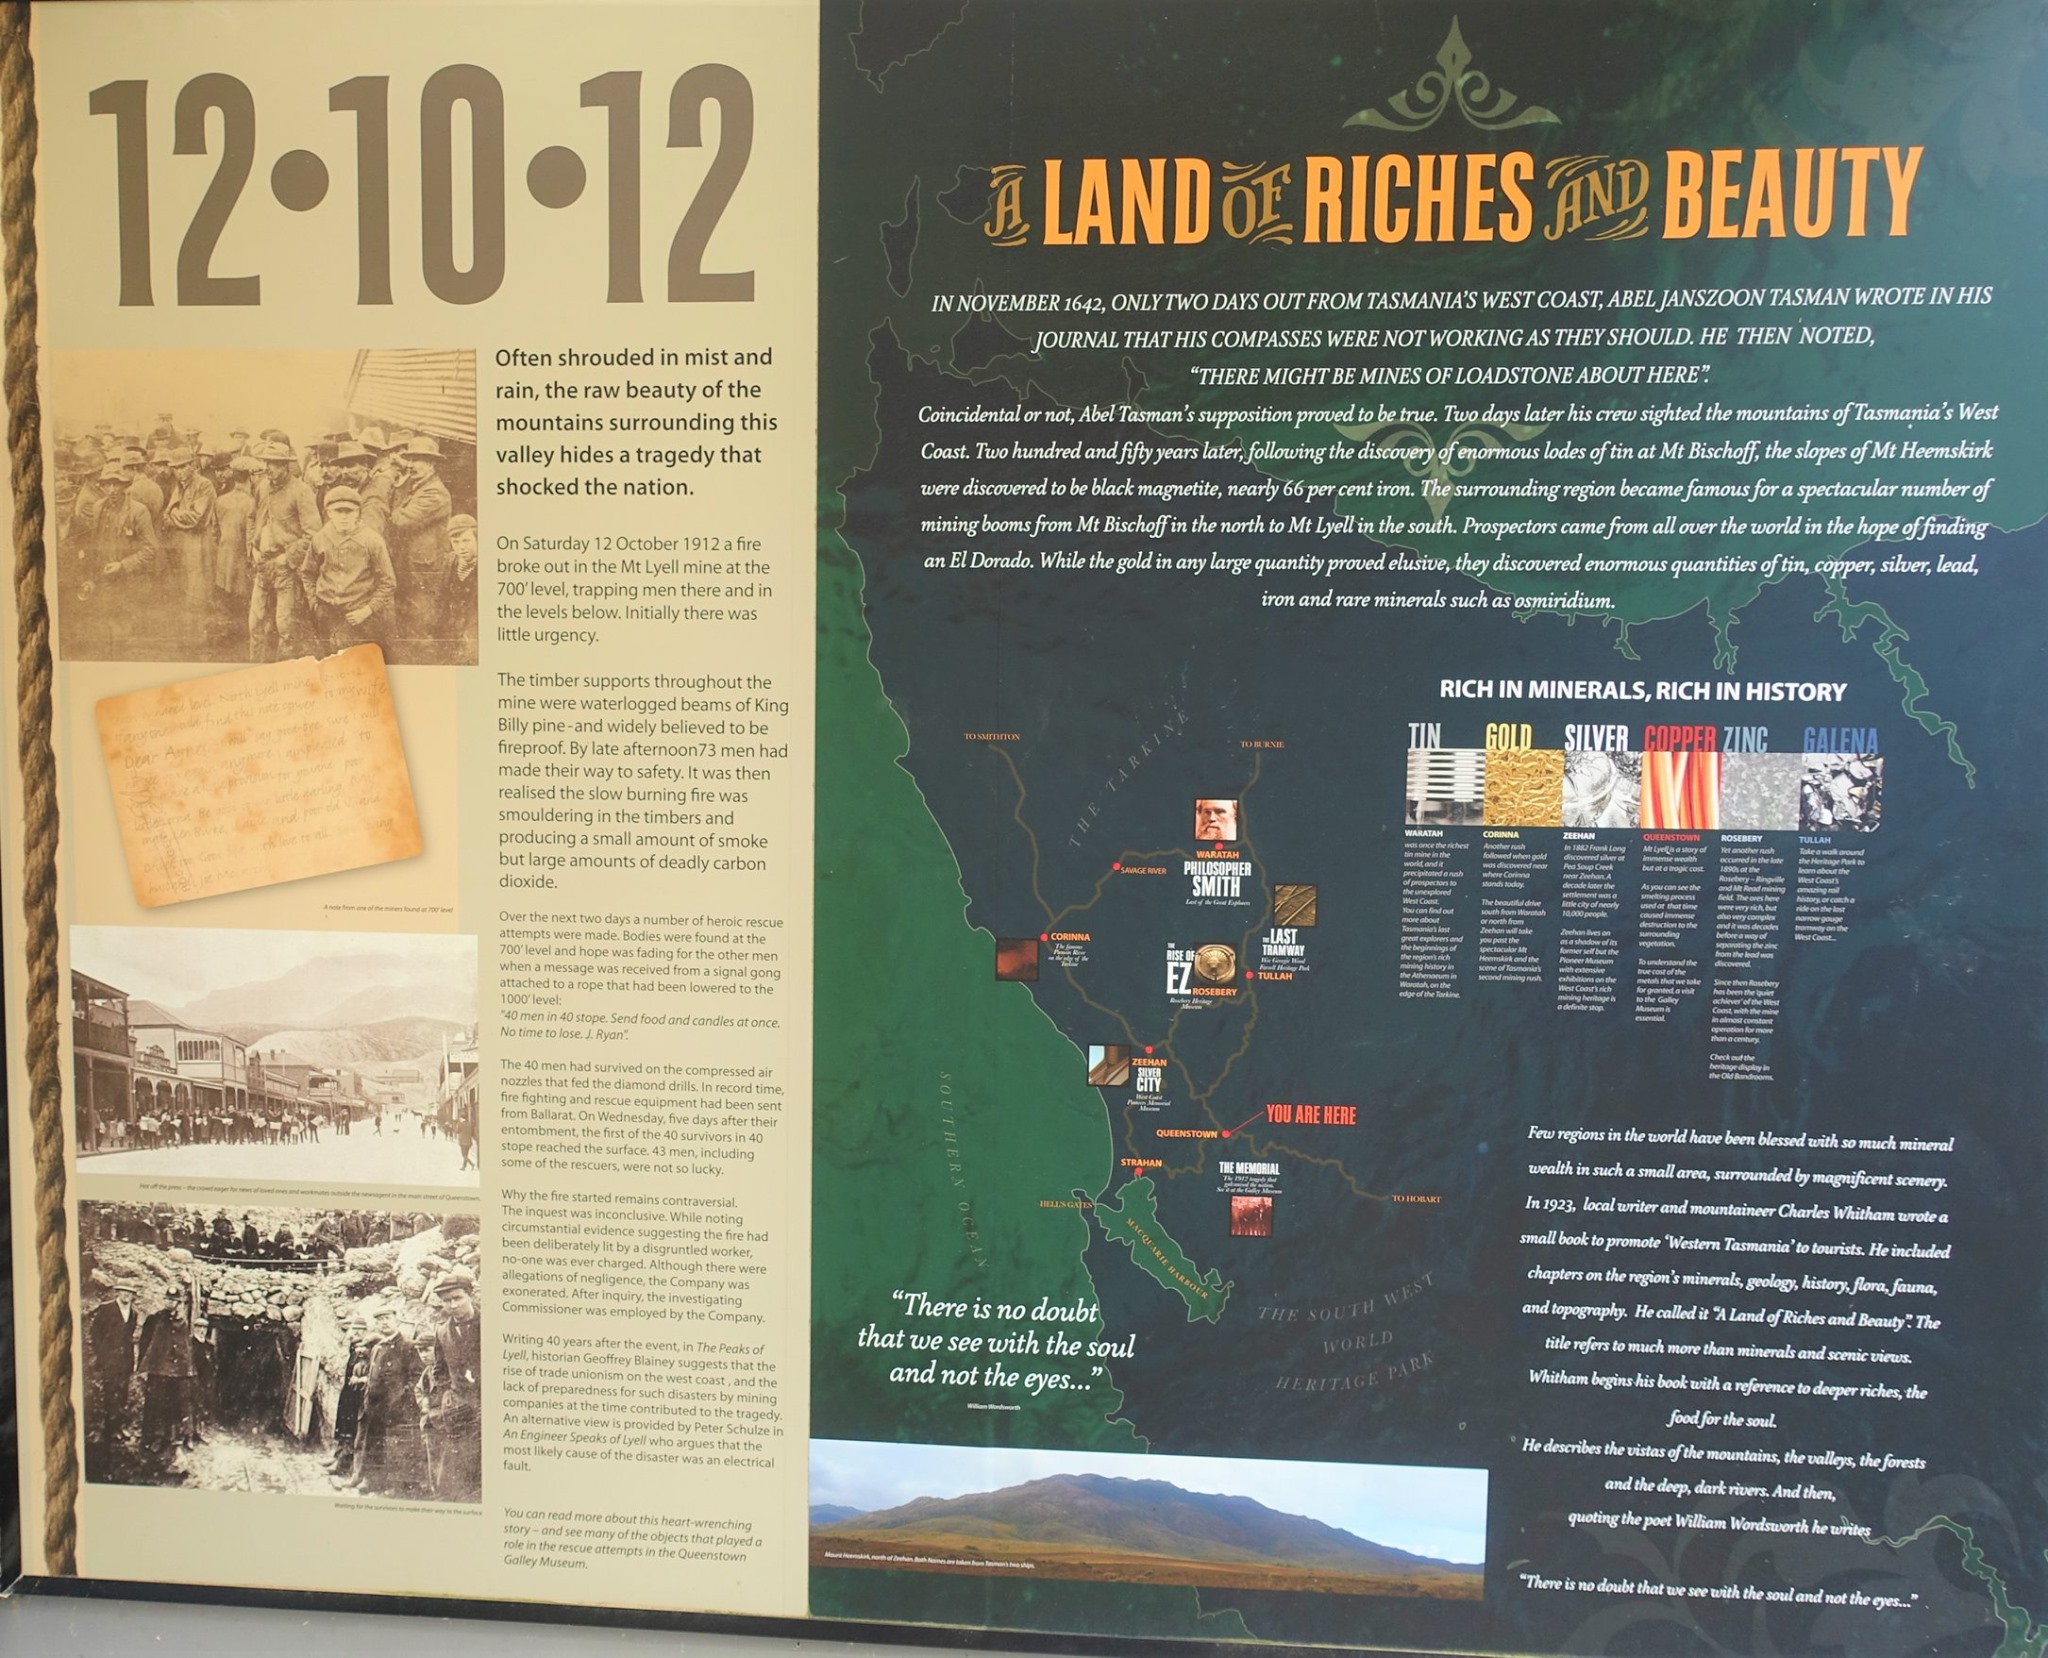
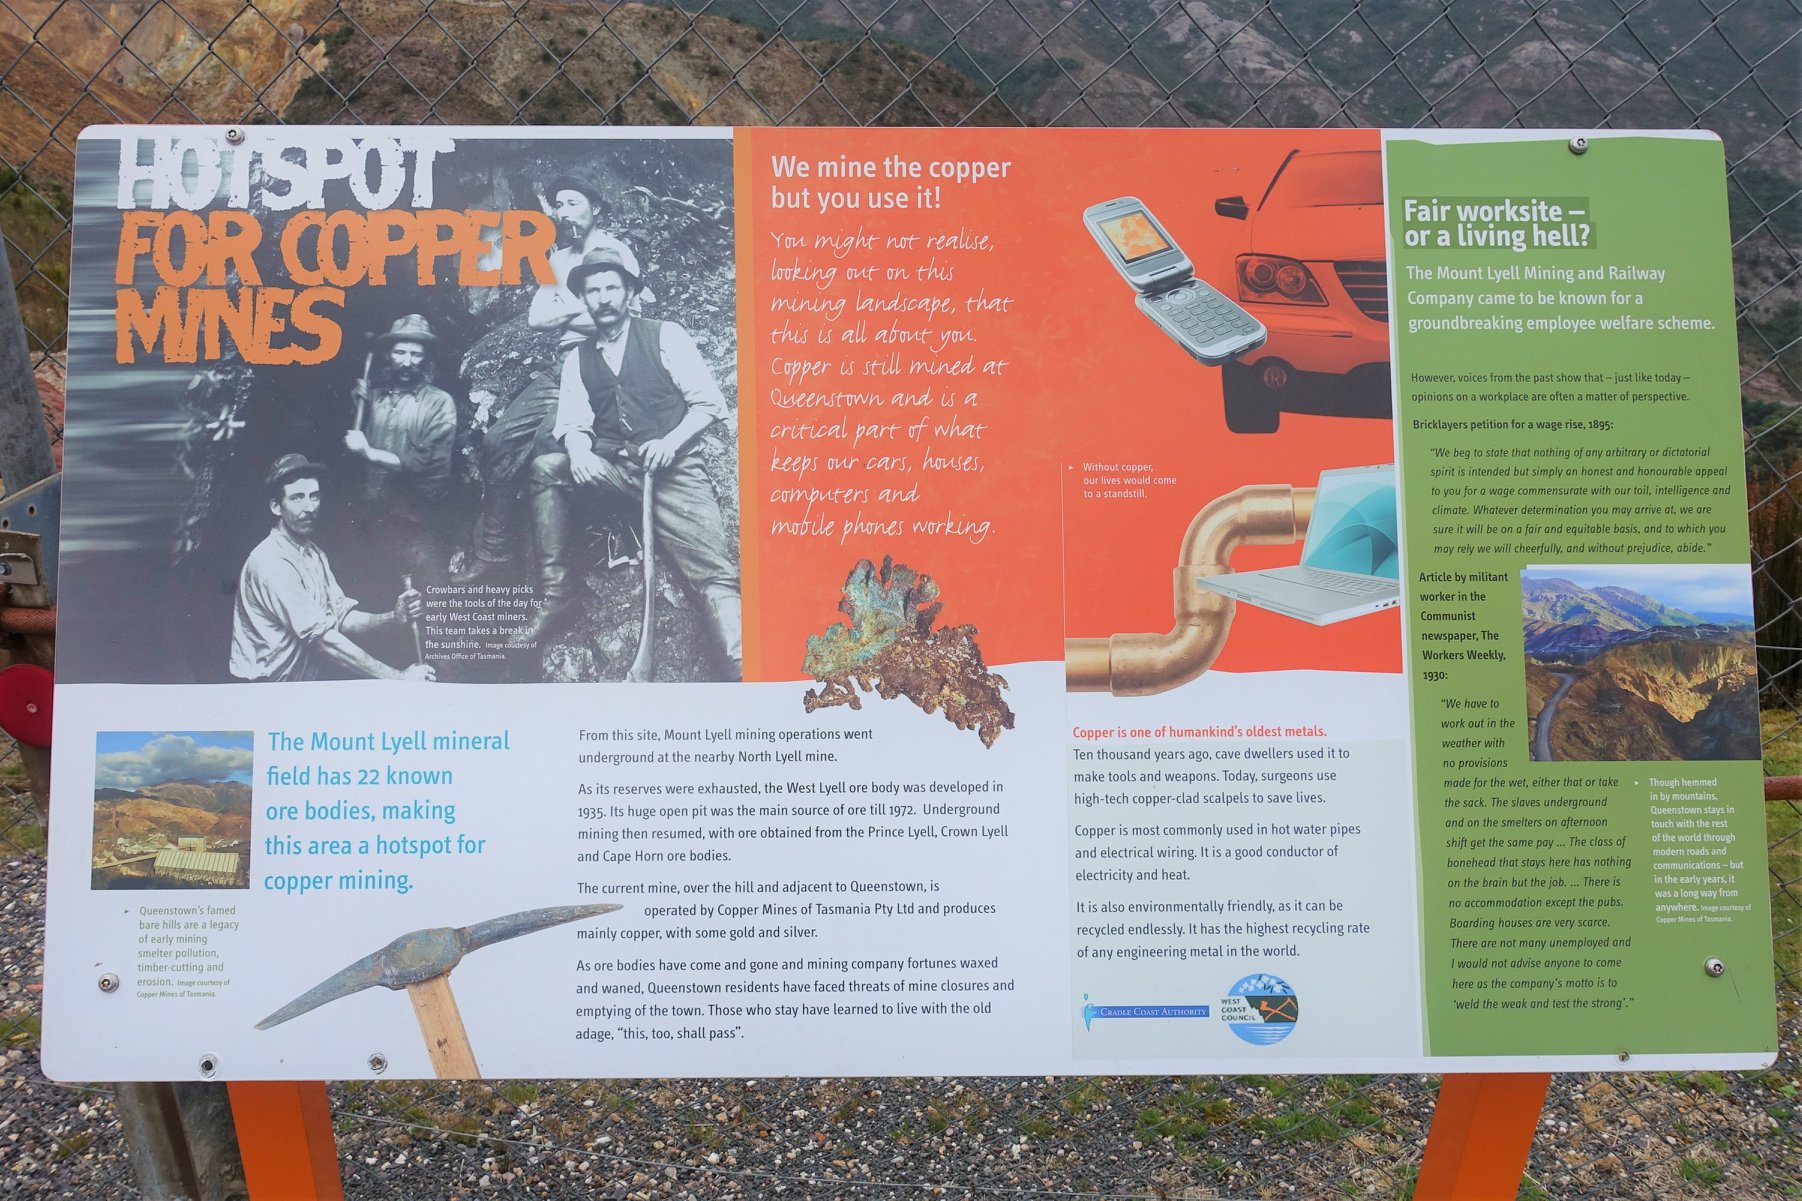
Because of our delay, we didn’t make a stop along the way to Nelson Falls, which is about 30 mins from Queenstown. It is a 45 min return walk, which takes you to an amazing waterfall and is great for young families. We also drove past Iron Blow Lookout or Horsetail Falls. However, we did come back to see these two sites since they are very close to the centre of town. The only stop we did make before checking into our accommodation was Queenstown tourist stop. It is located off the highway as you enter the Queenstown region and had some information boards that tell of Mt Lyell mining history. You can’t quite see them unless you get our of your car because they face the view.
Afterwards, we checked into our accommodation at the Comfort Inn Goldrush Motor Inn. The room was very simple and outdated. However, it was also incredibly clean, so I can’t fault it too much for the reasonable price we paid. Now the first thing we had to do was sort out our little car dilemma and find something to eat. So we used the washing machine facilities at the motor inn, which unfortunately weren’t great. The washing cycle and detergent combined cost $8 and it only ran on a for 20 minutes cycle. So it didn’t really get the smell out of the car seat cover or our daughter’s clothes. We did go into town to find some cleaning supplies and some lunch. Unfortunately, Cafe Serenade closed at 2 pm on a Sunday, just as we arrived. I was disappointed we didn’t get to try one of their house-made pies, since I was starving by now. The only place that was open in town at this time was the IGA General Store. They didn’t have much in the way of cleaning supplies or ready to eat food (for a pregnant lady). But we bought some cleaning vinegar and some fresh fruit to snack on before dinner.
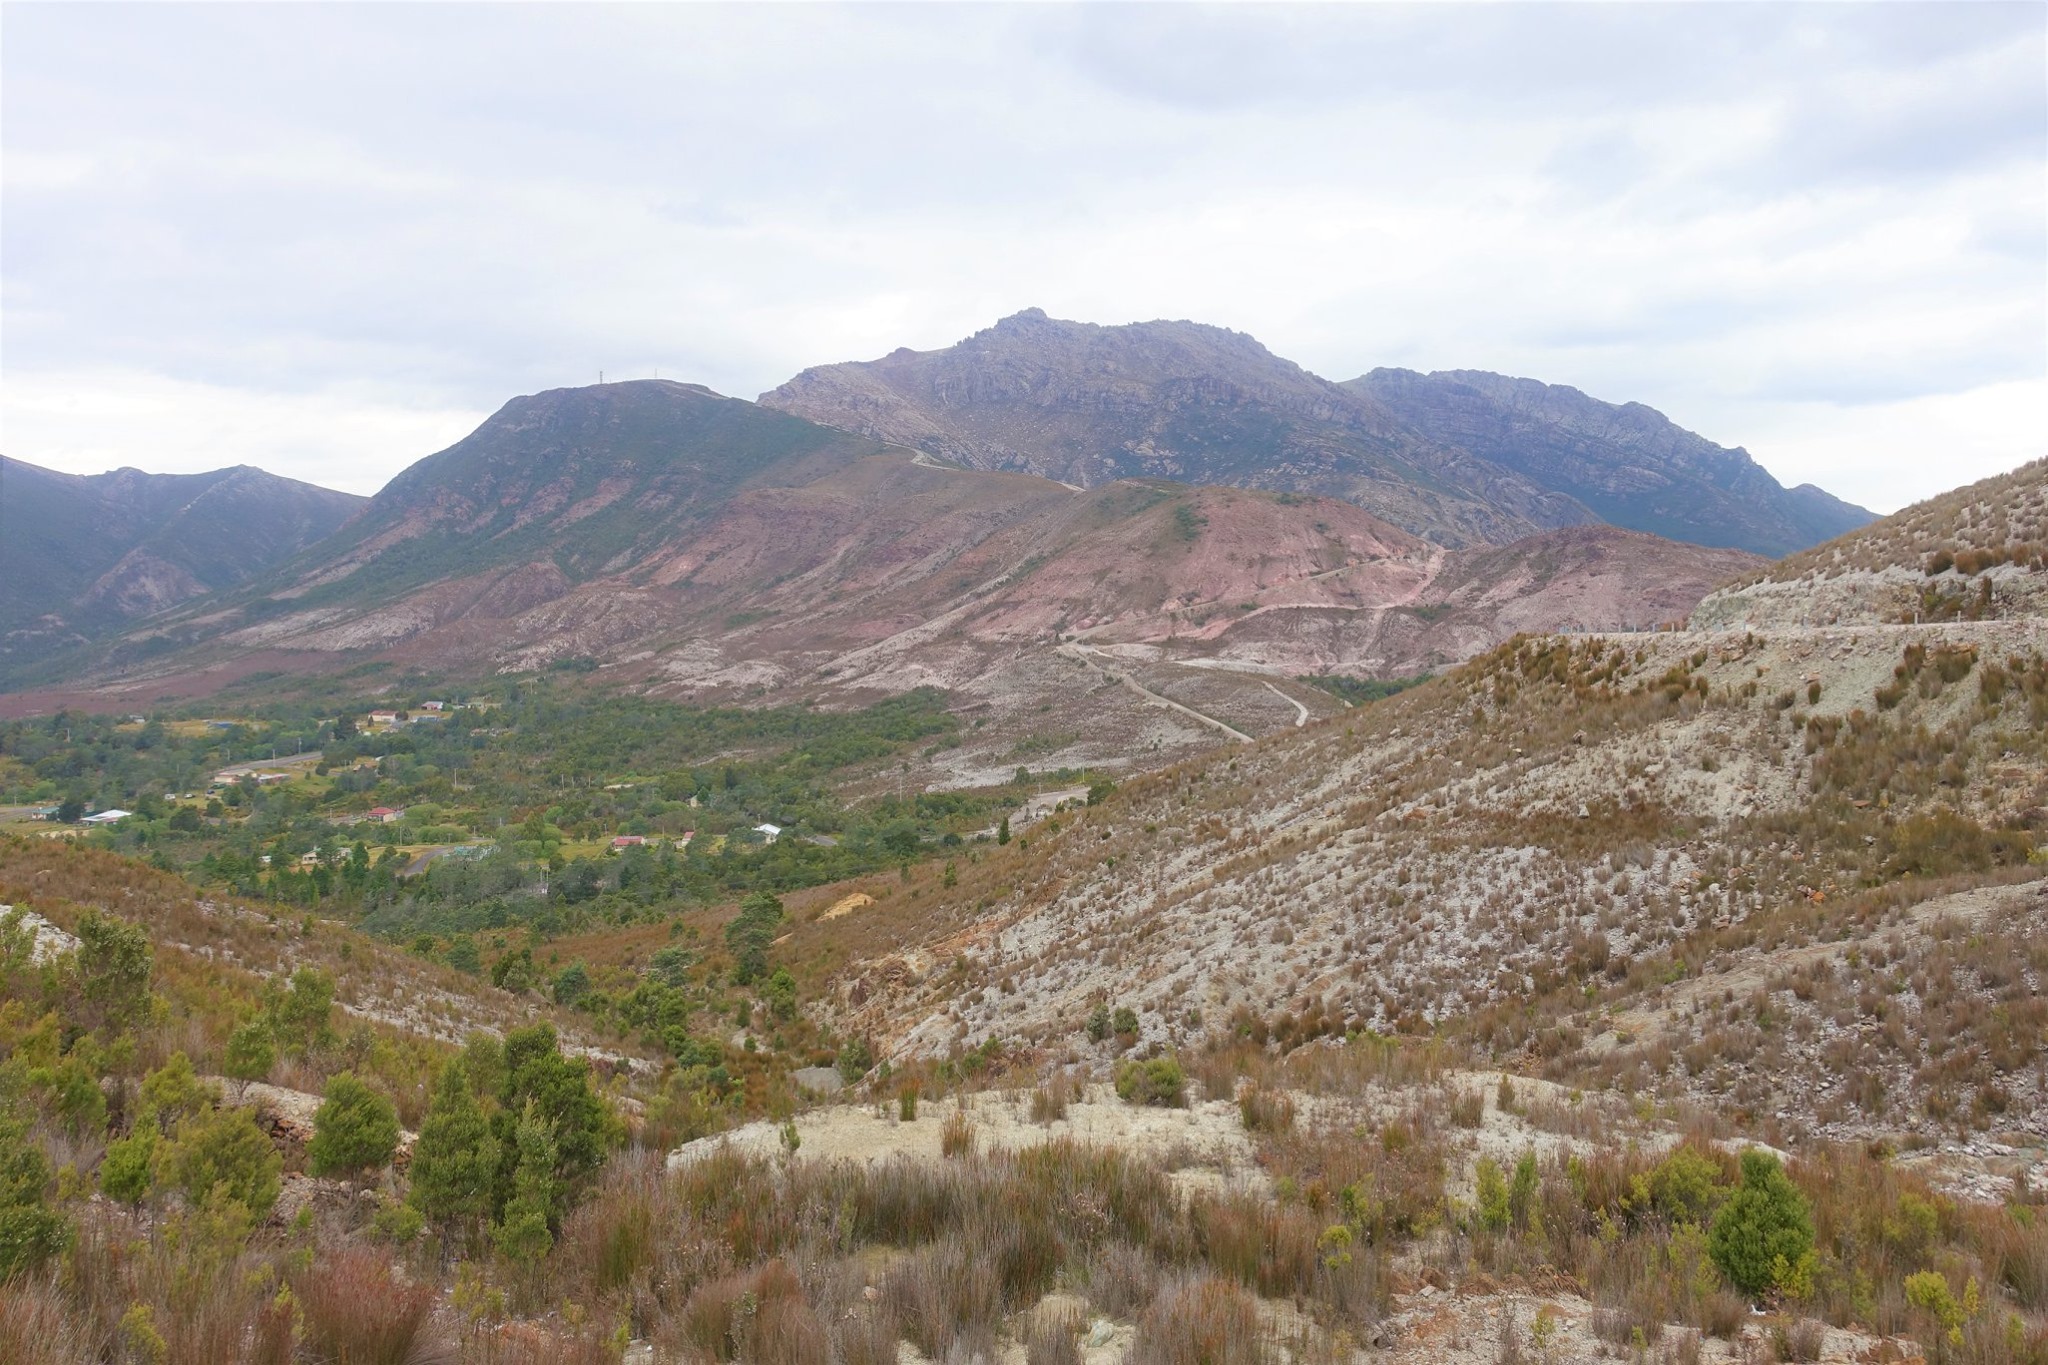
Afterwards, we went back to the Iron Blow Lookout in Gormanston. This is about 11 minutes drive from the centre of Queenstown. This was the earliest major mining venture at Mount Lyell and during the mining boom for the Queenstown region. The lookout allows a vertigo-inducing view of the open cut mine and the Linda Valley. When gold was discovered on hills of the Linda Valley in 1883, Iron Blow was founded and the site was descendent upon by miners who sort copper. They stripped the land bare and then deserted the area, leaving Gormanston and Linda as ghost towns. The over-mining and copper smelting has left a eerie, yet beautiful landscape which epitomises man’s greed.
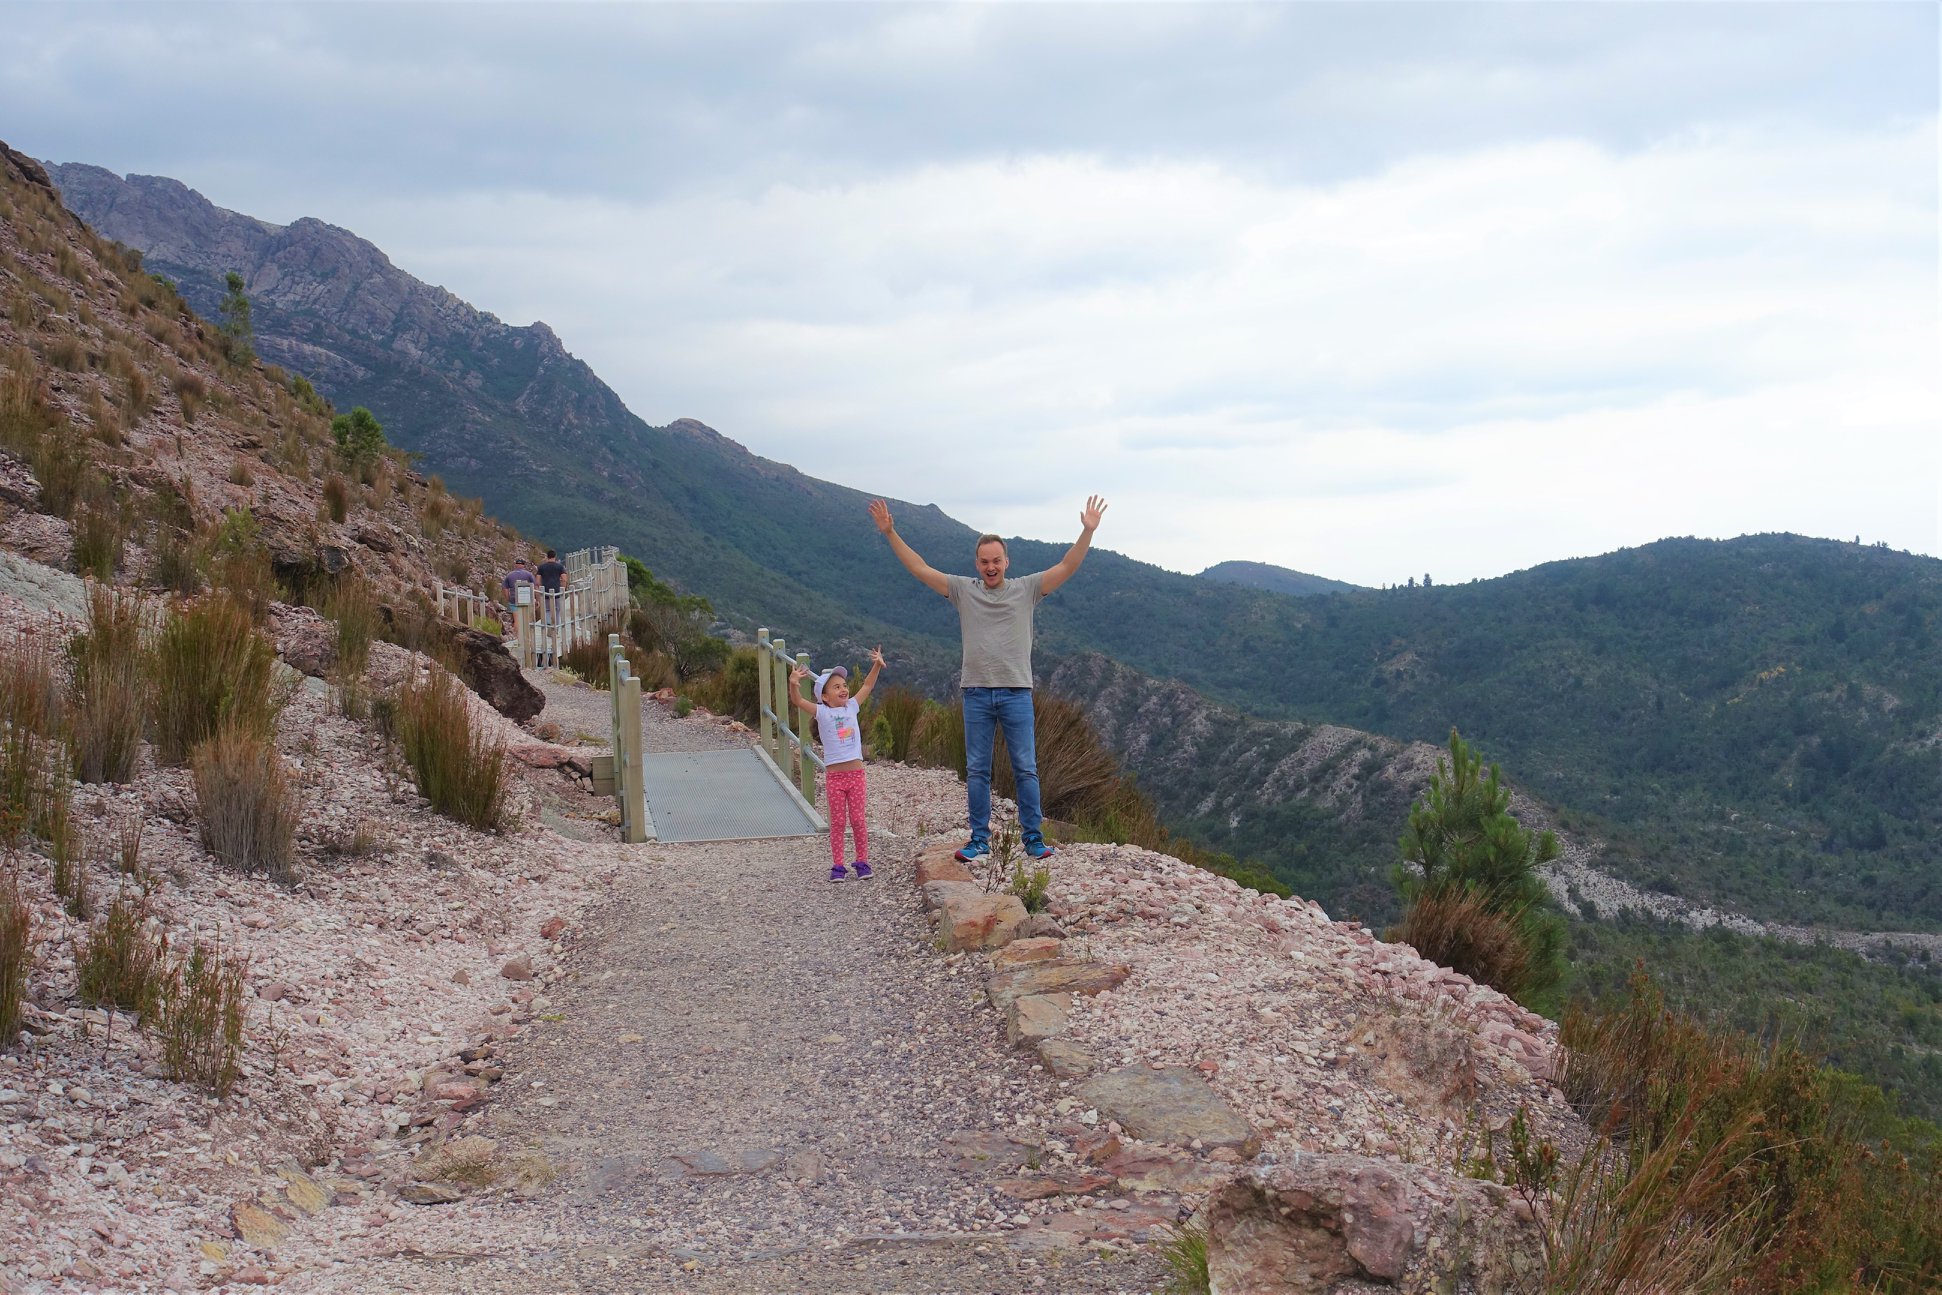
Next, we drove a couple of minutes down the highway to Horsetail Falls Track. Horsetail Falls is a large seasonal waterfall that falls of Mt Owen onto Moore Creek. During the summertime it’s only a slow trickle, so its best to see the misty cascade during winter. To get the best view of the falls, you need to walk the Horsetail Falls Track. This is a boardwalk staircase along Karlon’s Gap and gives a panoramic view of the mountains to the south, ocean to the west and side view of the falls. The return walk is only 1 km and takes 30 minutes. It’s a relatively easy walk and I managed to do it pregnant. However, I did have to take quite a few breaks, since I have been struggling to walk on elevated ground. If you have a child just be careful because some parts of the side rails are open. I didn’t think I would make it all the way up, but it was an amazing view and worth the trip.
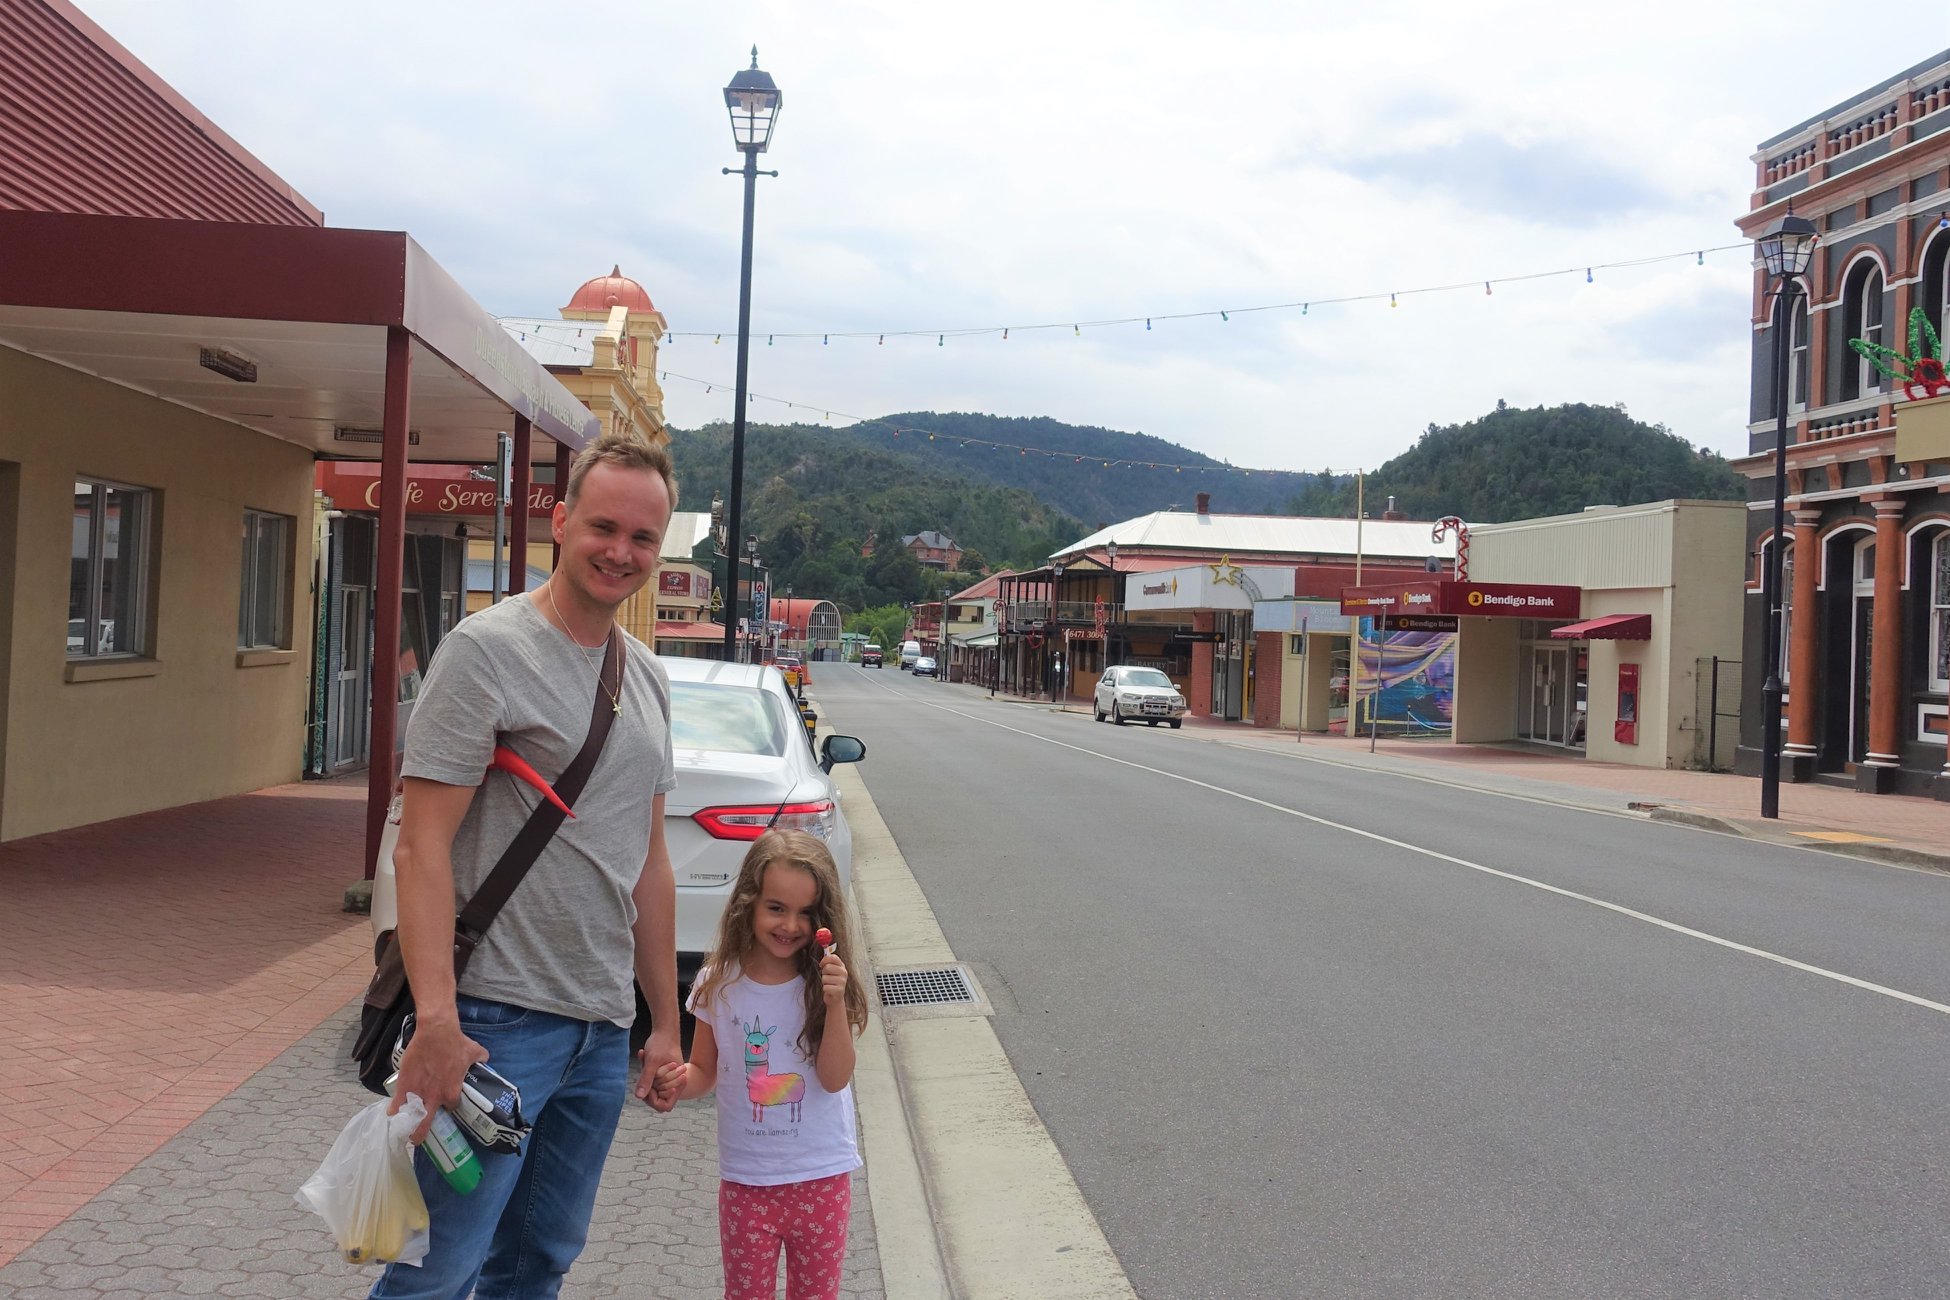
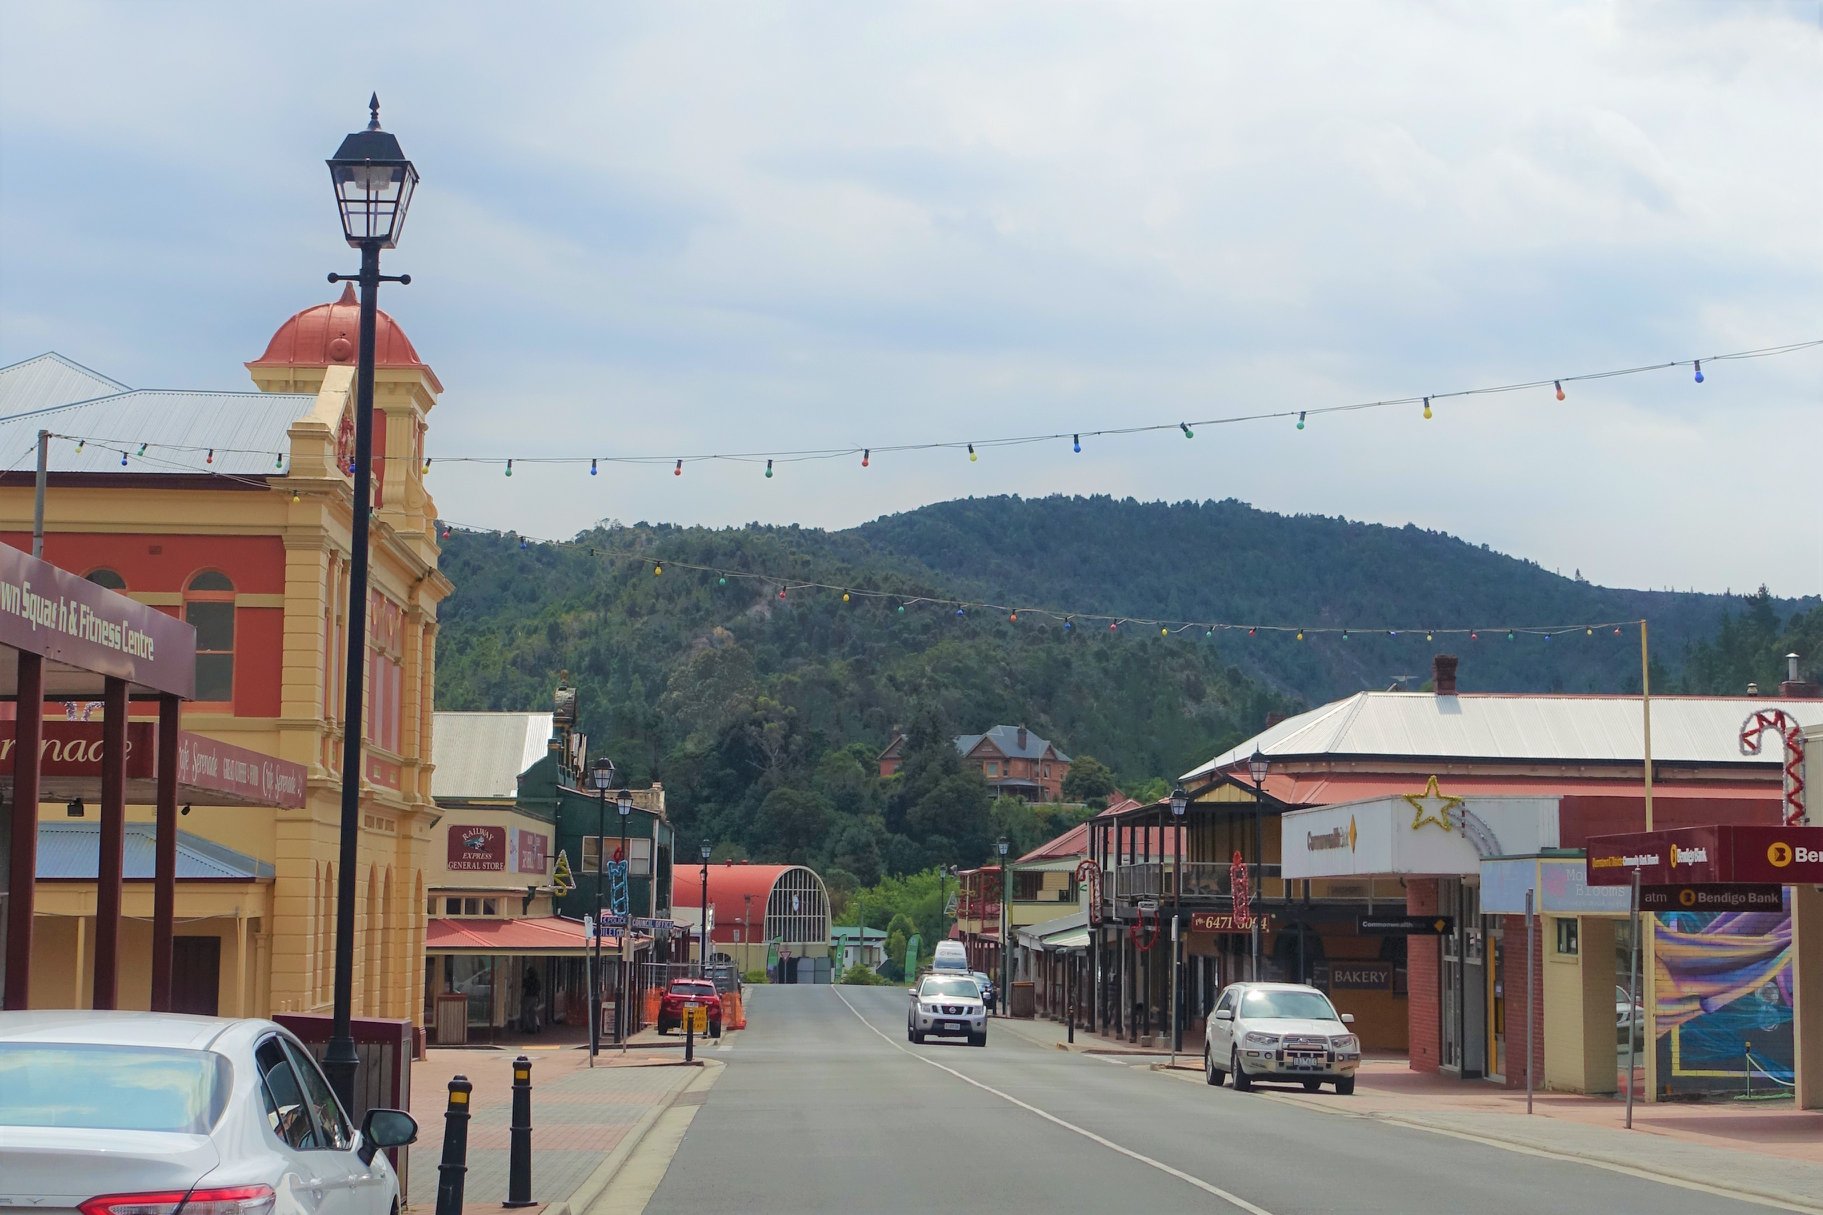
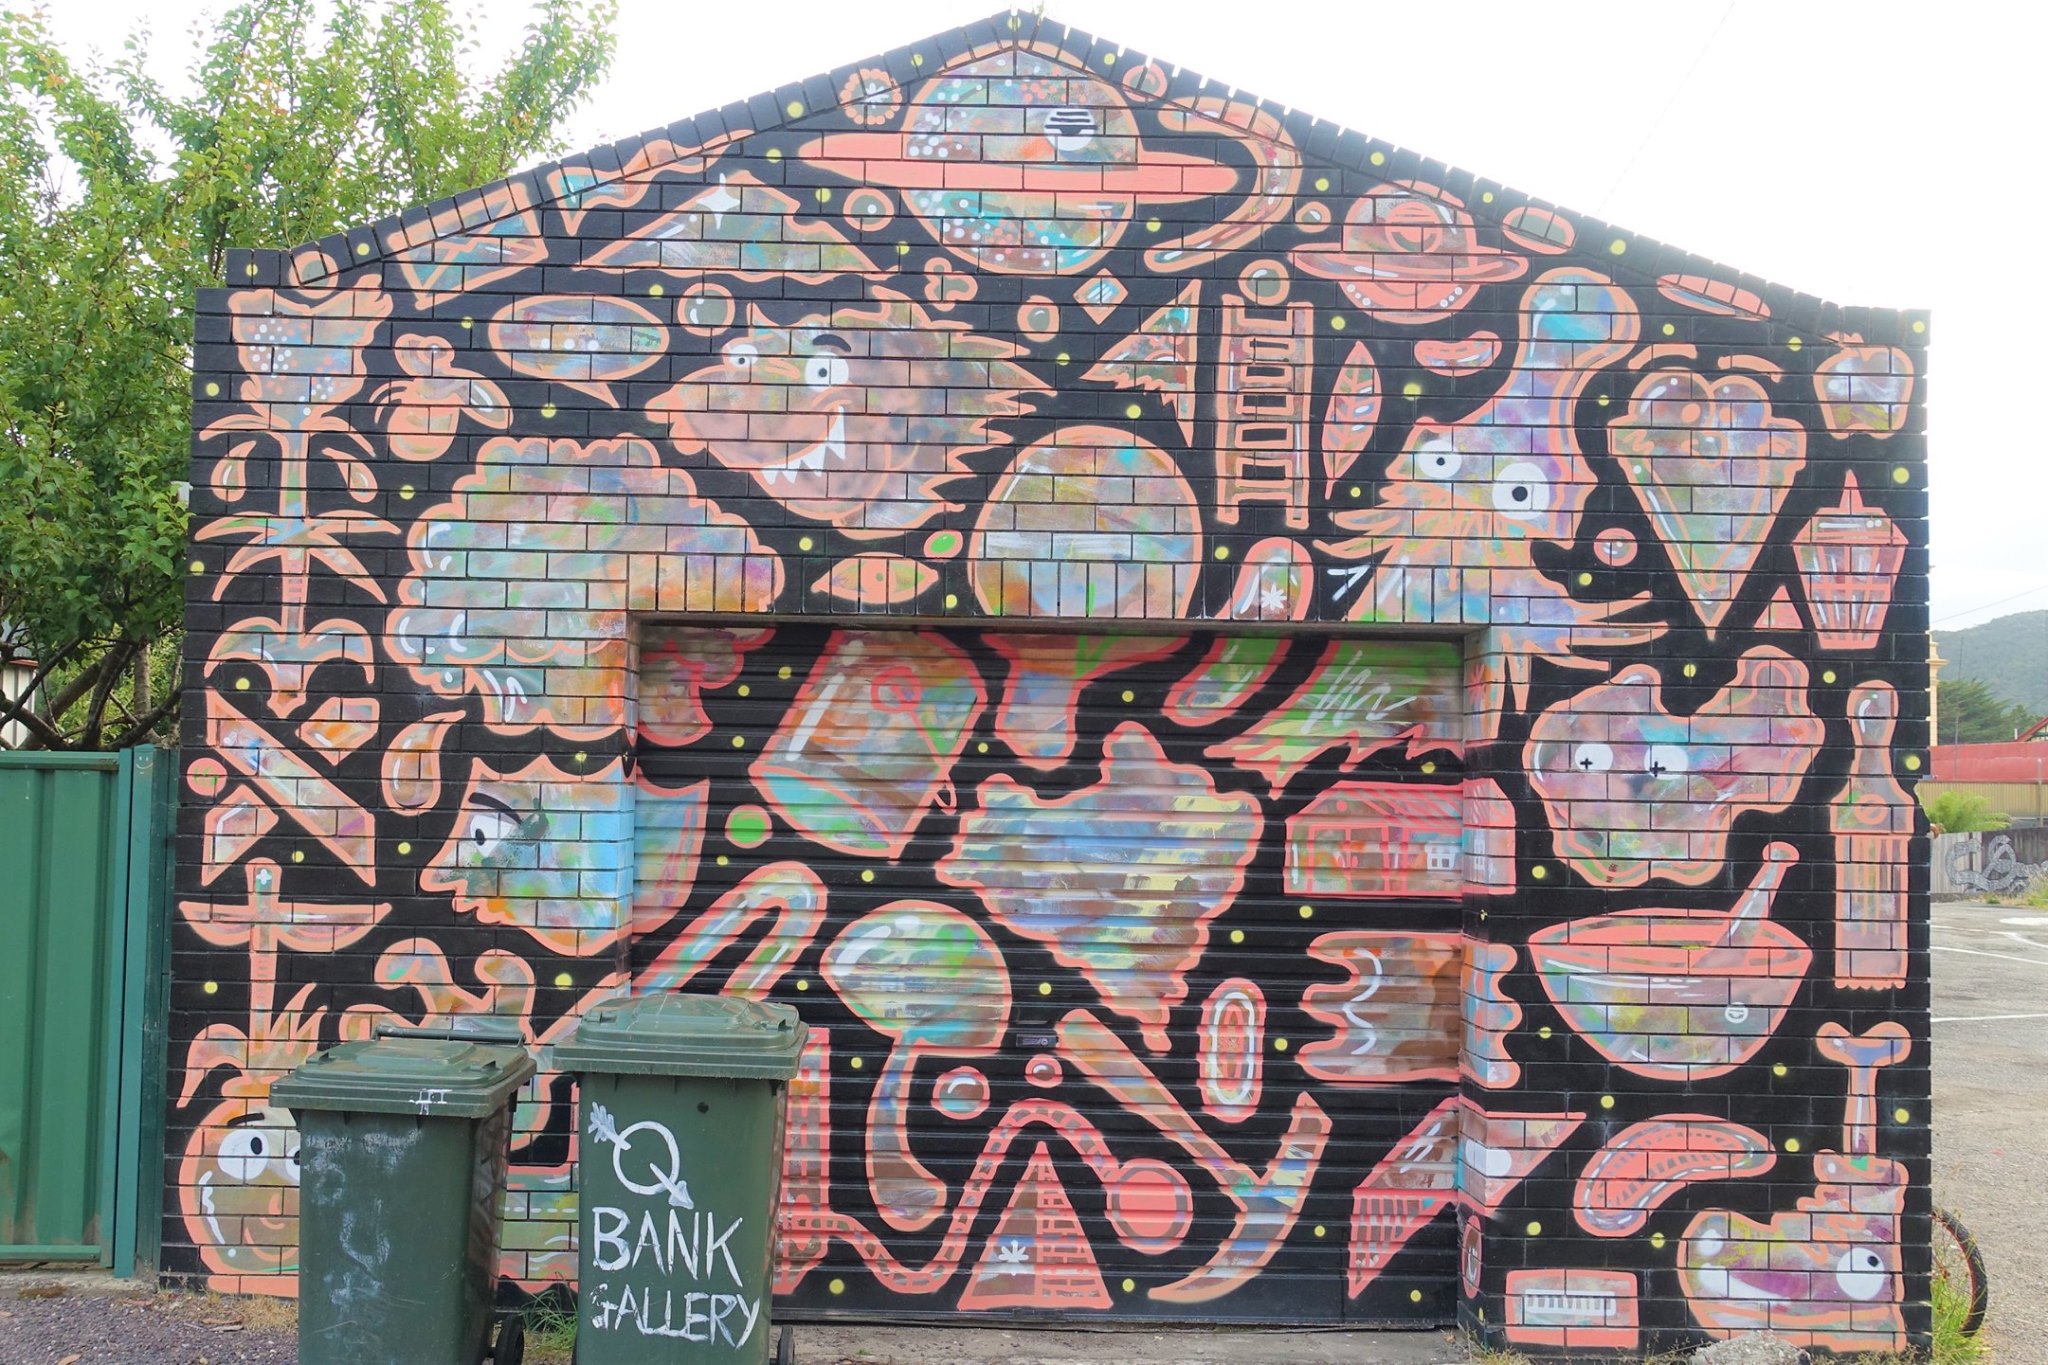
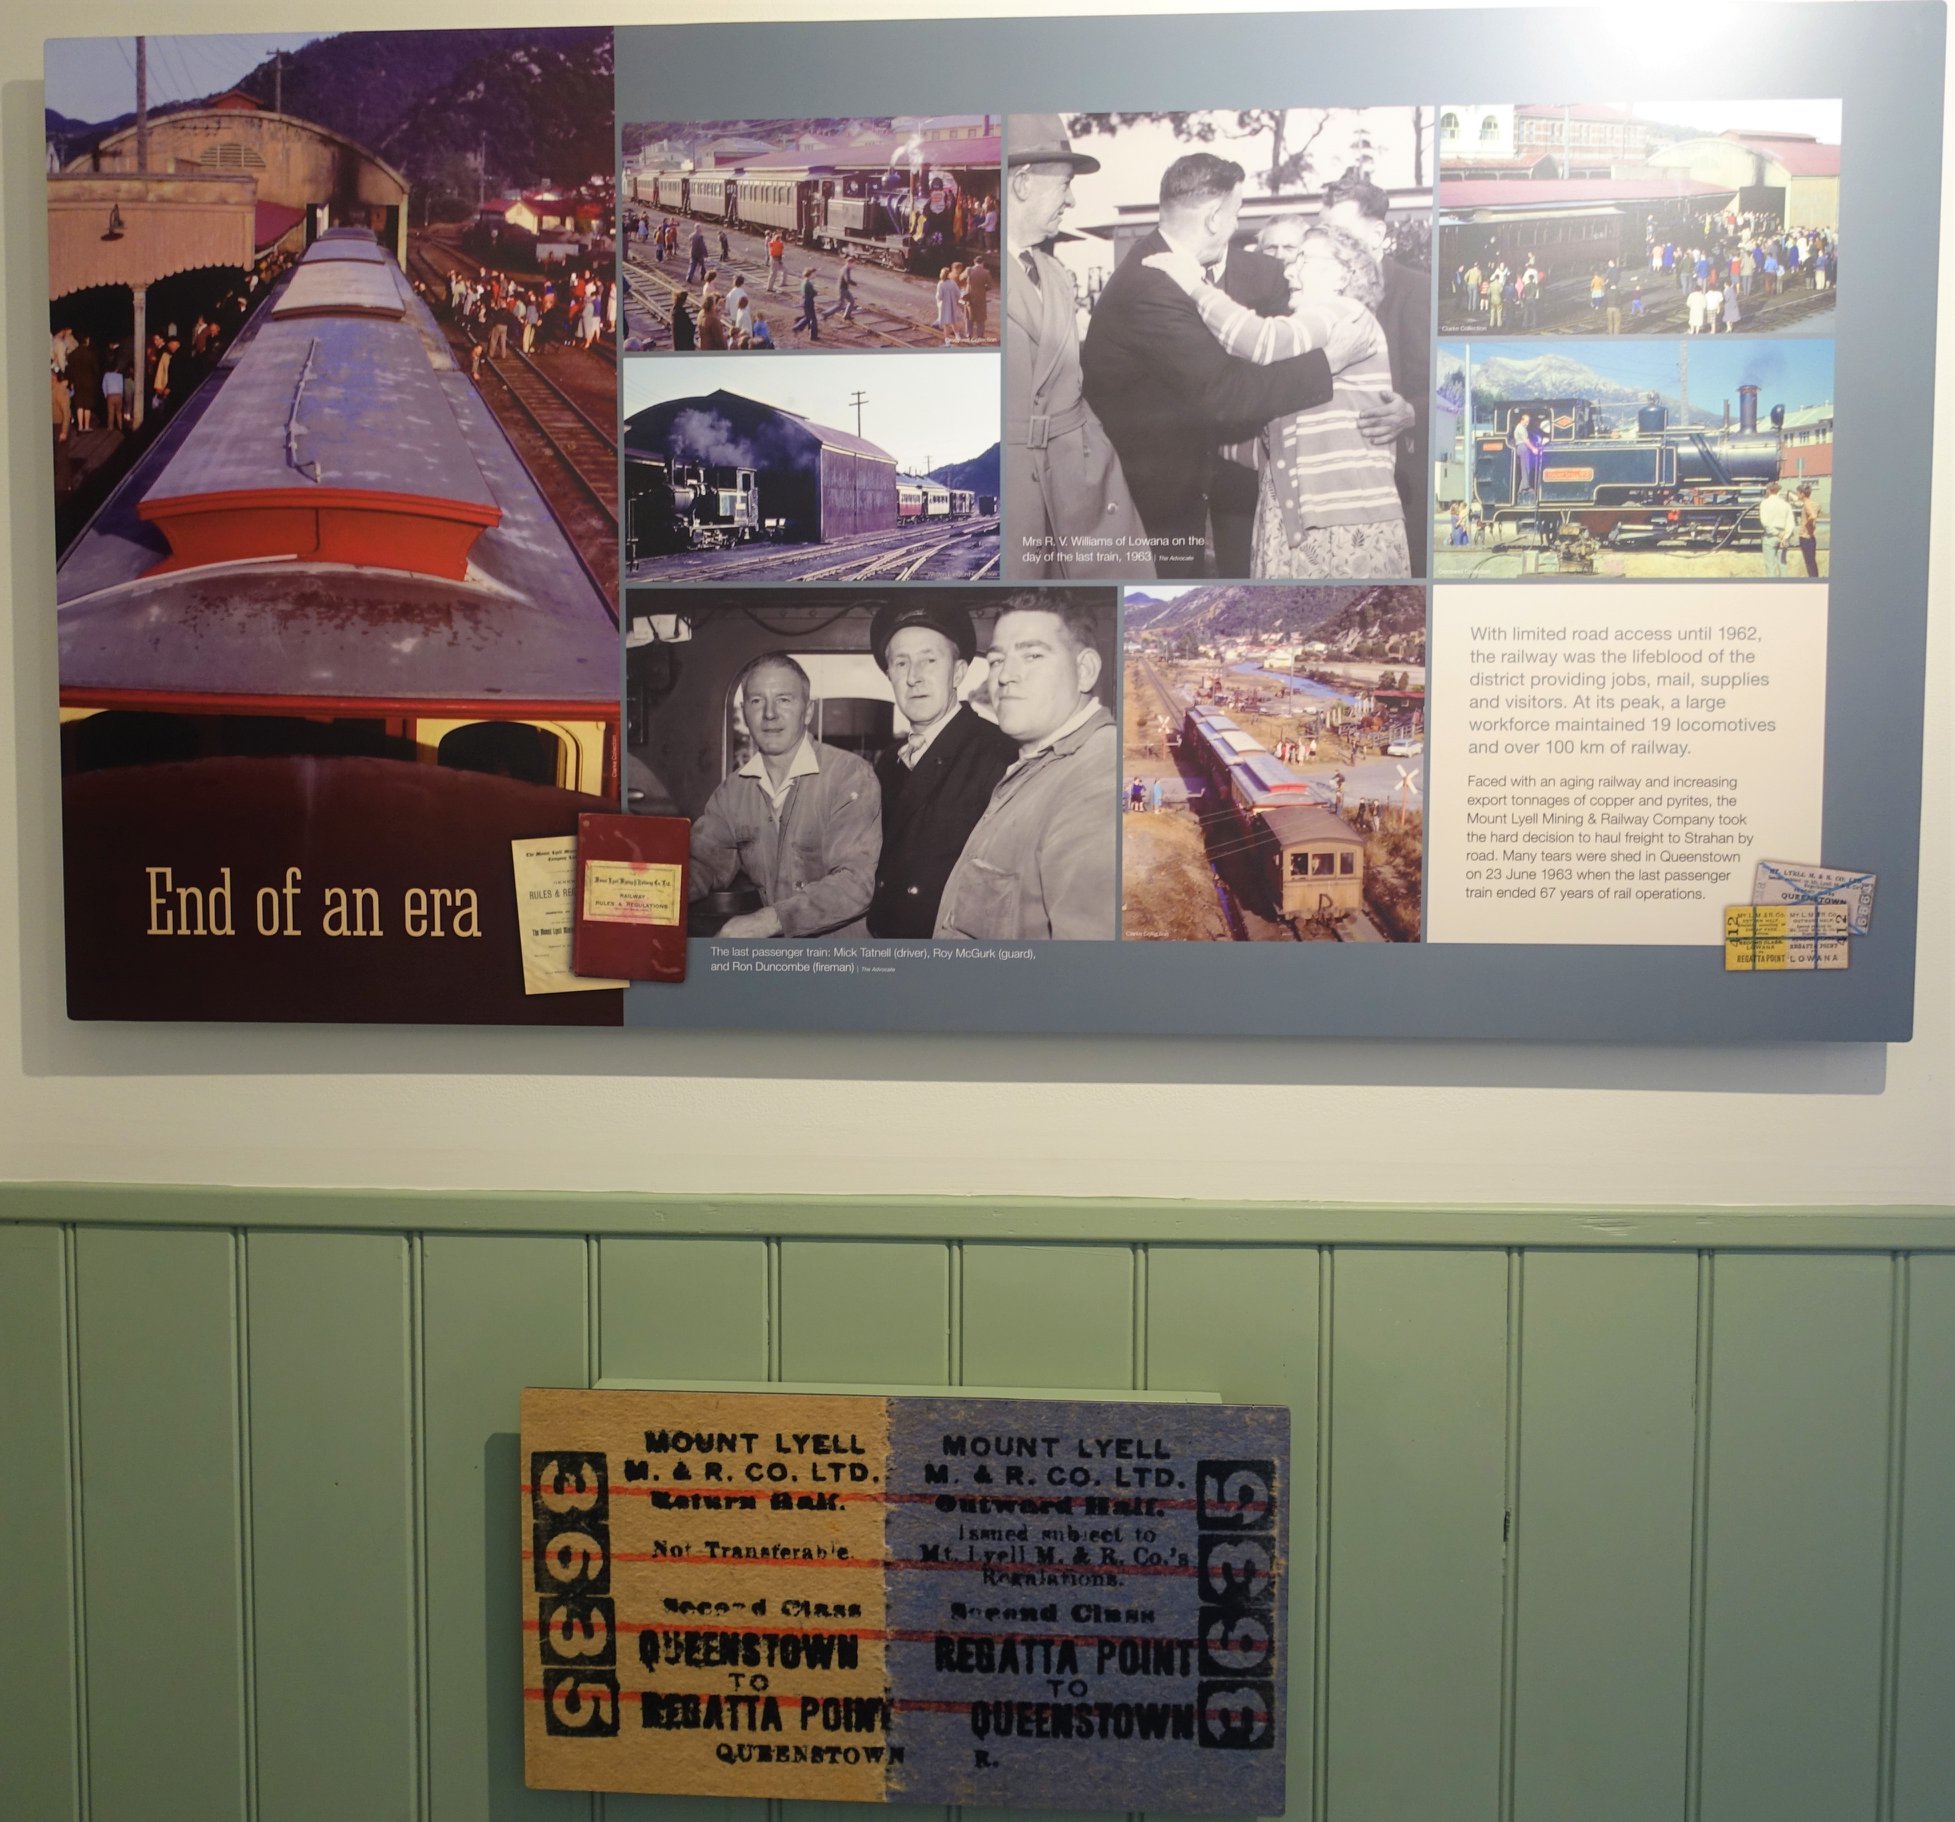
Next, we went back into the heart of Queenstown to have a look around before dinner. It was a bit of a ghost town, but it gave us a chance to get orientated. We found only a few restaurants, including a couple of pizzerias, an Asian restaurant and the Empire Hotel. Attractions we noted were the Eric Thomas Gallery Museum, The Paragon Theatre (old movies, dinner and tours), Q Bank Gallery, Armel Wall Memorial Plaza, Miner’s Siding Monument and Queenstown railway station (museum and steam train tours).
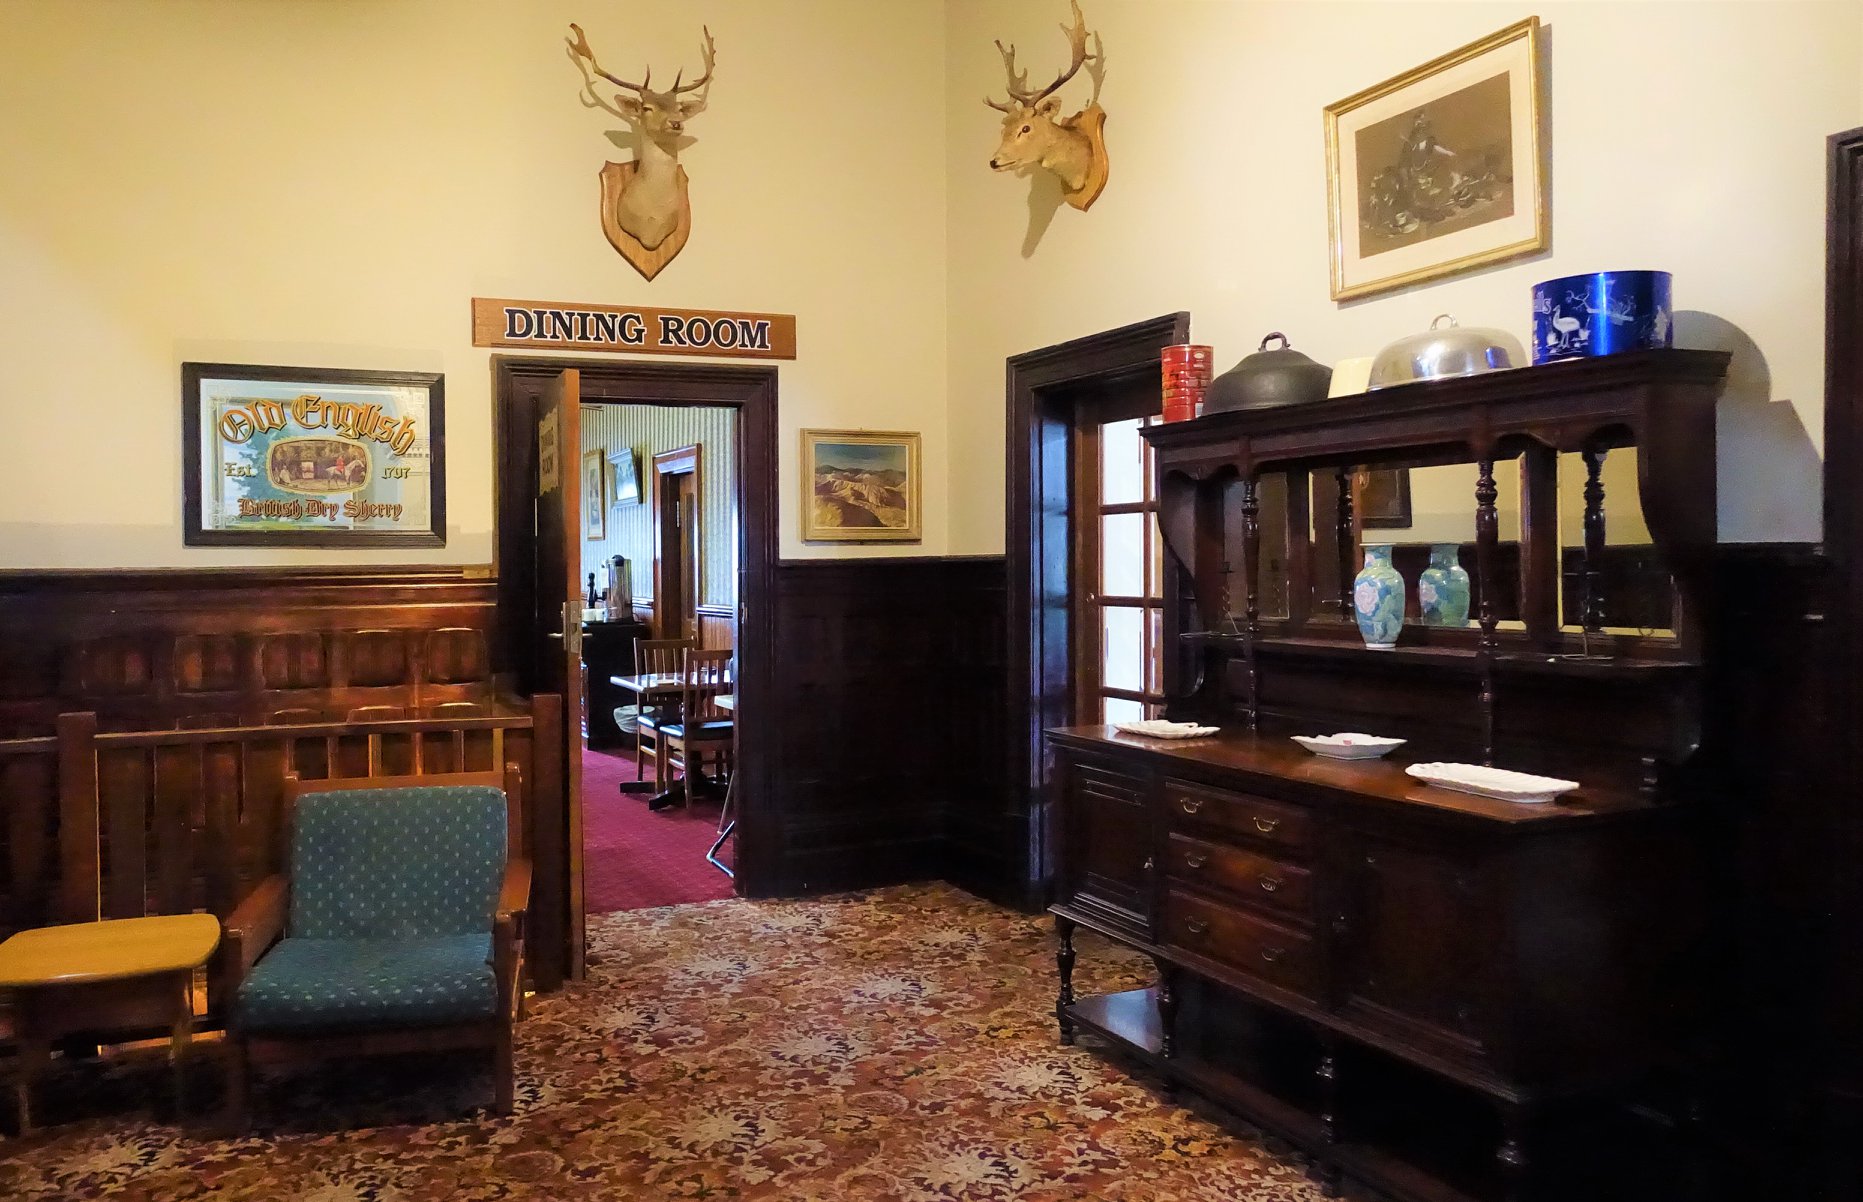
For dinner, we went to the historic and iconic Empire Hotel. It is known as the ‘Grand Old Lady of the West’ and was built in 1901, during the wealth of the mining boom. This hotel has accommodation, a restaurant and a bar. It also has a National Trust listed staircase, which leads to the guest accommodation. It was made of Tasmanian Blackwood, that was shipped to England to be carved and resent to be installed in the hotel. Unfortunately, you can’t go up the stairway unless you’re a guest, so I wasn’t able to see the paintings on the second floor. The restaurant has a small dining room, so I recommend arriving just before opening to get a table. It was quite busy the night we visited, which was surprising because I didn’t see anyone else walking around before. The menu features pub food including grilled steak, protein mains, pasta, salads and burgers. We found the prices were a little high for the quality and the service wasn’t great. You actually order and pay in the bar area and the servers bring out the food when it’s ready.
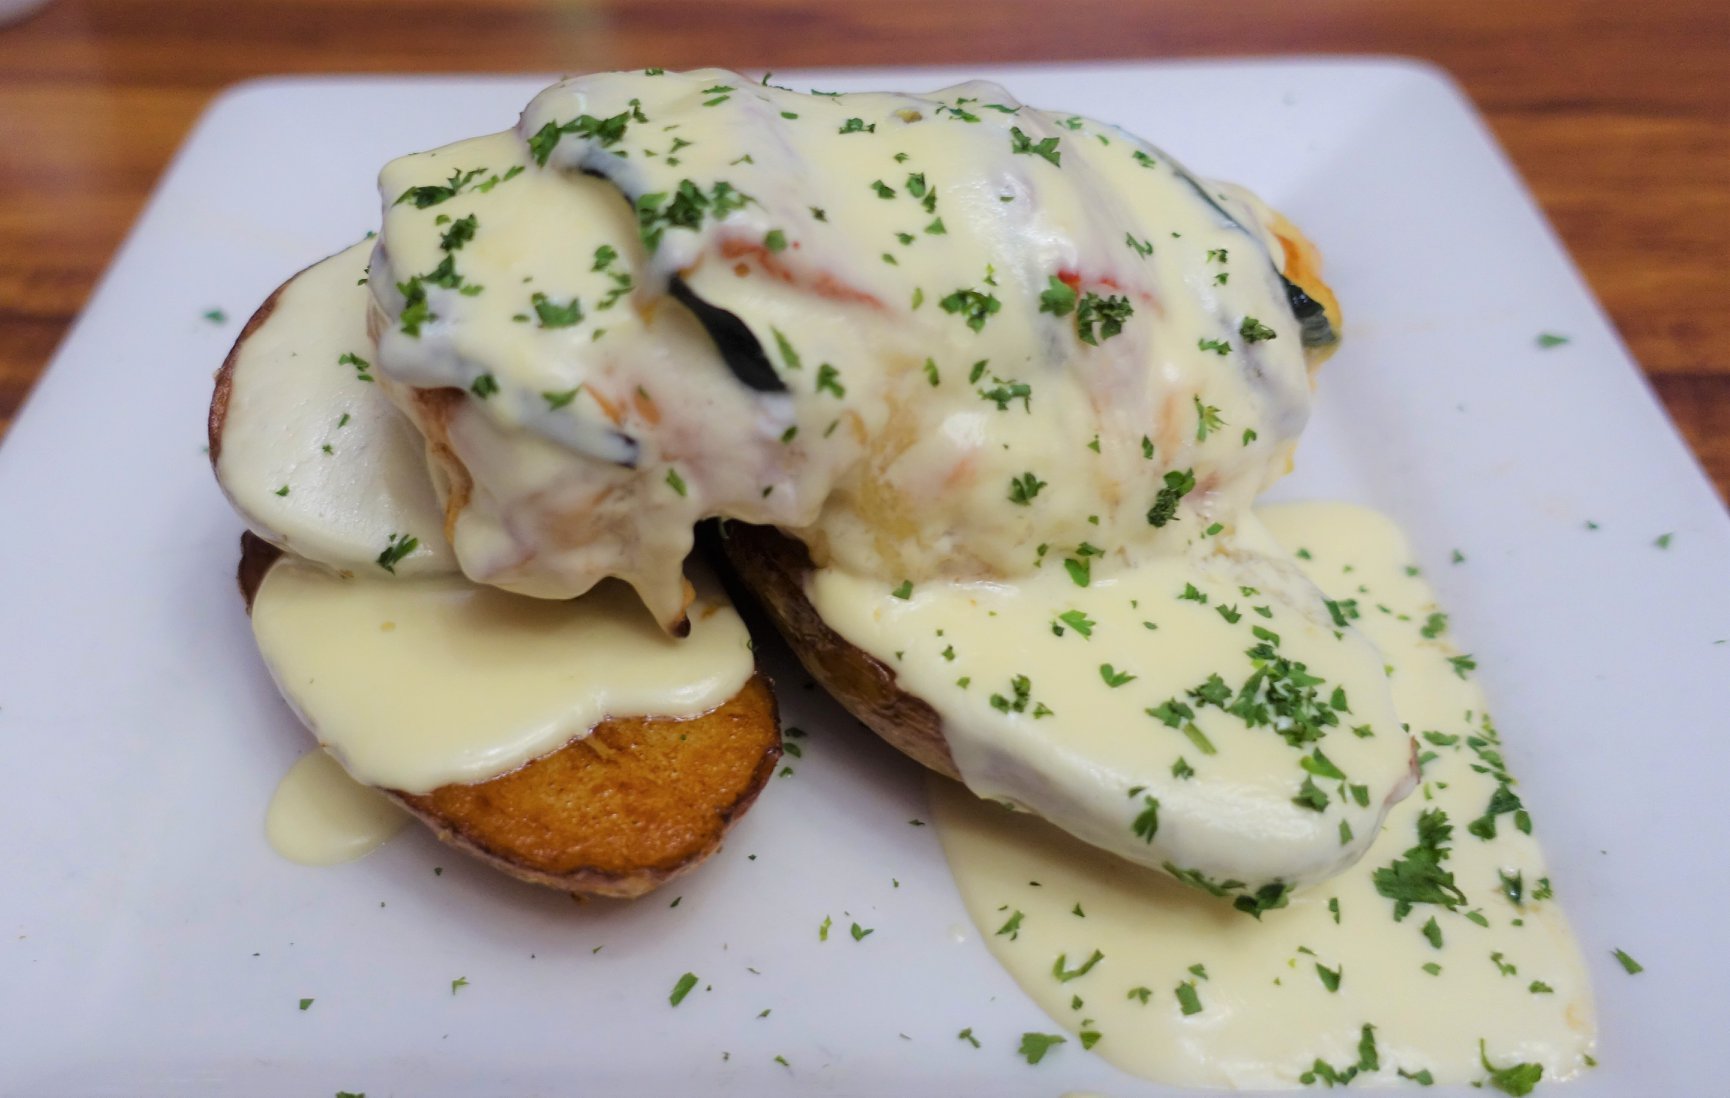
For dinner, I order the Hasselback chicken (stuffed with zucchini, eggplant and tomatoes) with white wine cream sauce and buttered potatoes. Marco had the Gourmet Bangers (Devonport beef sausages) and Mash, with peas and house onion gravy and O had the Kids ‘homemade’ chicken nuggets, chips and salad. My dish was ok. I really didn’t like the sauce at all, as it didn’t taste like the cream had been cooked. I had scrap it all off. The chicken was tender and the potatoes were nice and crispy. Marco’s dish wasn’t bad but average. It was also very odd that it came in a bowl rather than a plate. As for O’s, I really don’t think those nuggets were homemade and the chips were also average. Afterwards, we thought we would try the Berry Pavlova and Sticky date pudding for dessert. They were nice and probably the highlight of the meal.
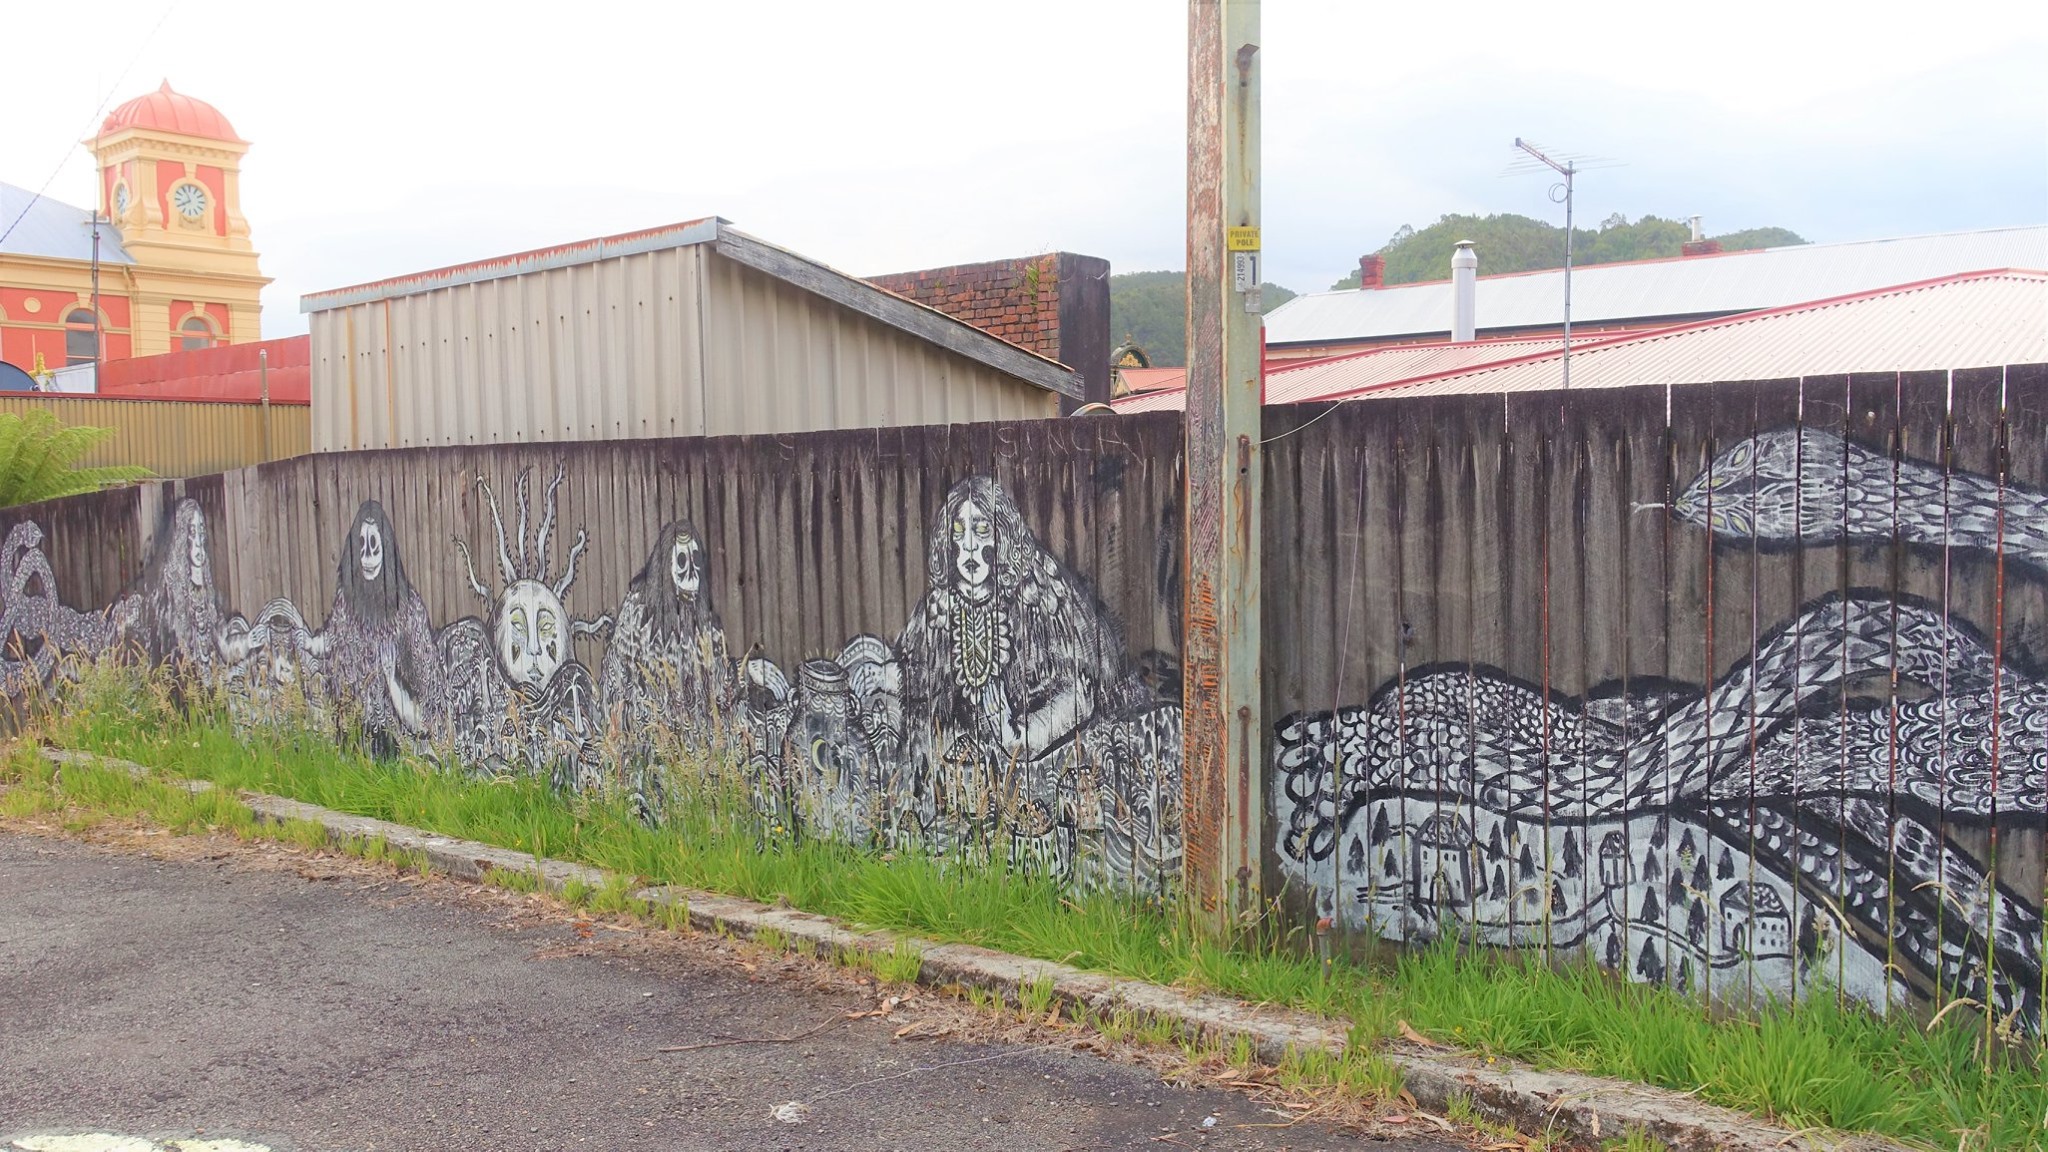
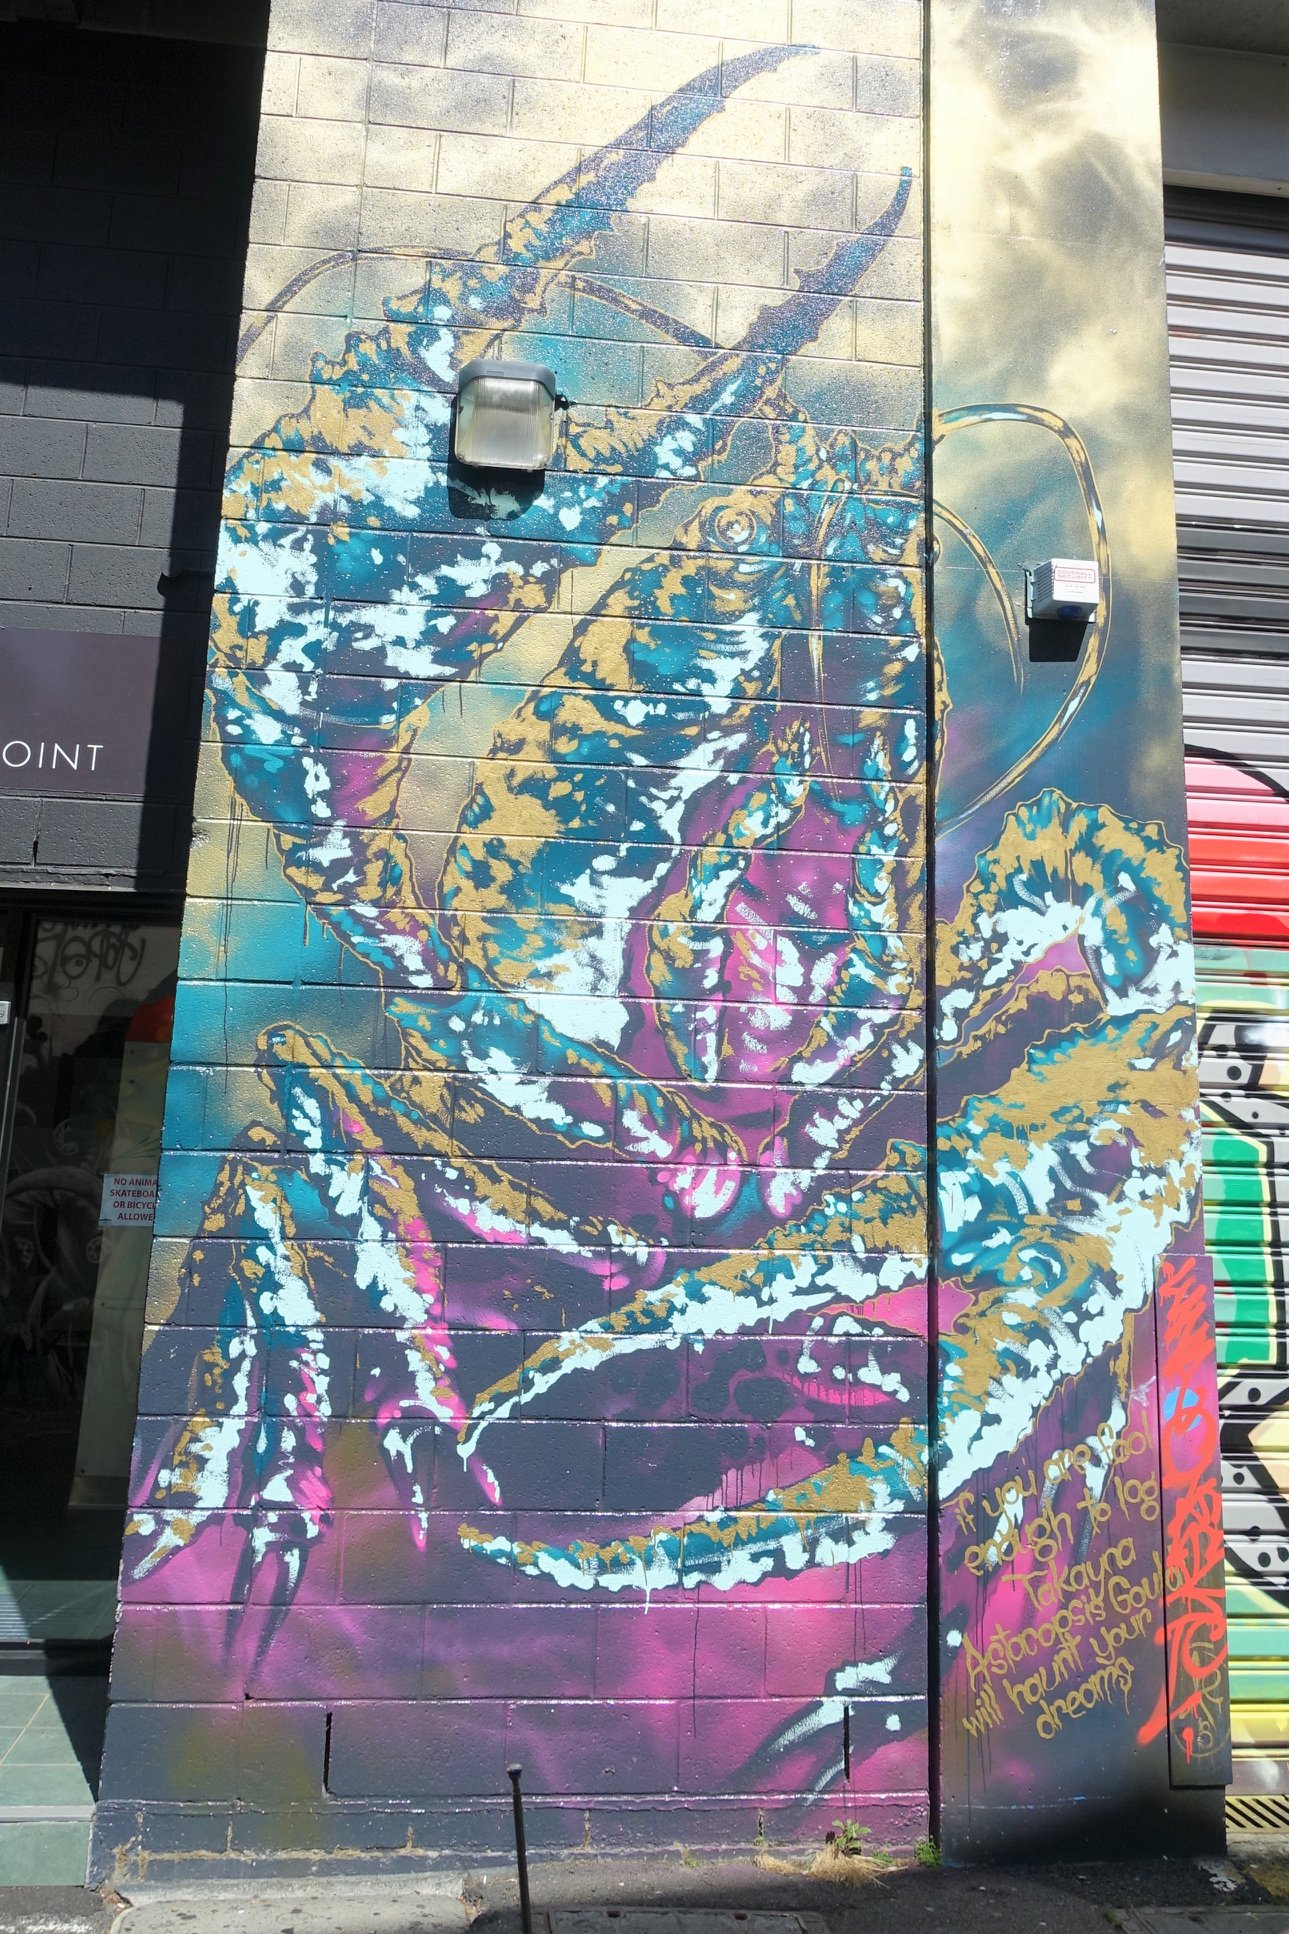
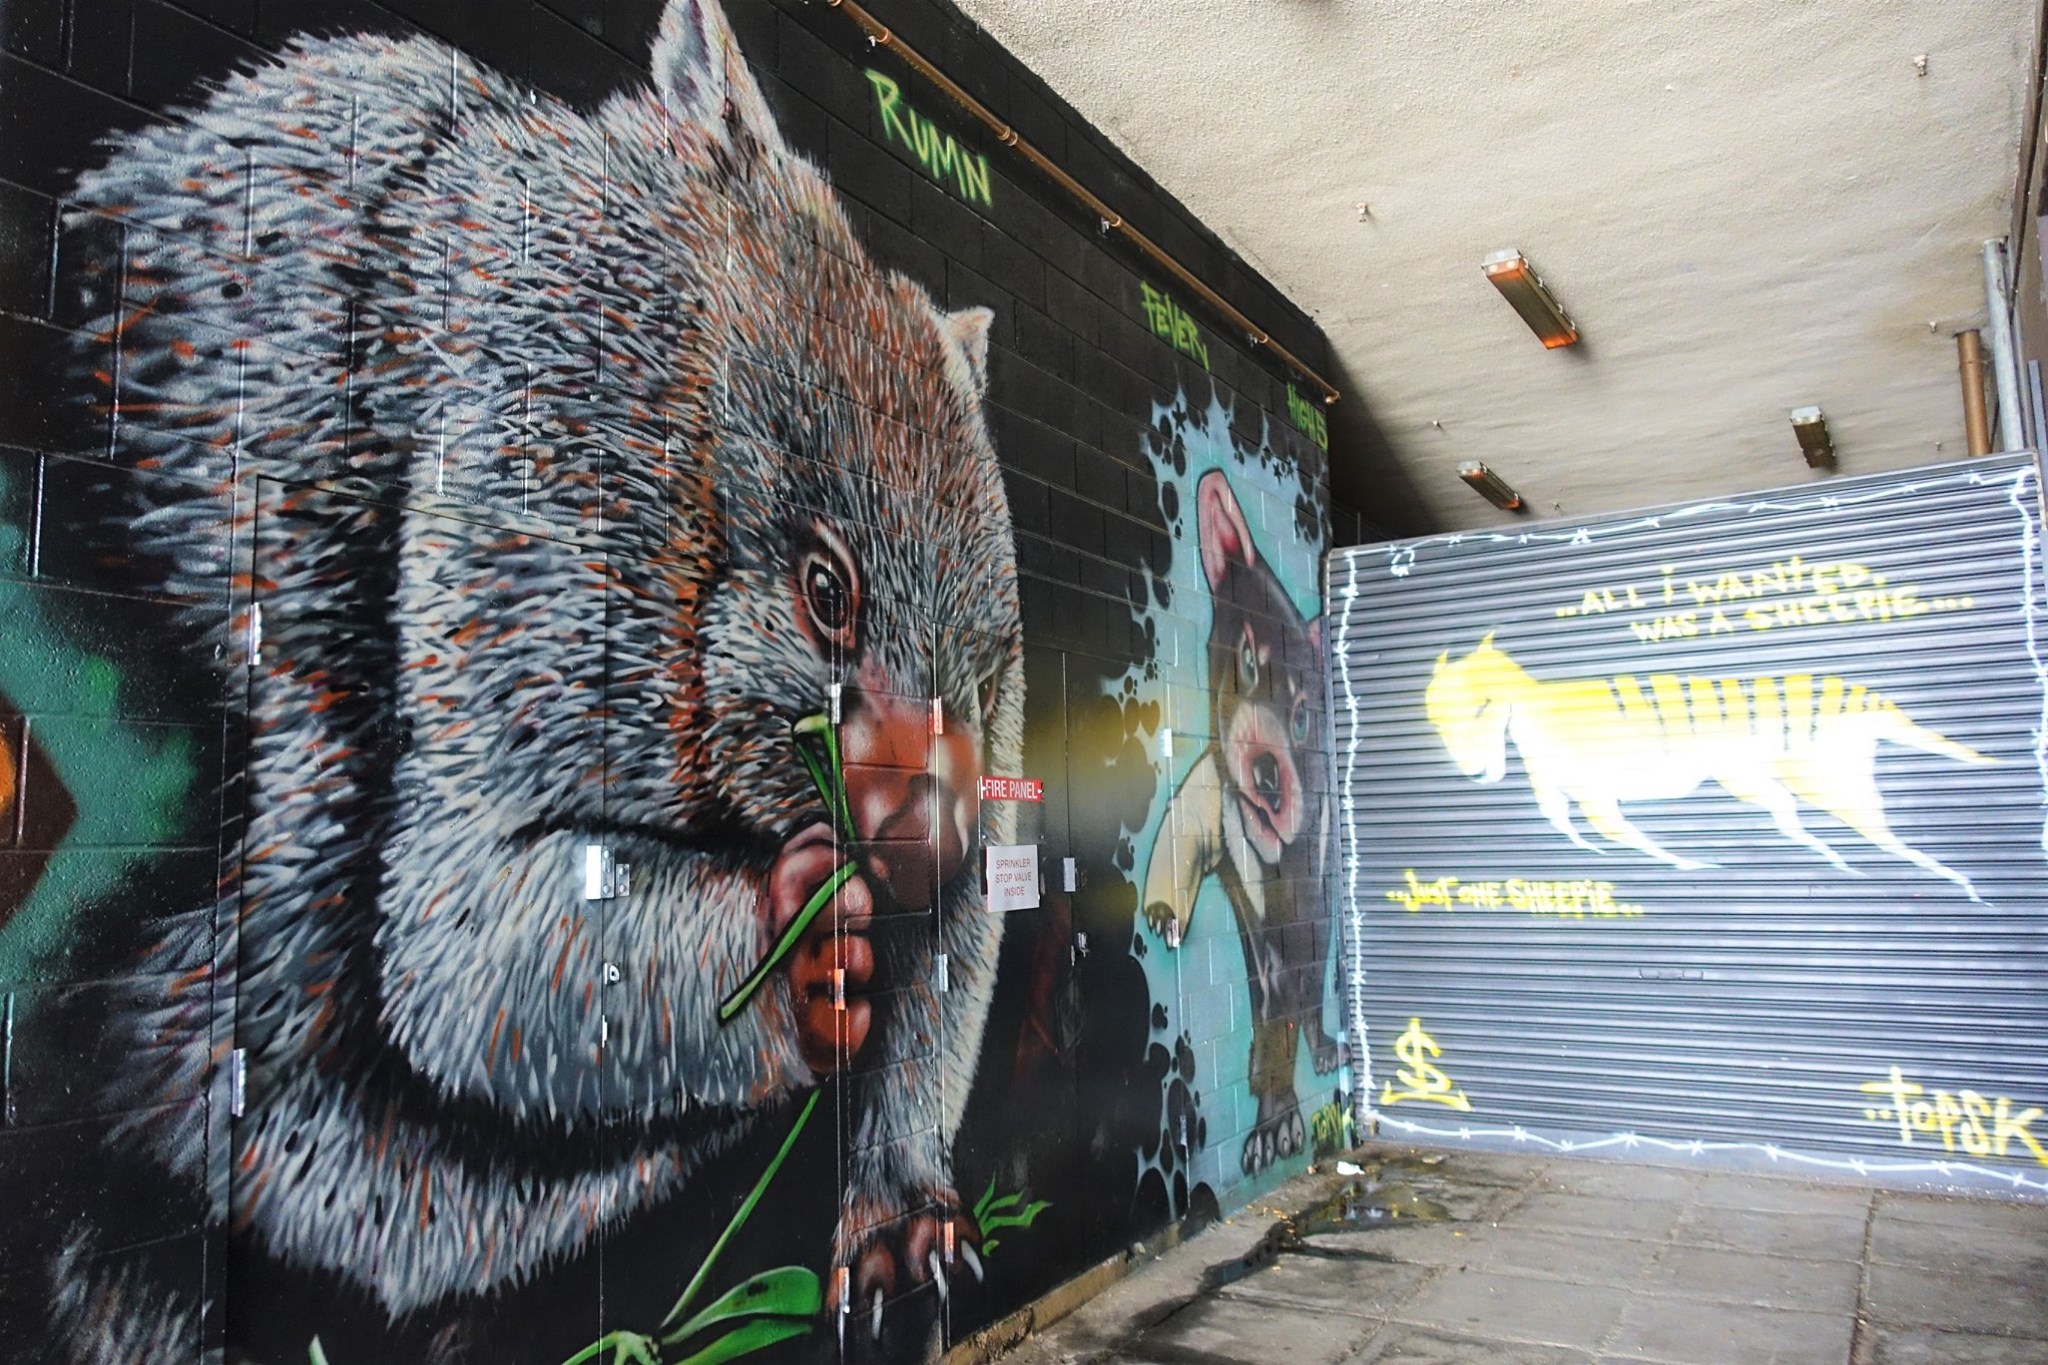
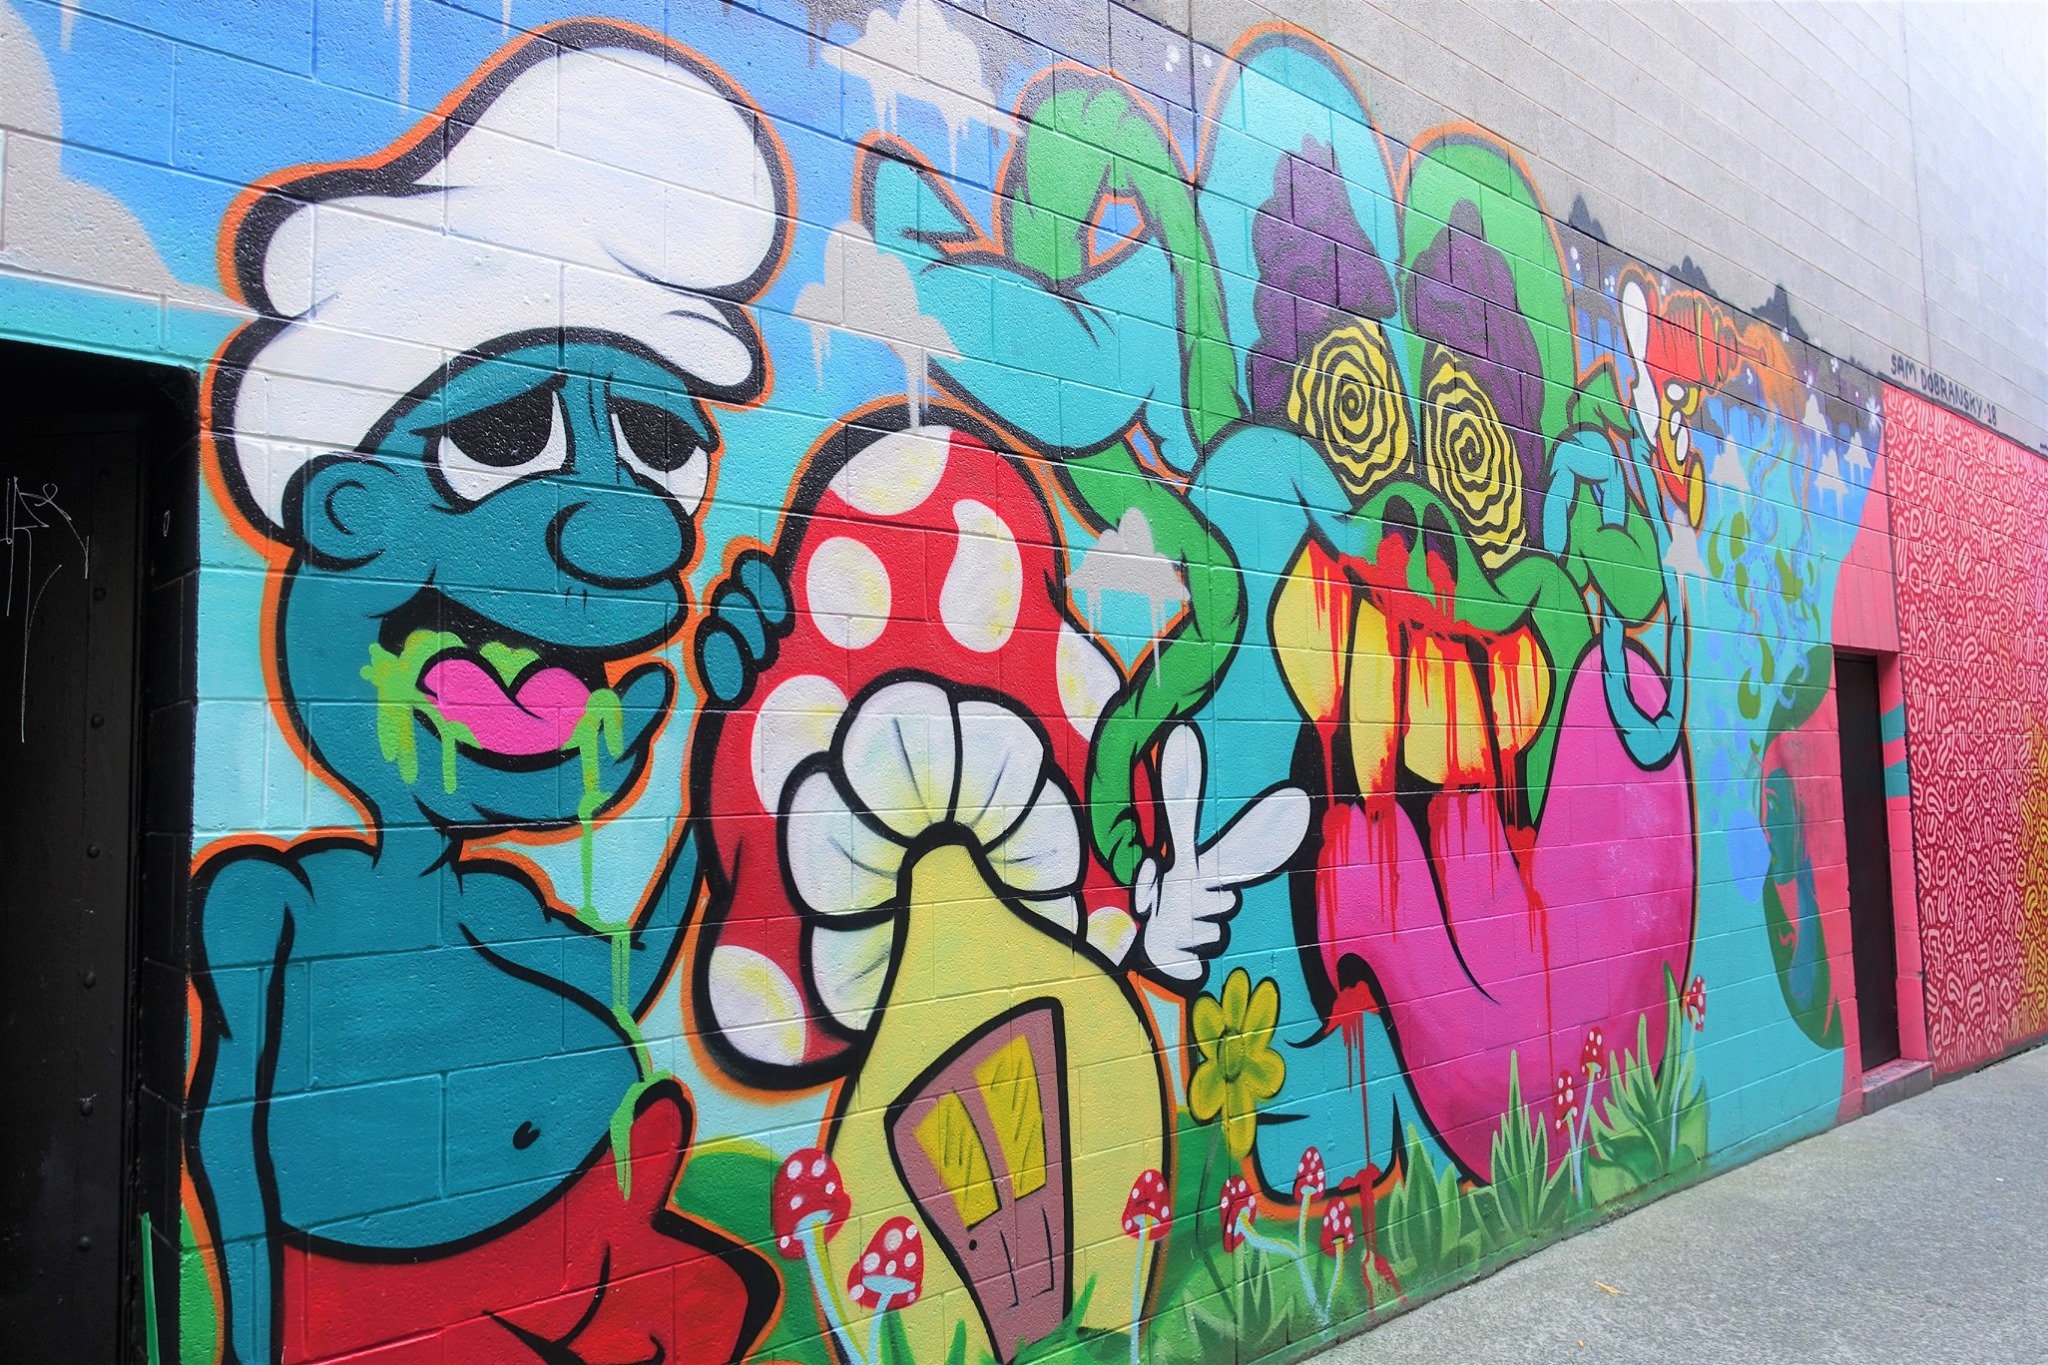
After dinner, we explore the street art around the town. This was probably the last place I thought we would find so much art. Many of the works were by artists we had seen in Hobart laneways and a few new ones. You can actually do a self-guided Street Art Tour. I didn’t know about this map at the time or about the Q Bank Gallery, which has an artist-in-residency program. I did find the QBar, but it wasn’t open when I came across it. That is within the 1-story building you can see below and looks to be a gallery. The Q Bank Gallery is located behind it.
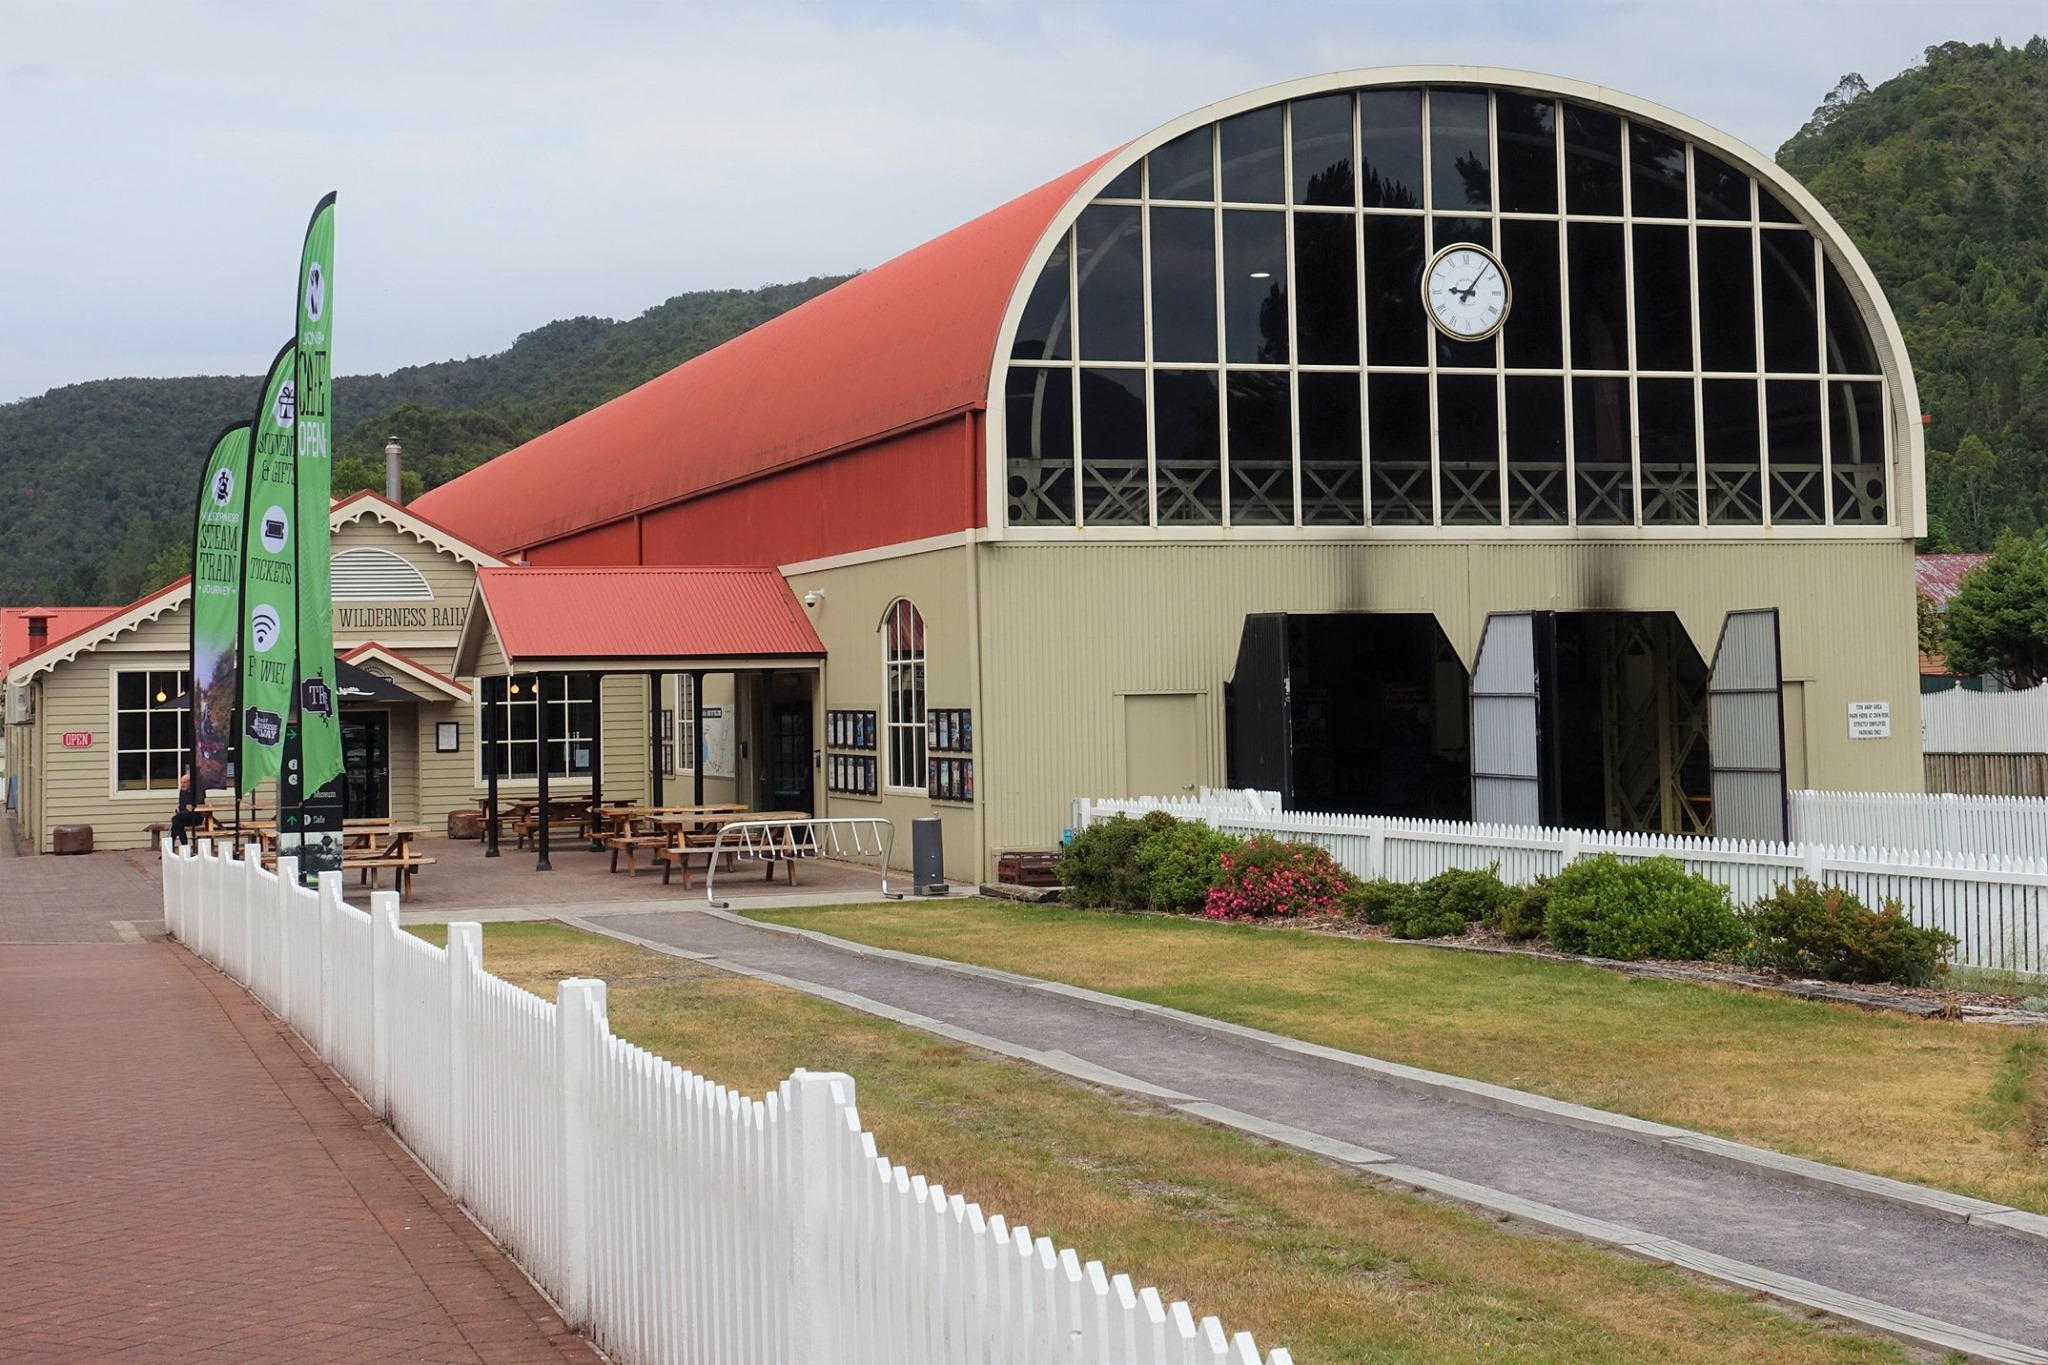
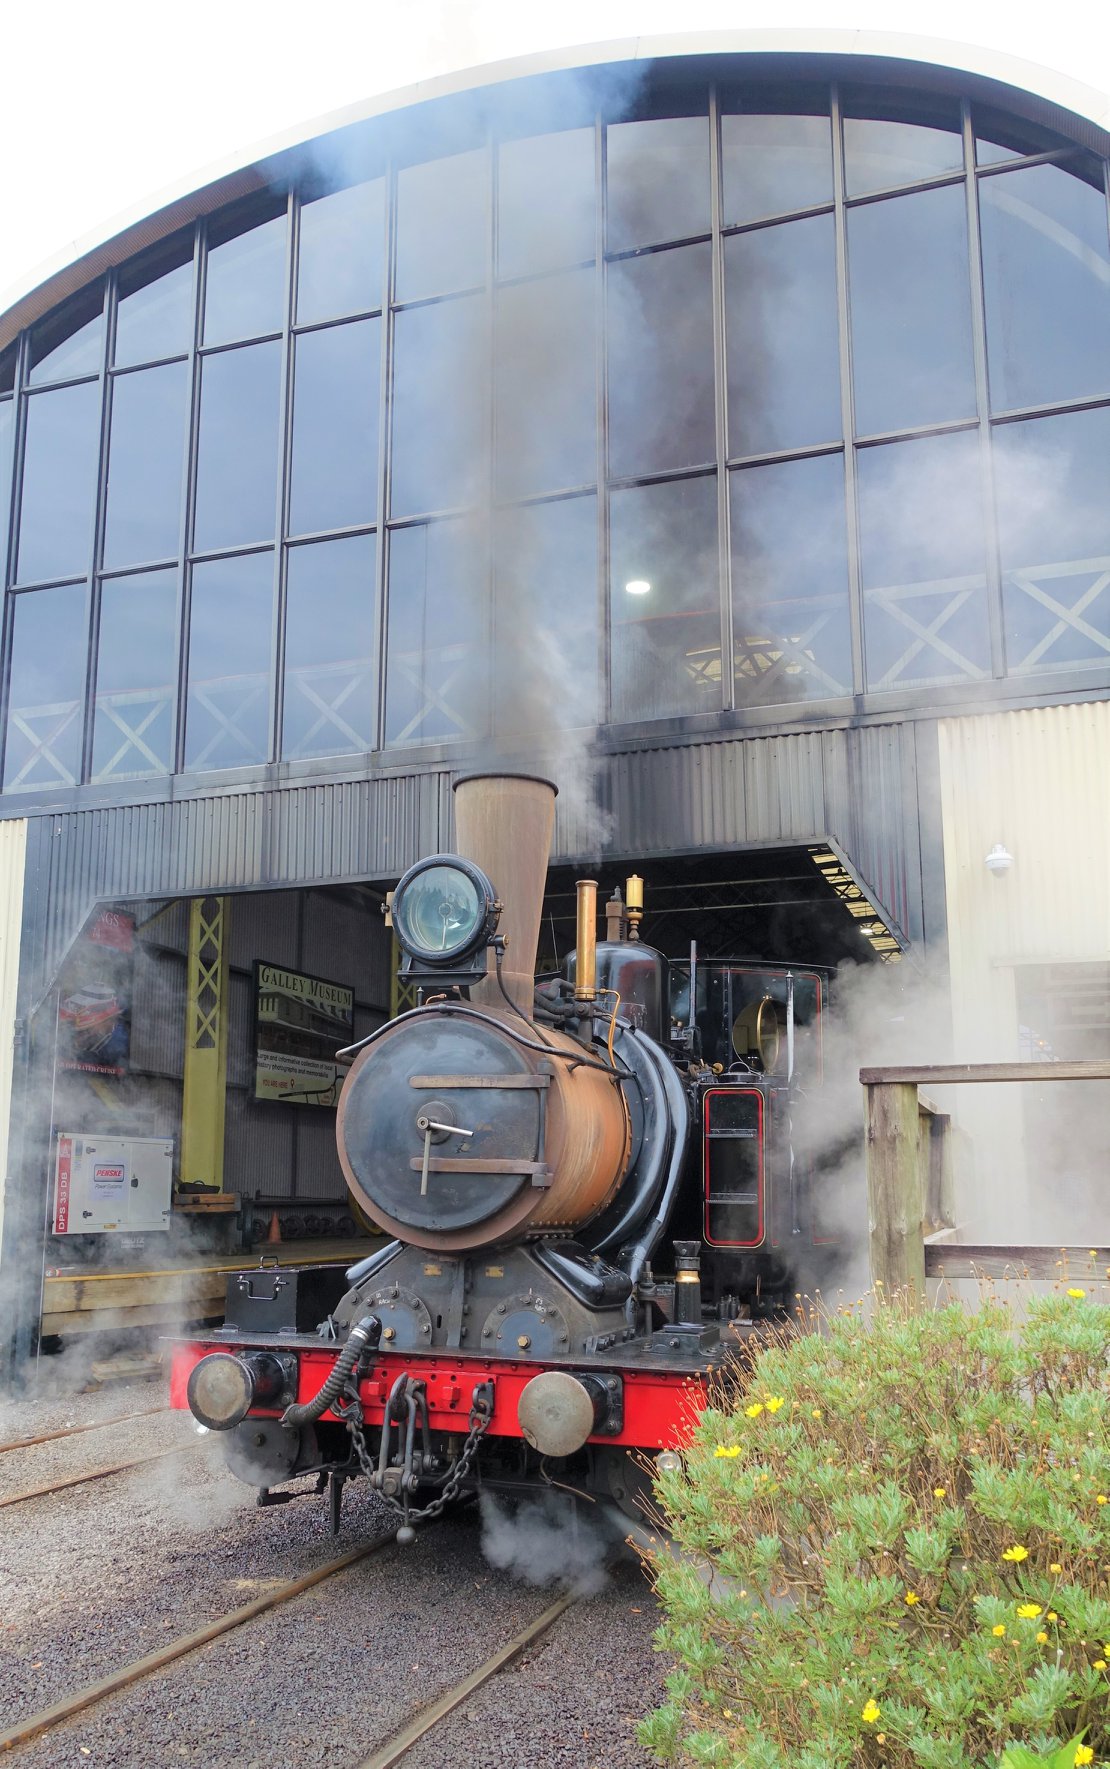
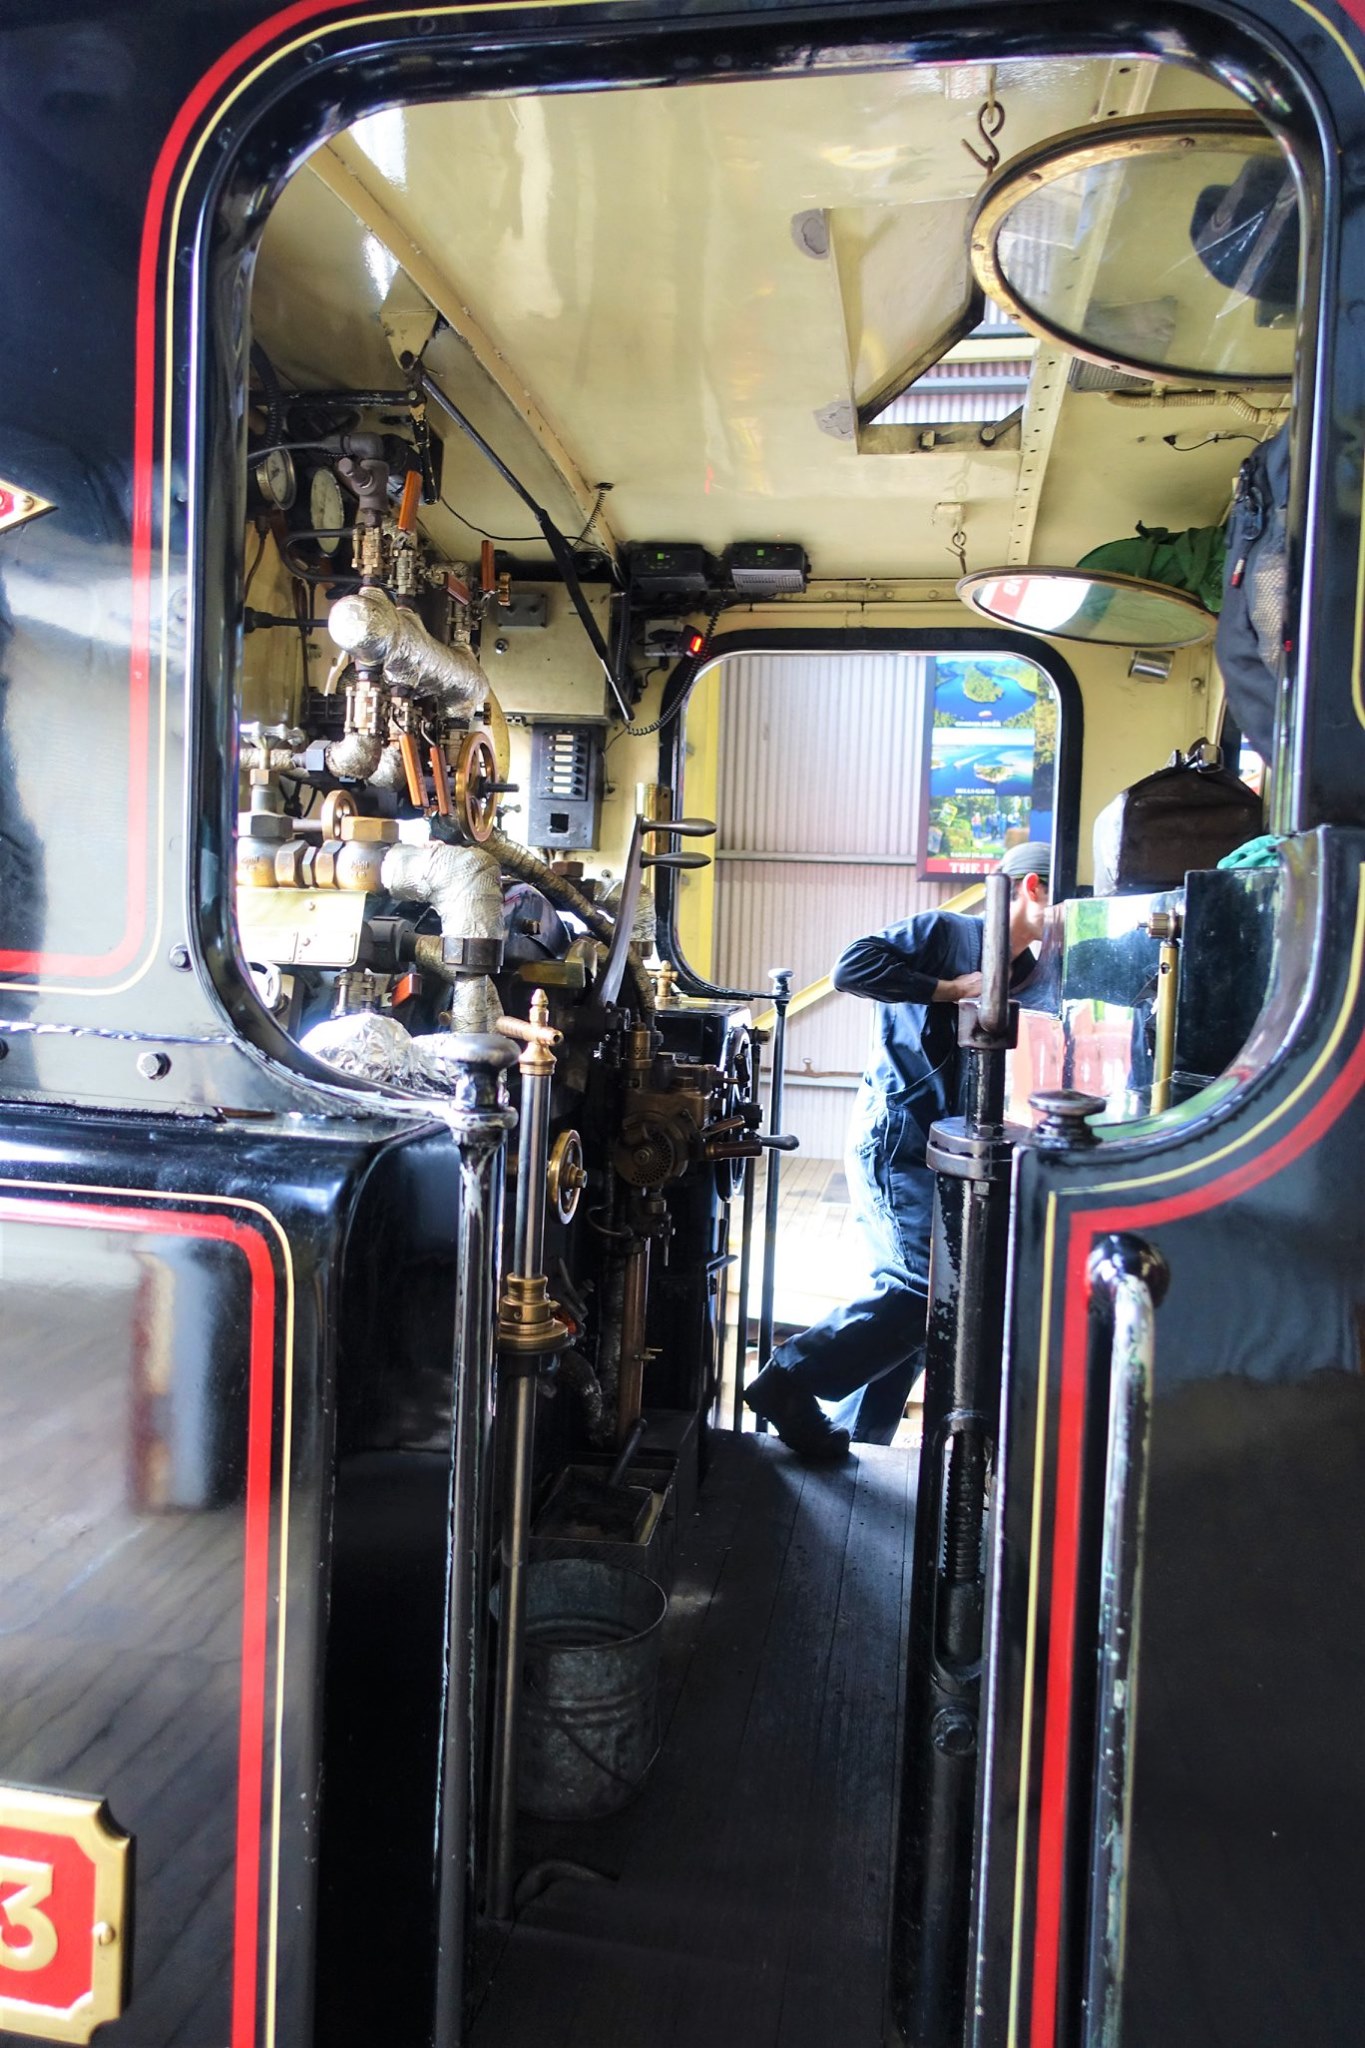
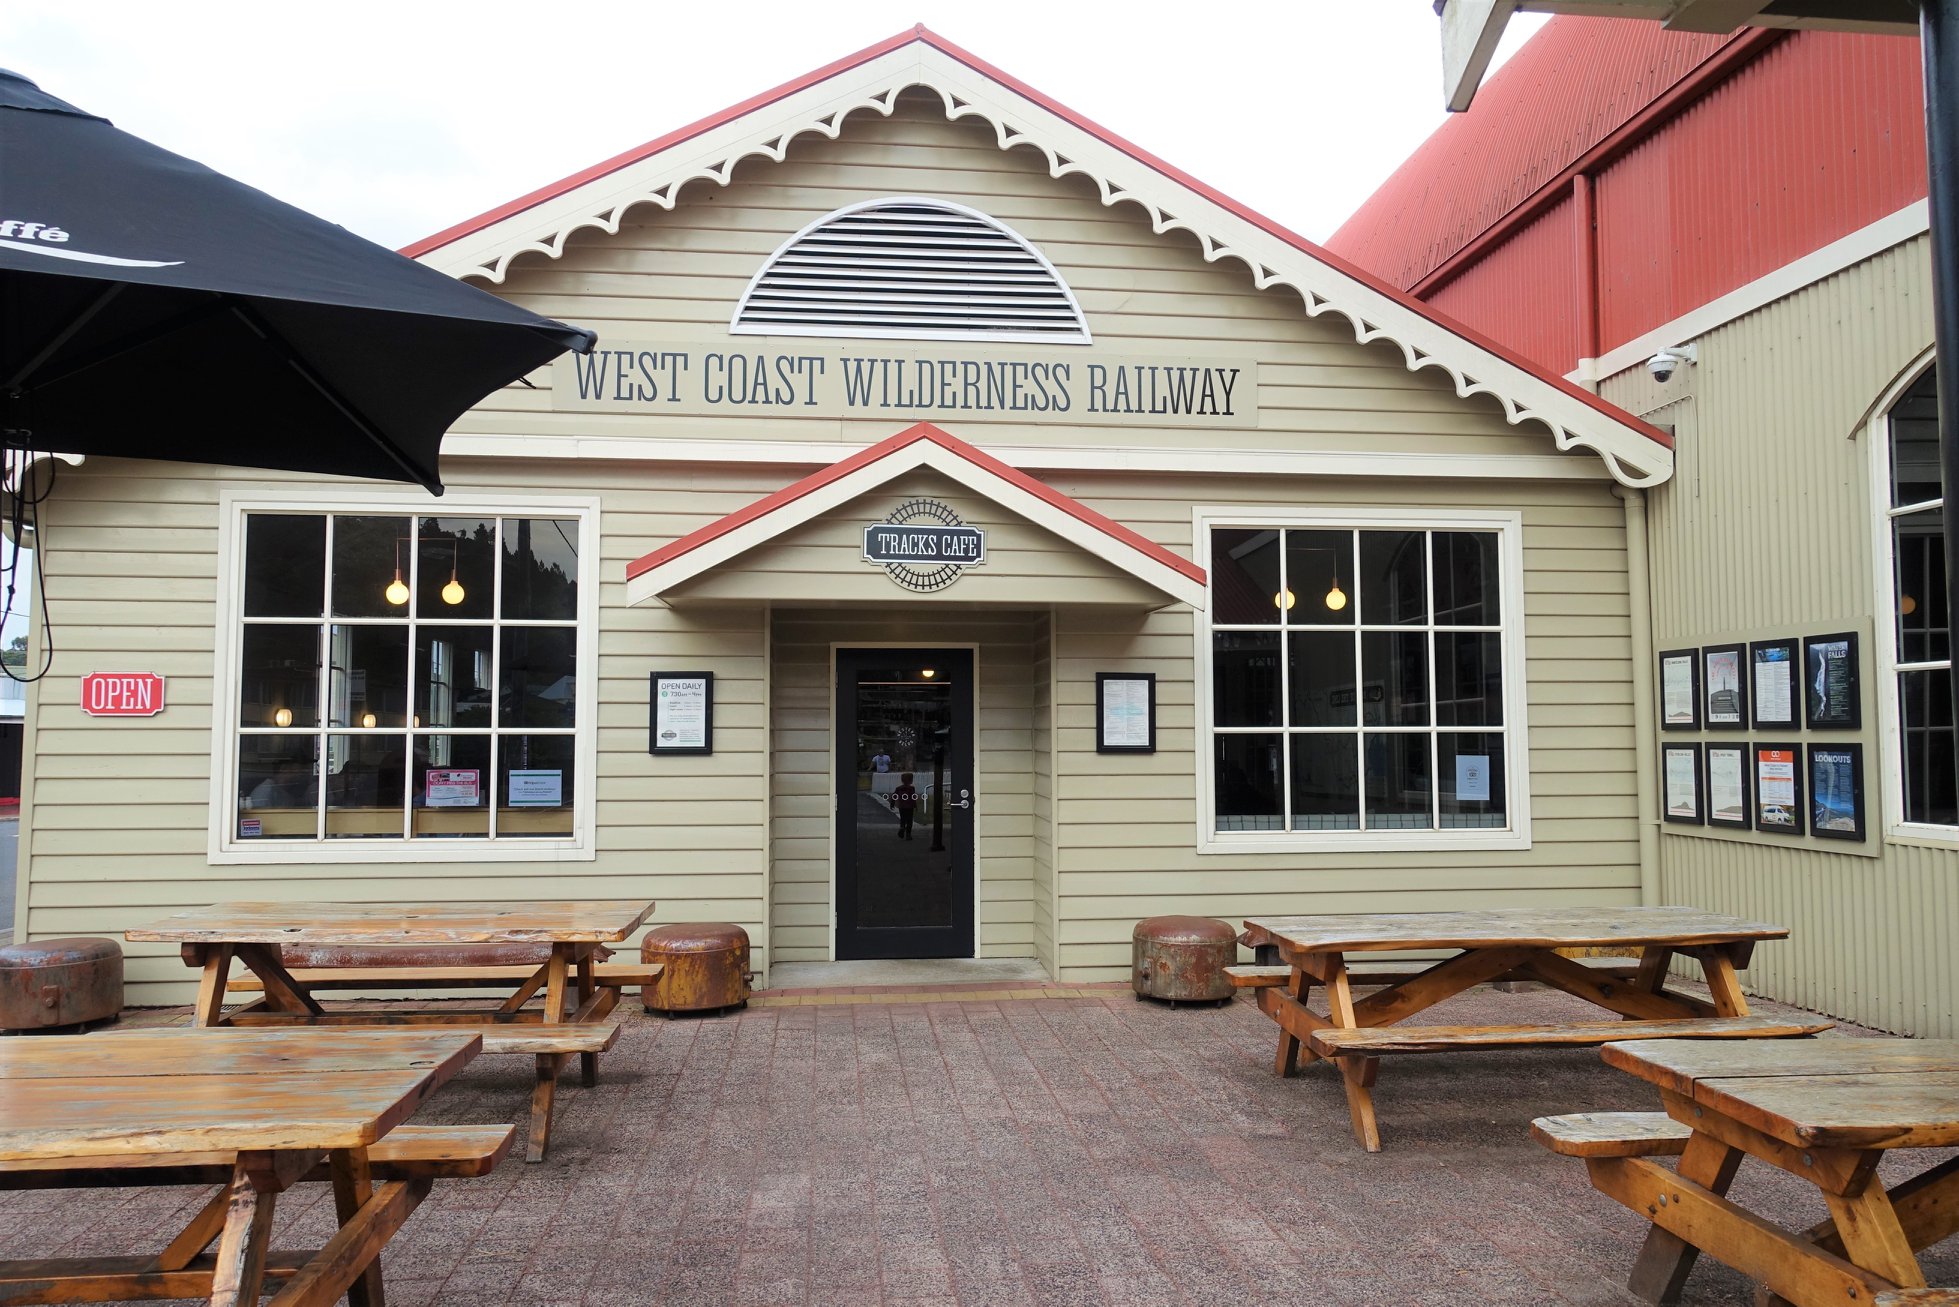
The next morning we headed to the Queenstown railway station to see the steam train leave the station and to have breakfast. This track is part of the West Coast Wildness Railway and travels between Strahan, Cradle Mountain, Devonport, Hobart and Launceston, with various stops in between. We didn’t have the time to take on of these trips and I did find the ticket prices were a bit expensive for all of us to travel. However, it seems to be quite a popular attraction for many tourists.
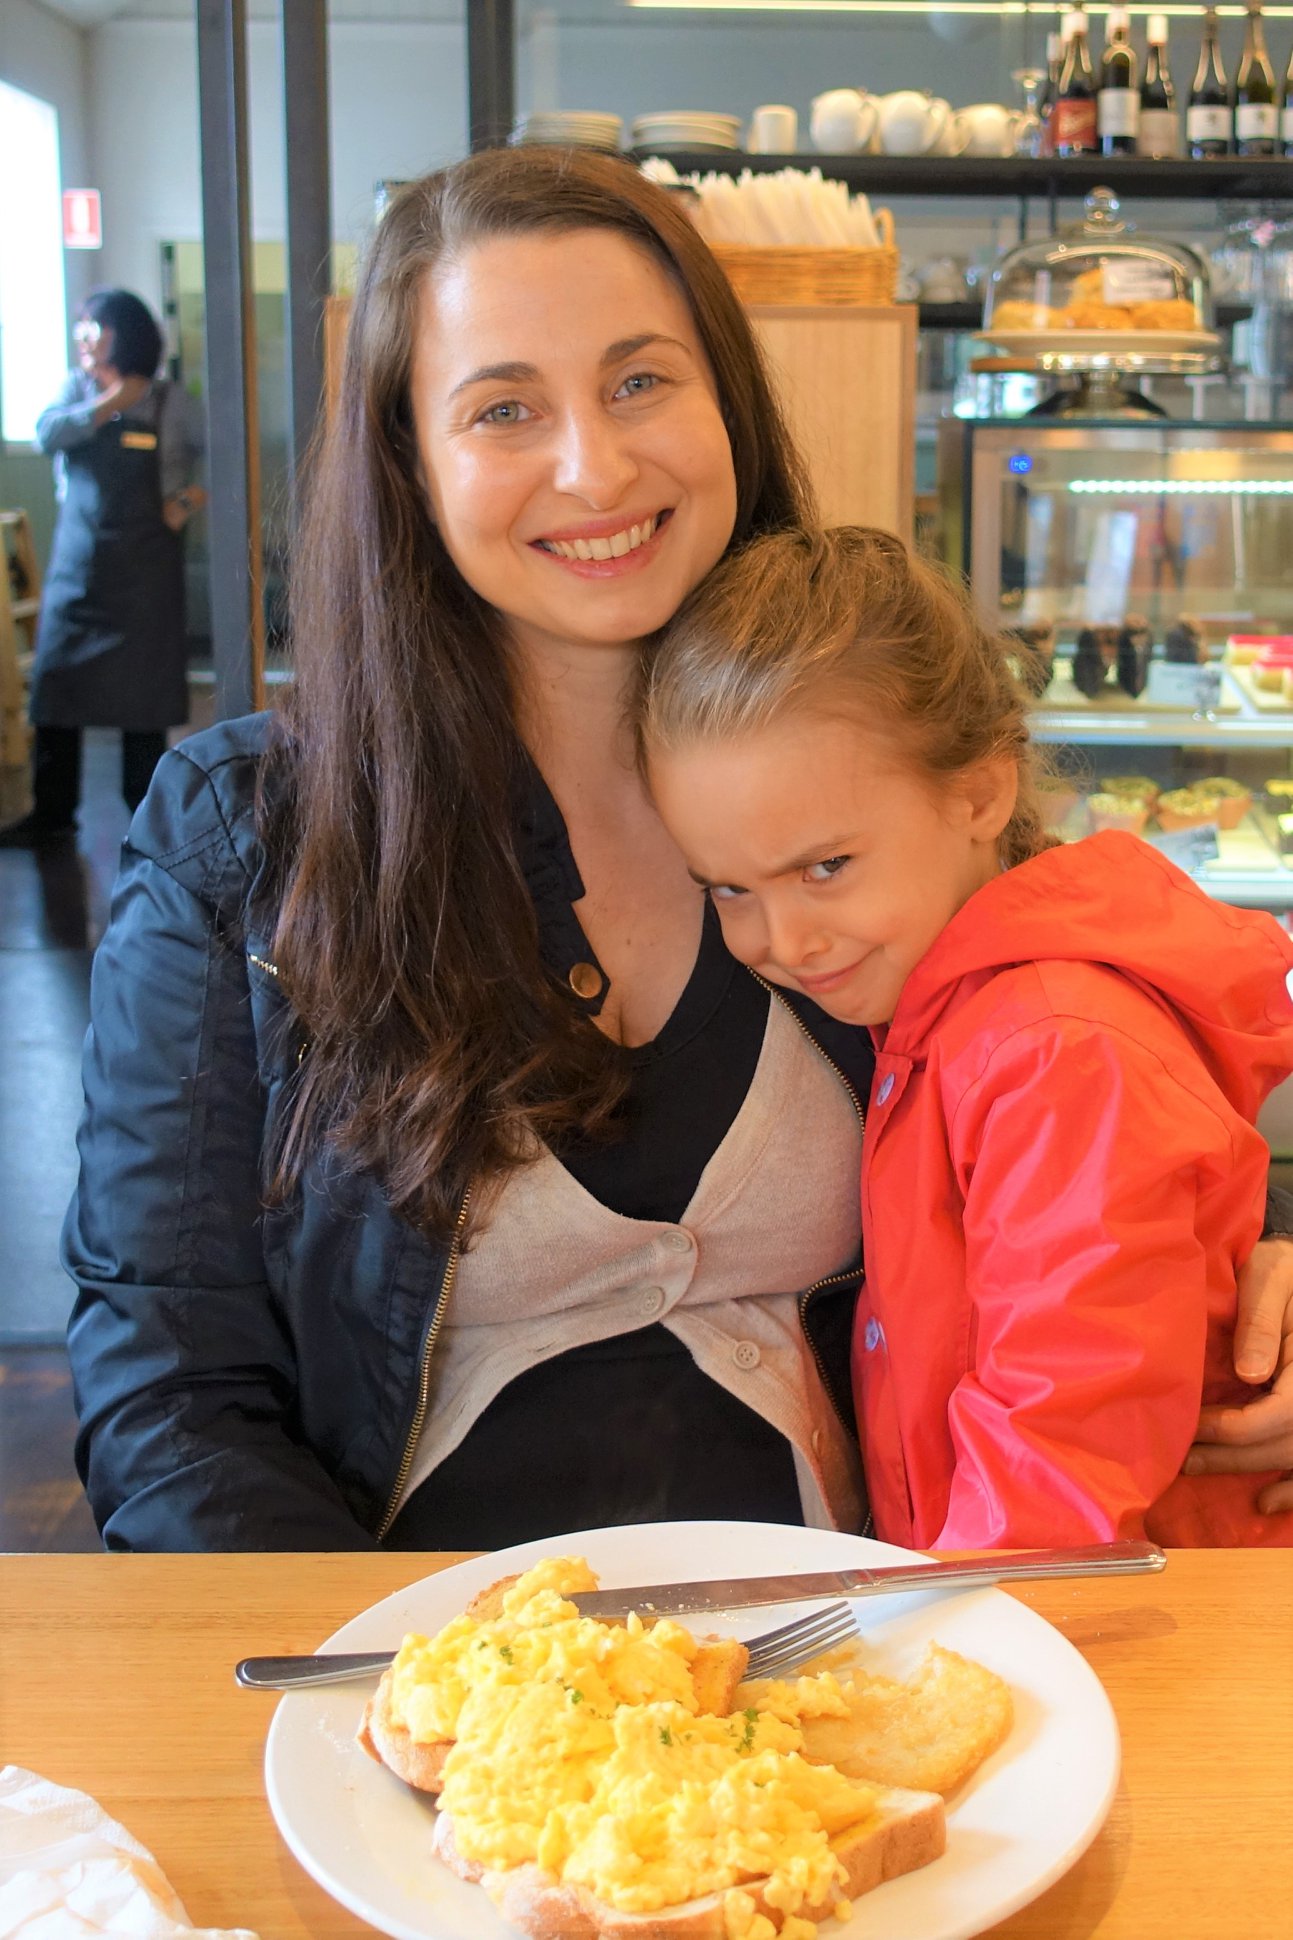
So before I had a chance to see much more of of the station we stopped for breakfast at the Tracks Cafe. They offer breakfast and lunch menus, as well as a kids menu, vegan and vegetarian options and the prices are quite reasonable. I ordered Scramble eggs with toasted sourdough and a hash brown to share my with angry daughter and Marco ordered the Egg and bacon roll. My eggs were very fluffy but a bit bland. The bread and hash brown were also soggy. So kind of wished I ordered something else. Marco’s breakfast roll was actually really tasty and his coffee also wasn’t too bad.
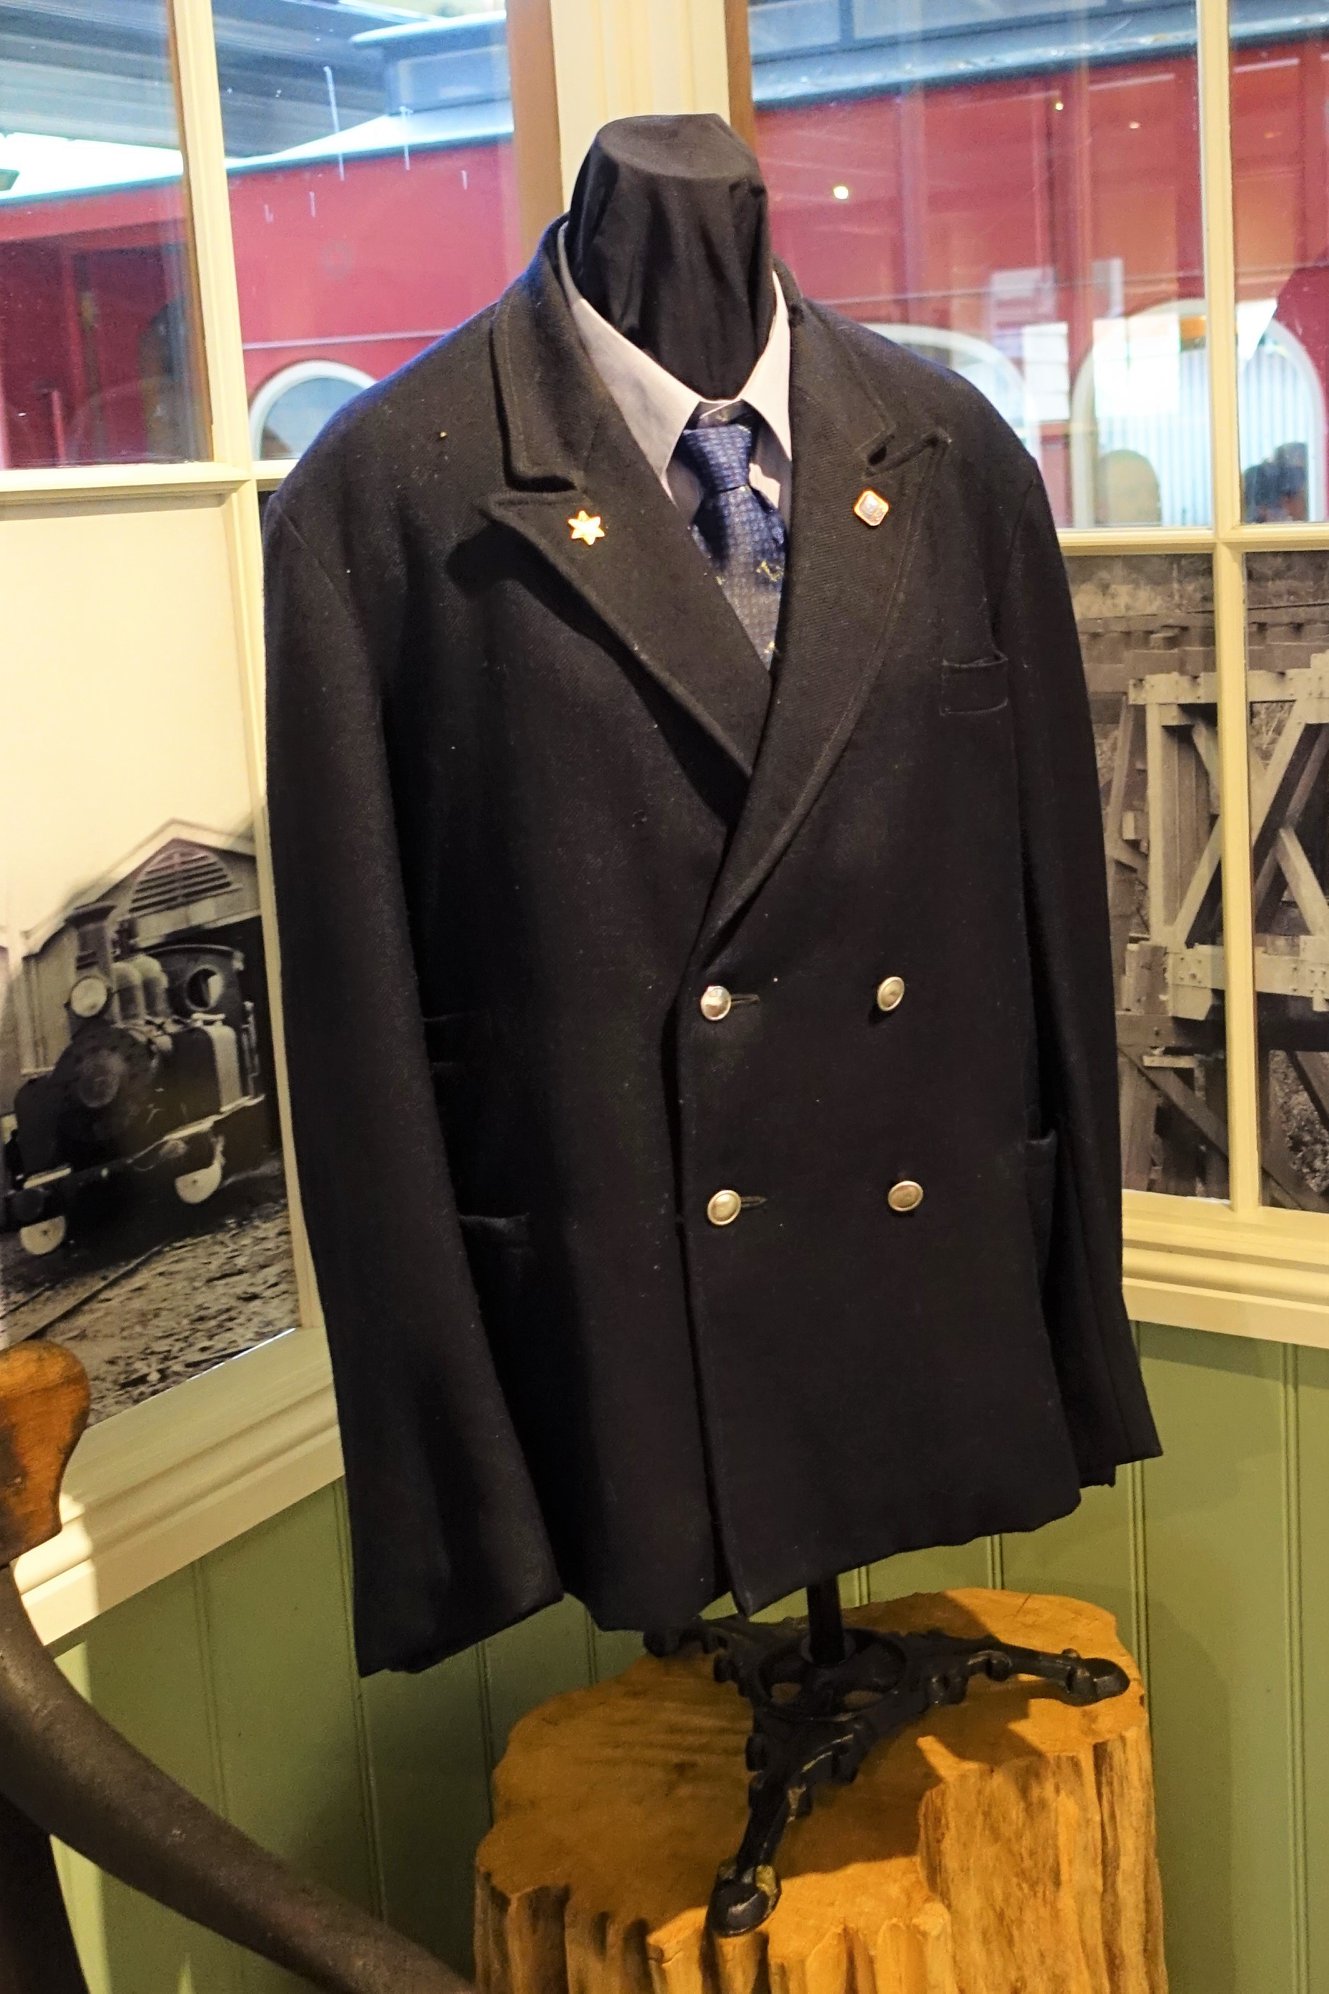
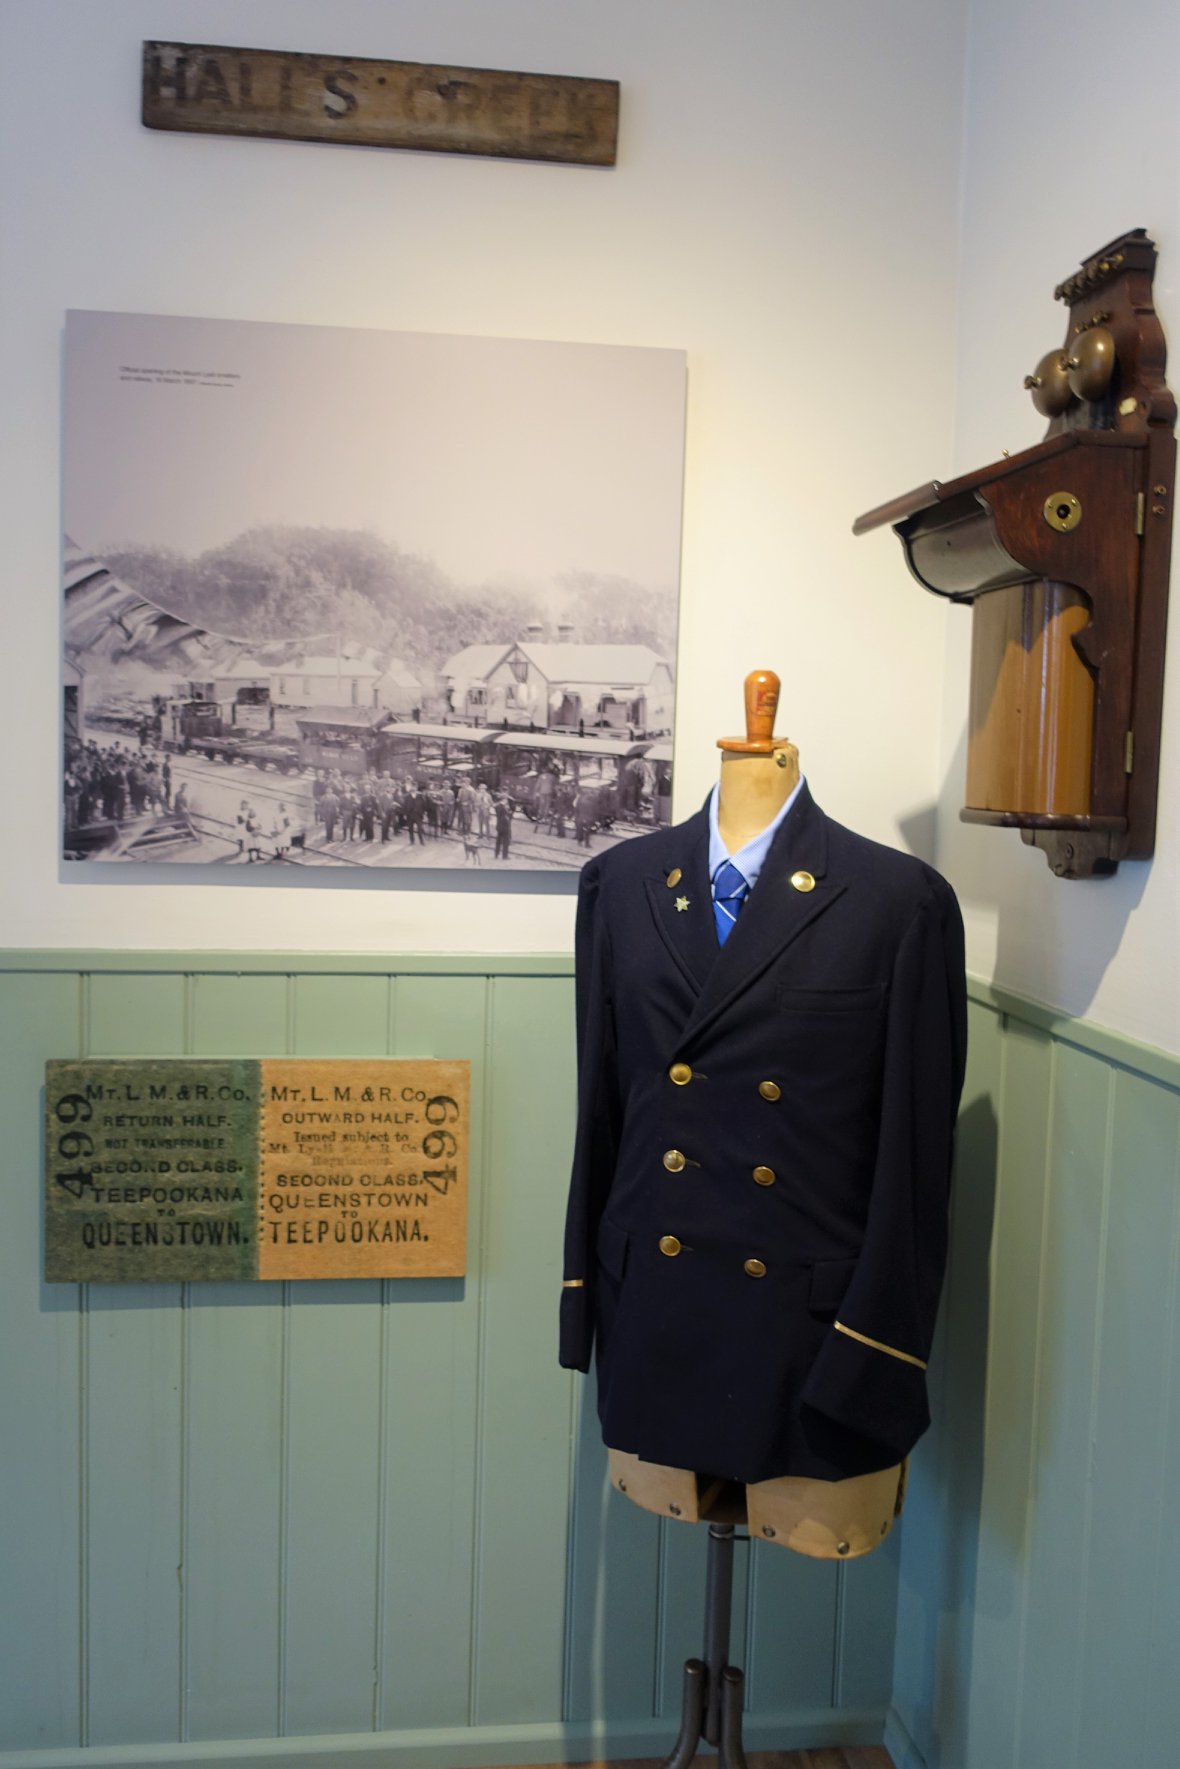
While I was waiting for breakfast, I went to have a little look in the tourist shop to see if they had the Tasmania devil my daughter had been hounding me about. They did have quite a few toys, but didn’t have the one in stock that she was after. I also came across the Railway Museum inside the station. It is only a small space, but it has a combination of information boards and authentic objects, which tell the story of the original construction of the Railway. It is free to go in and look around.
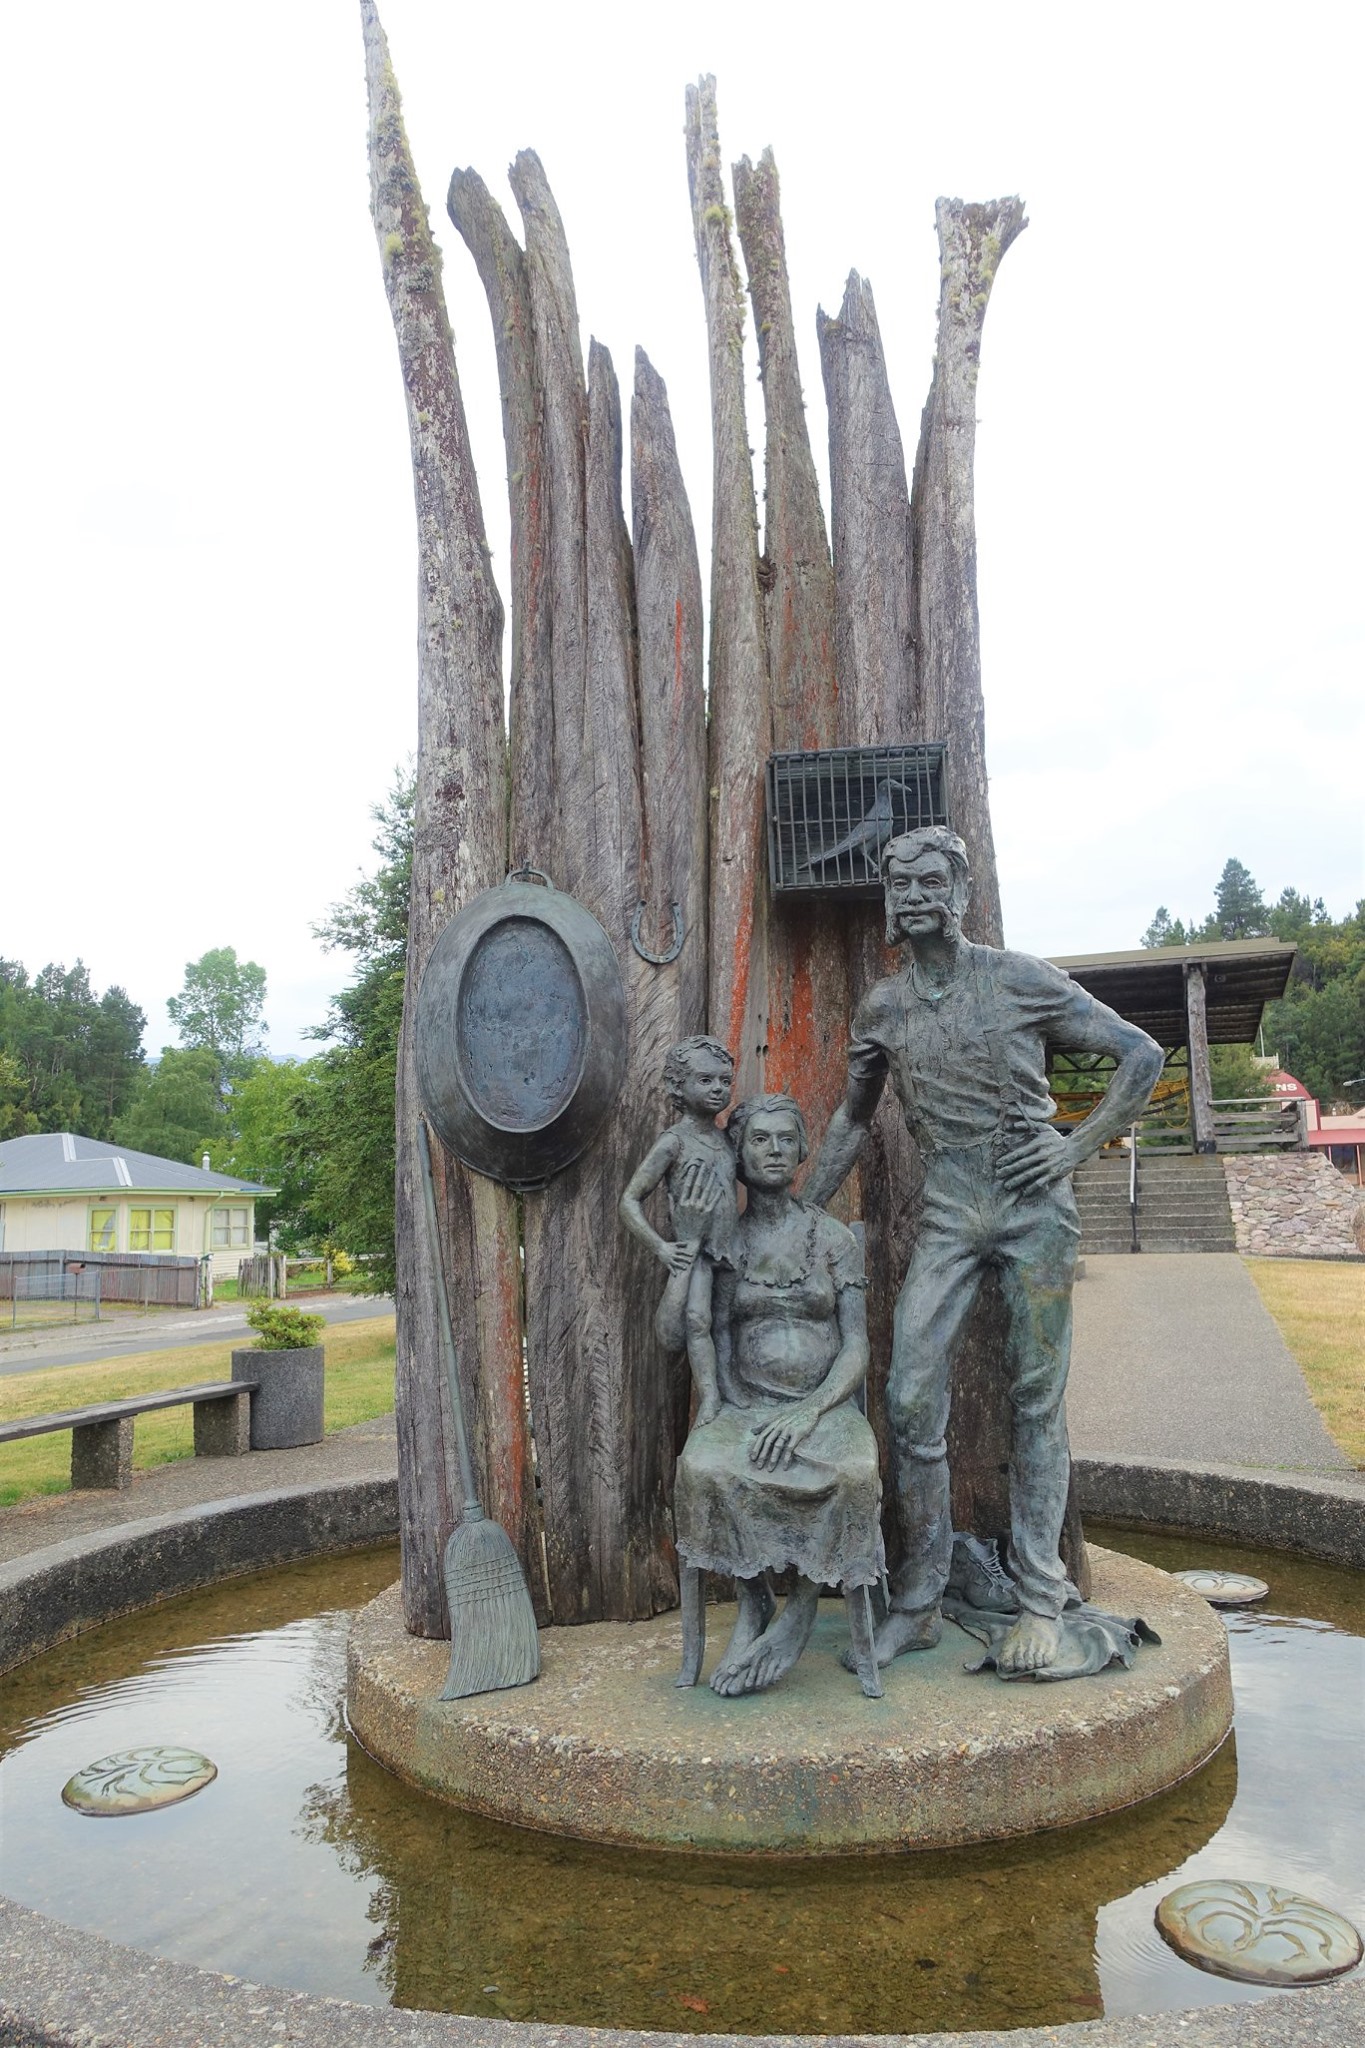
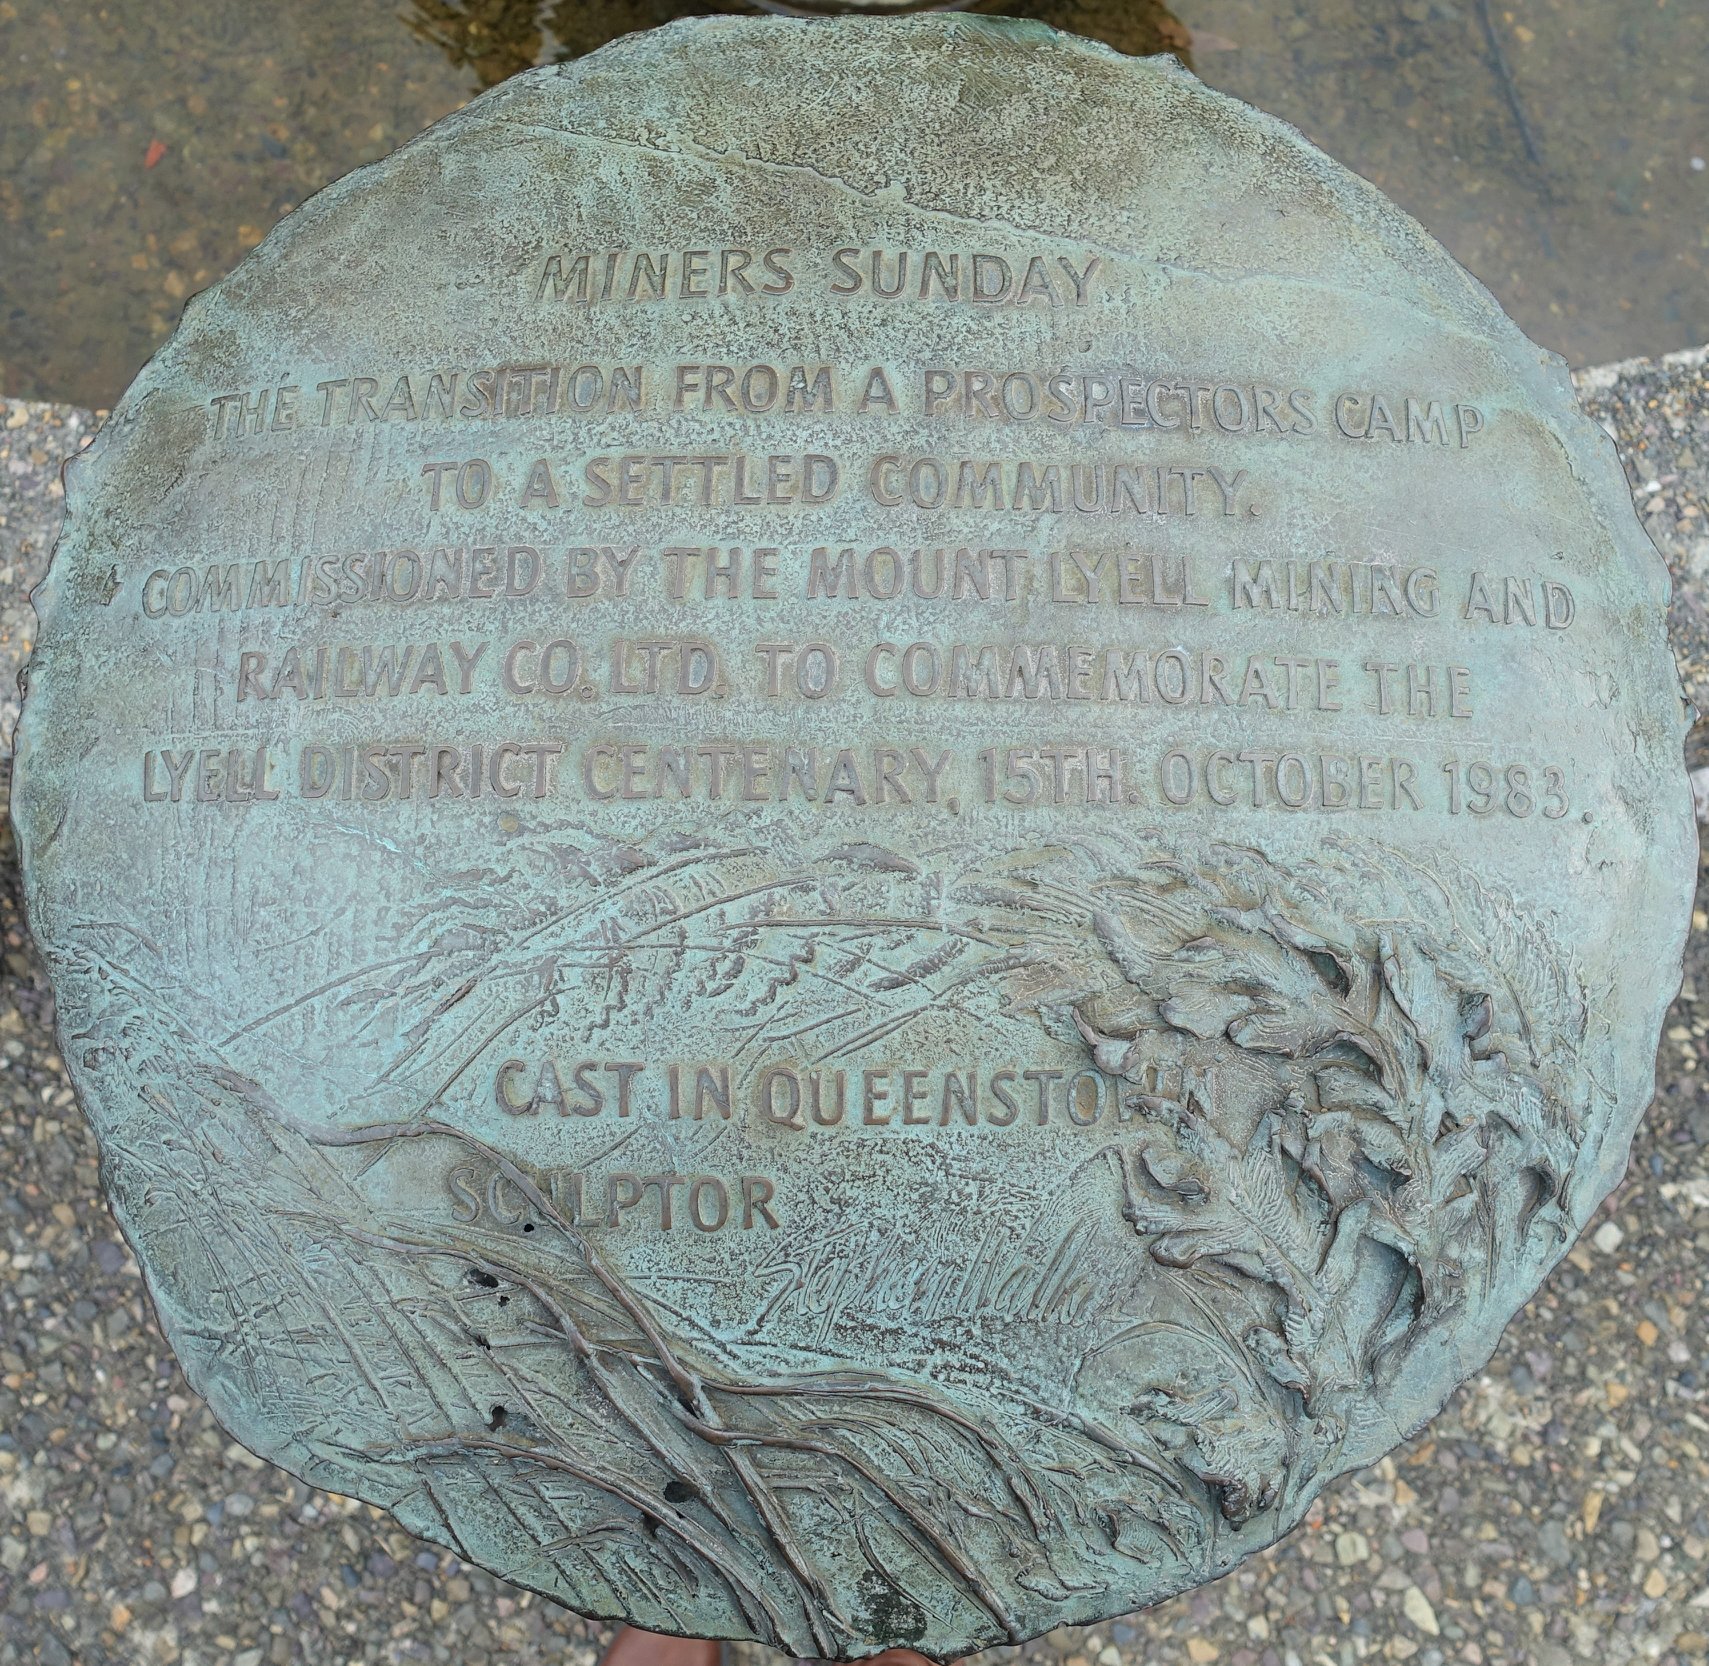
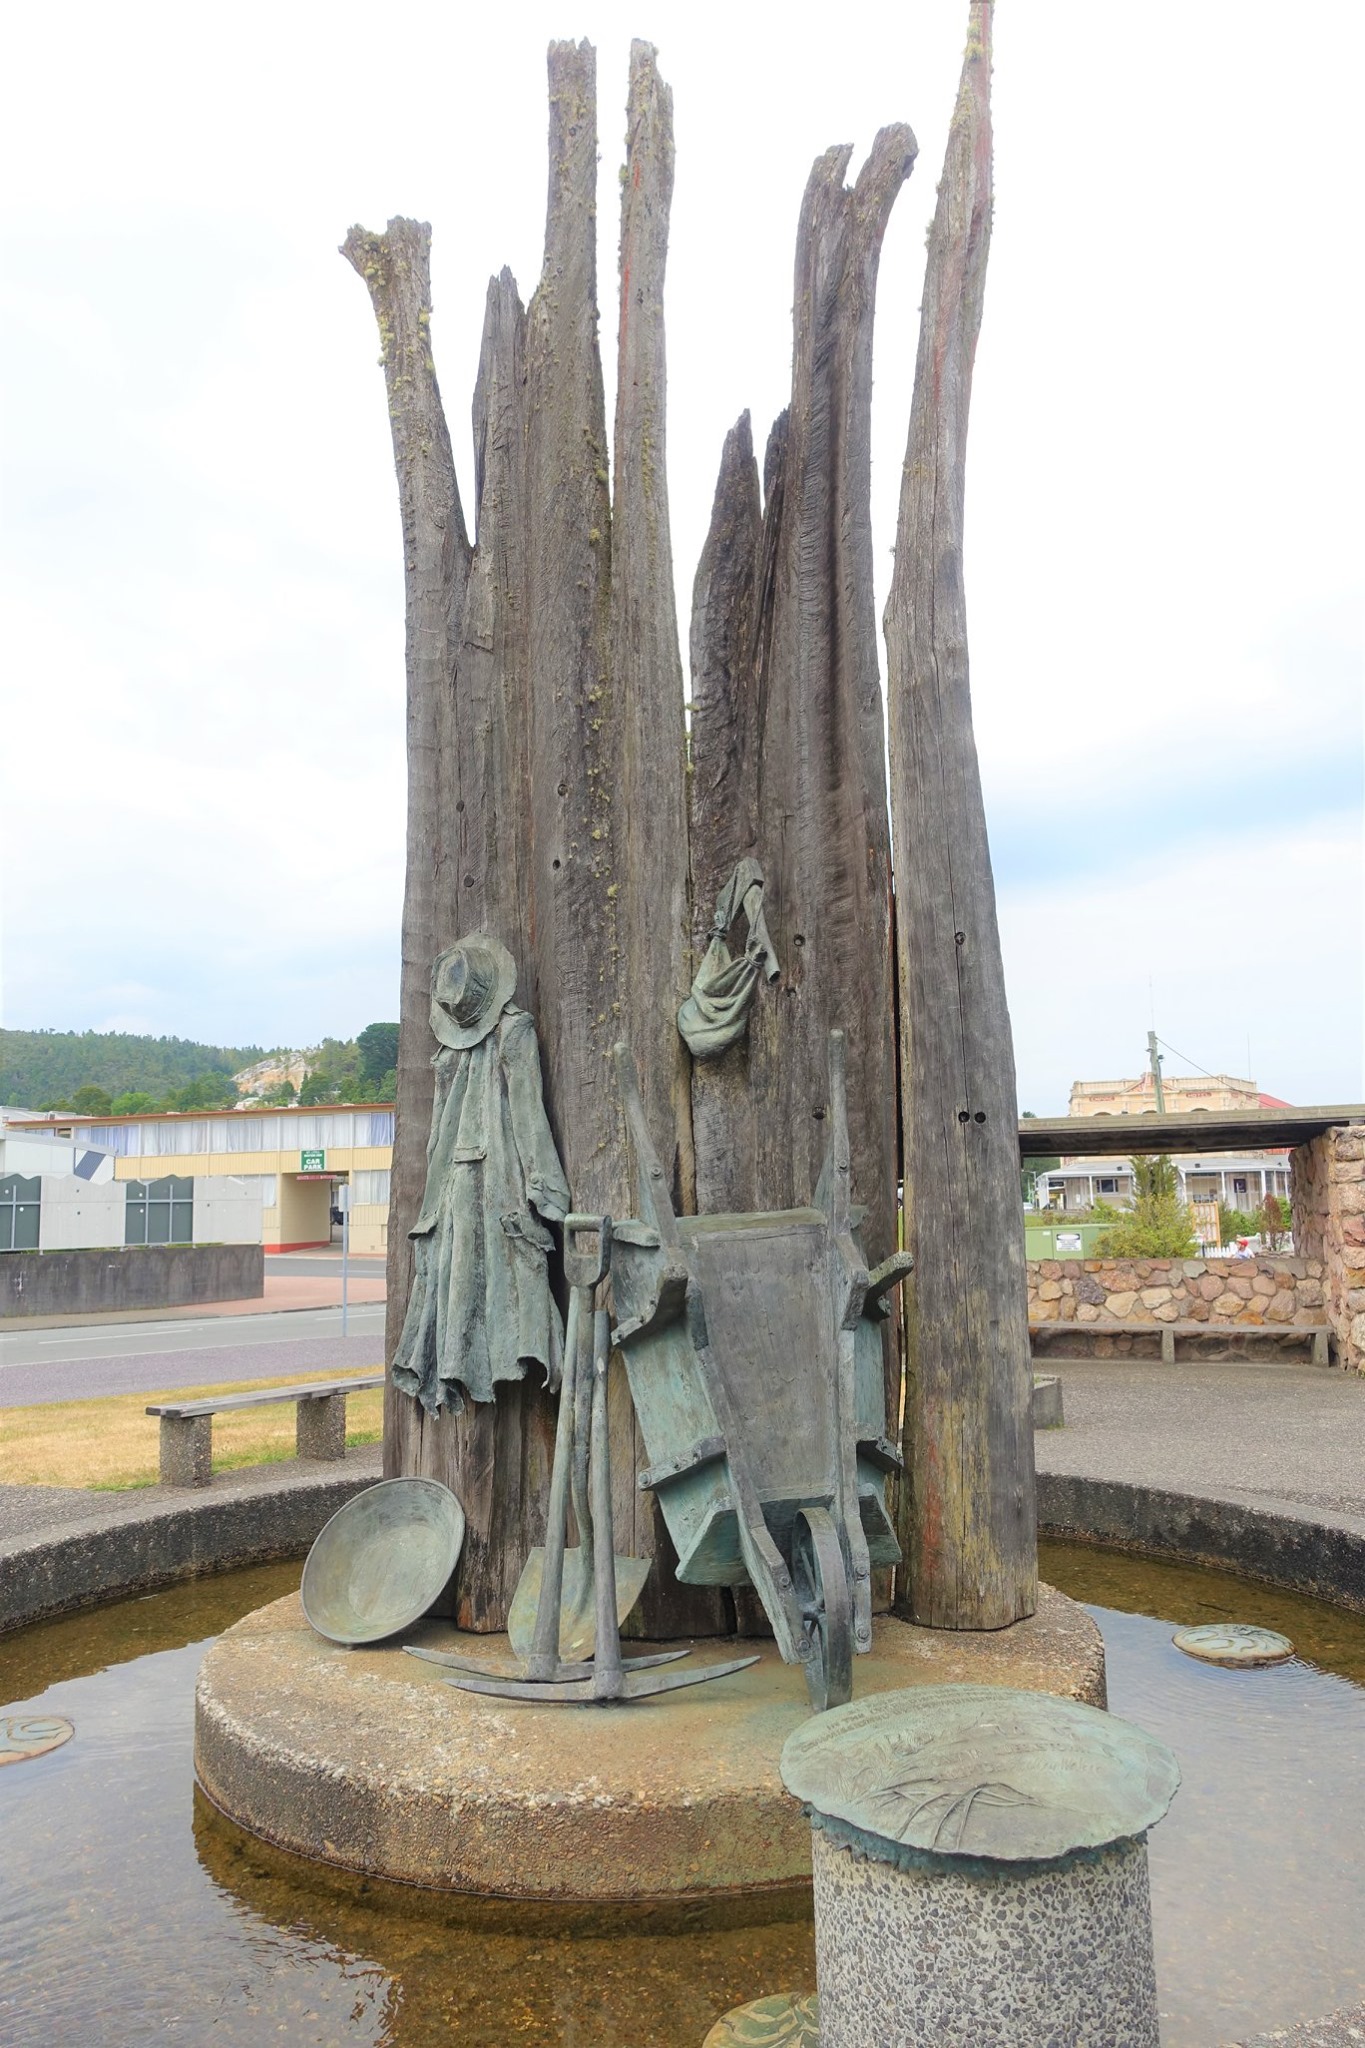
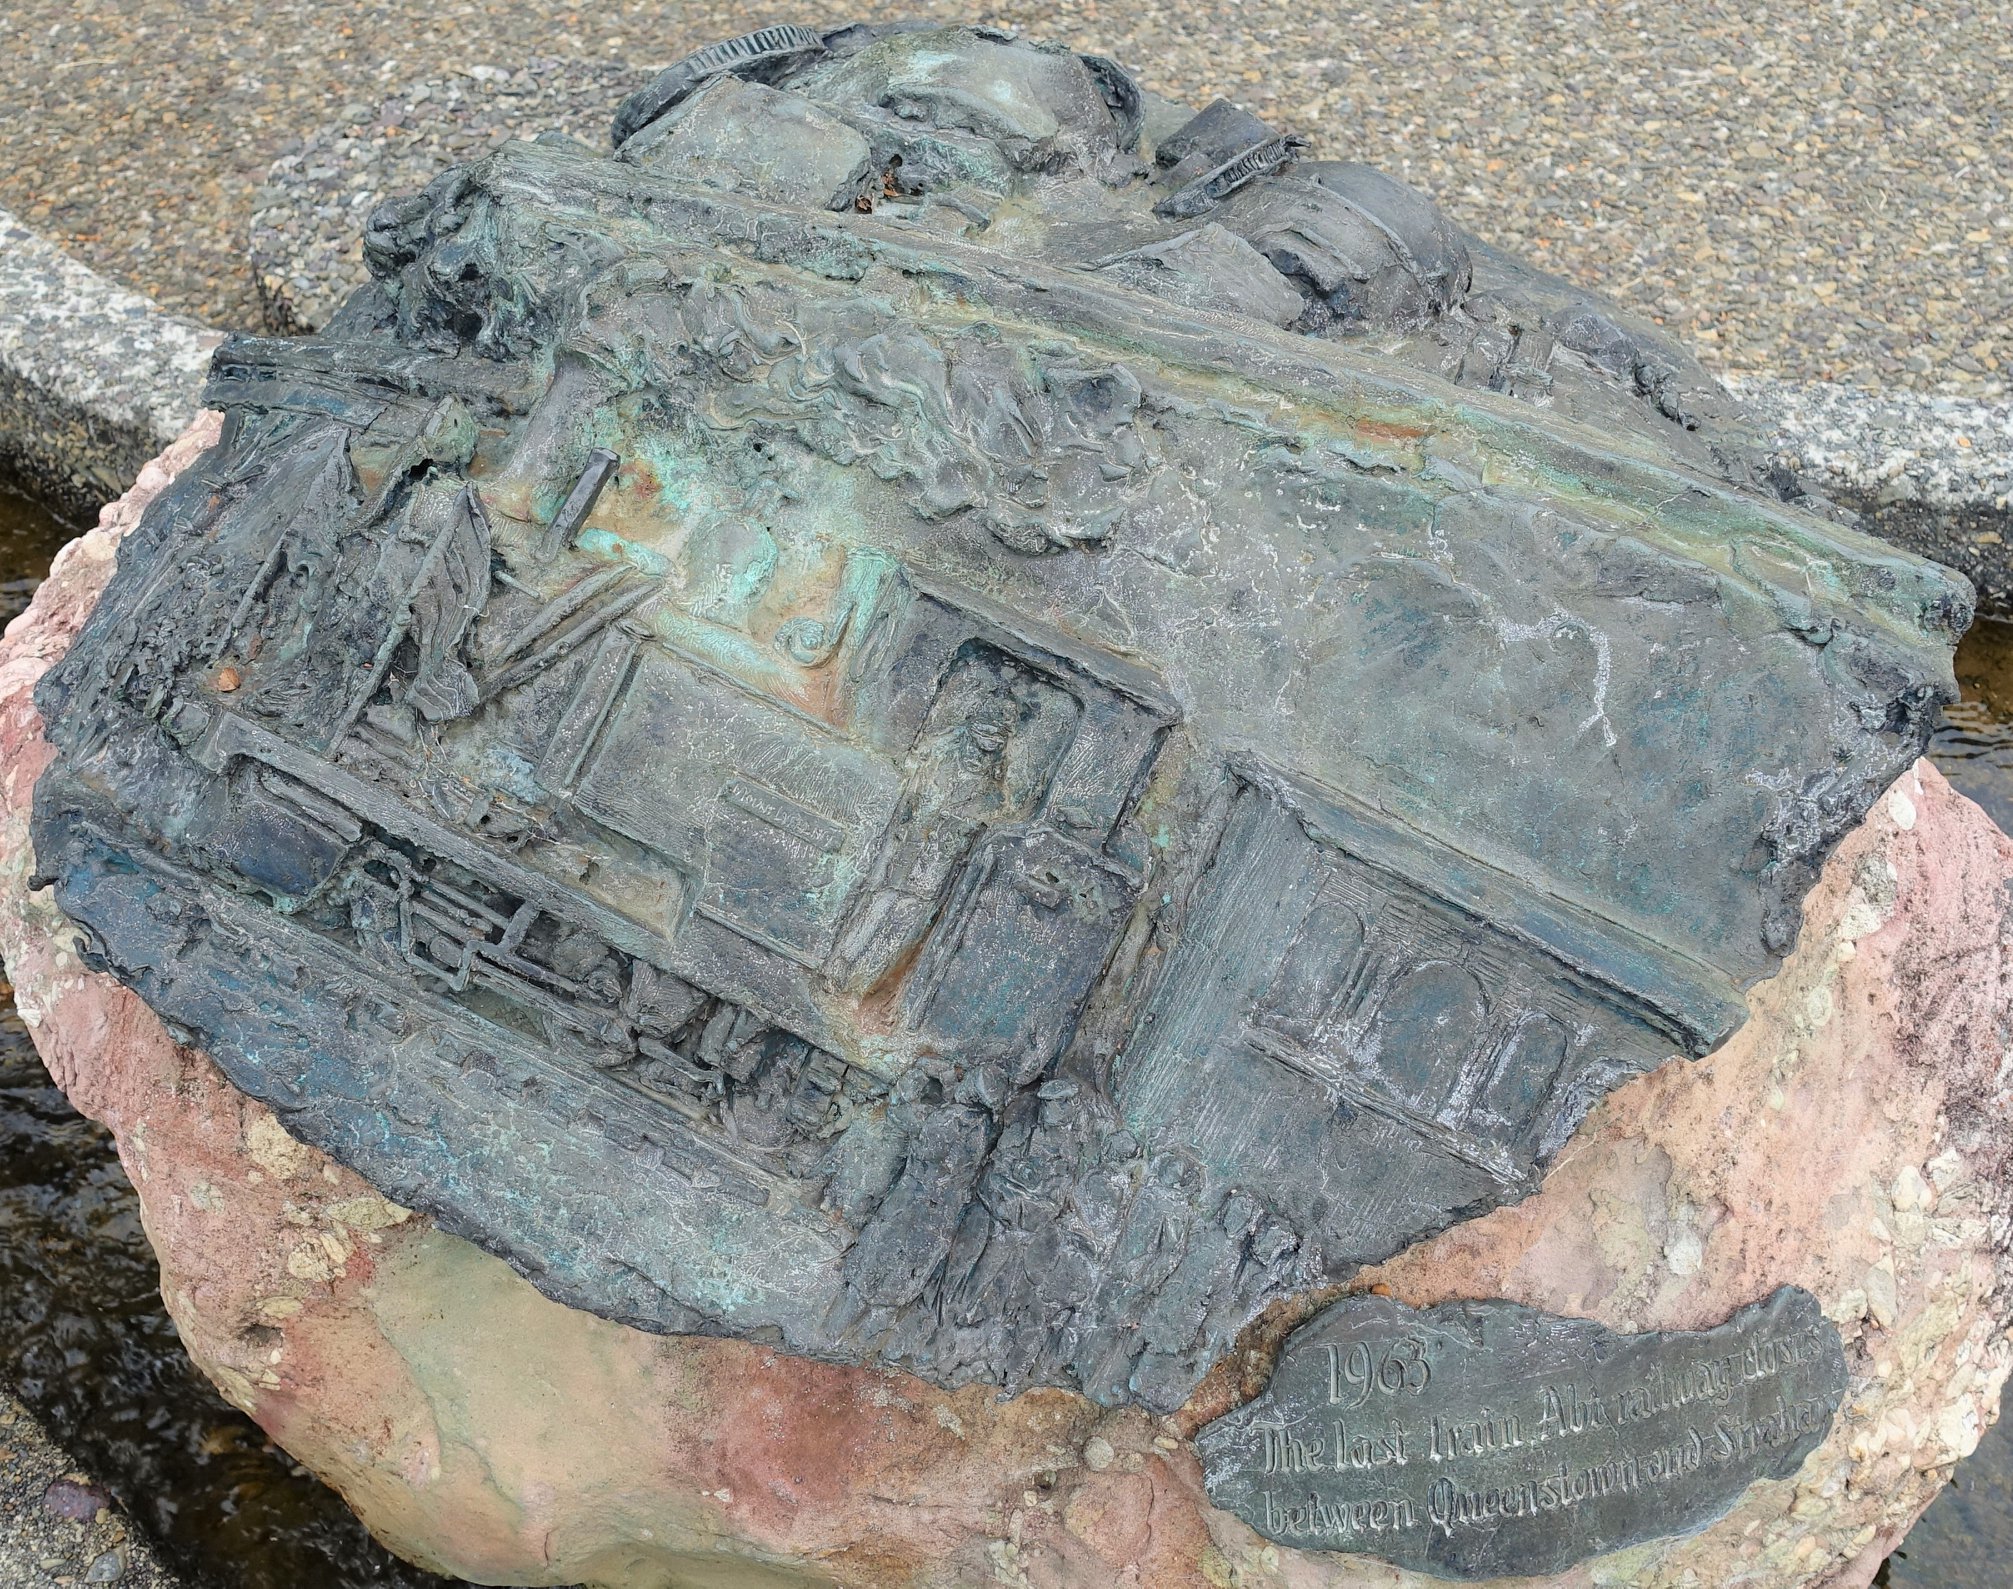
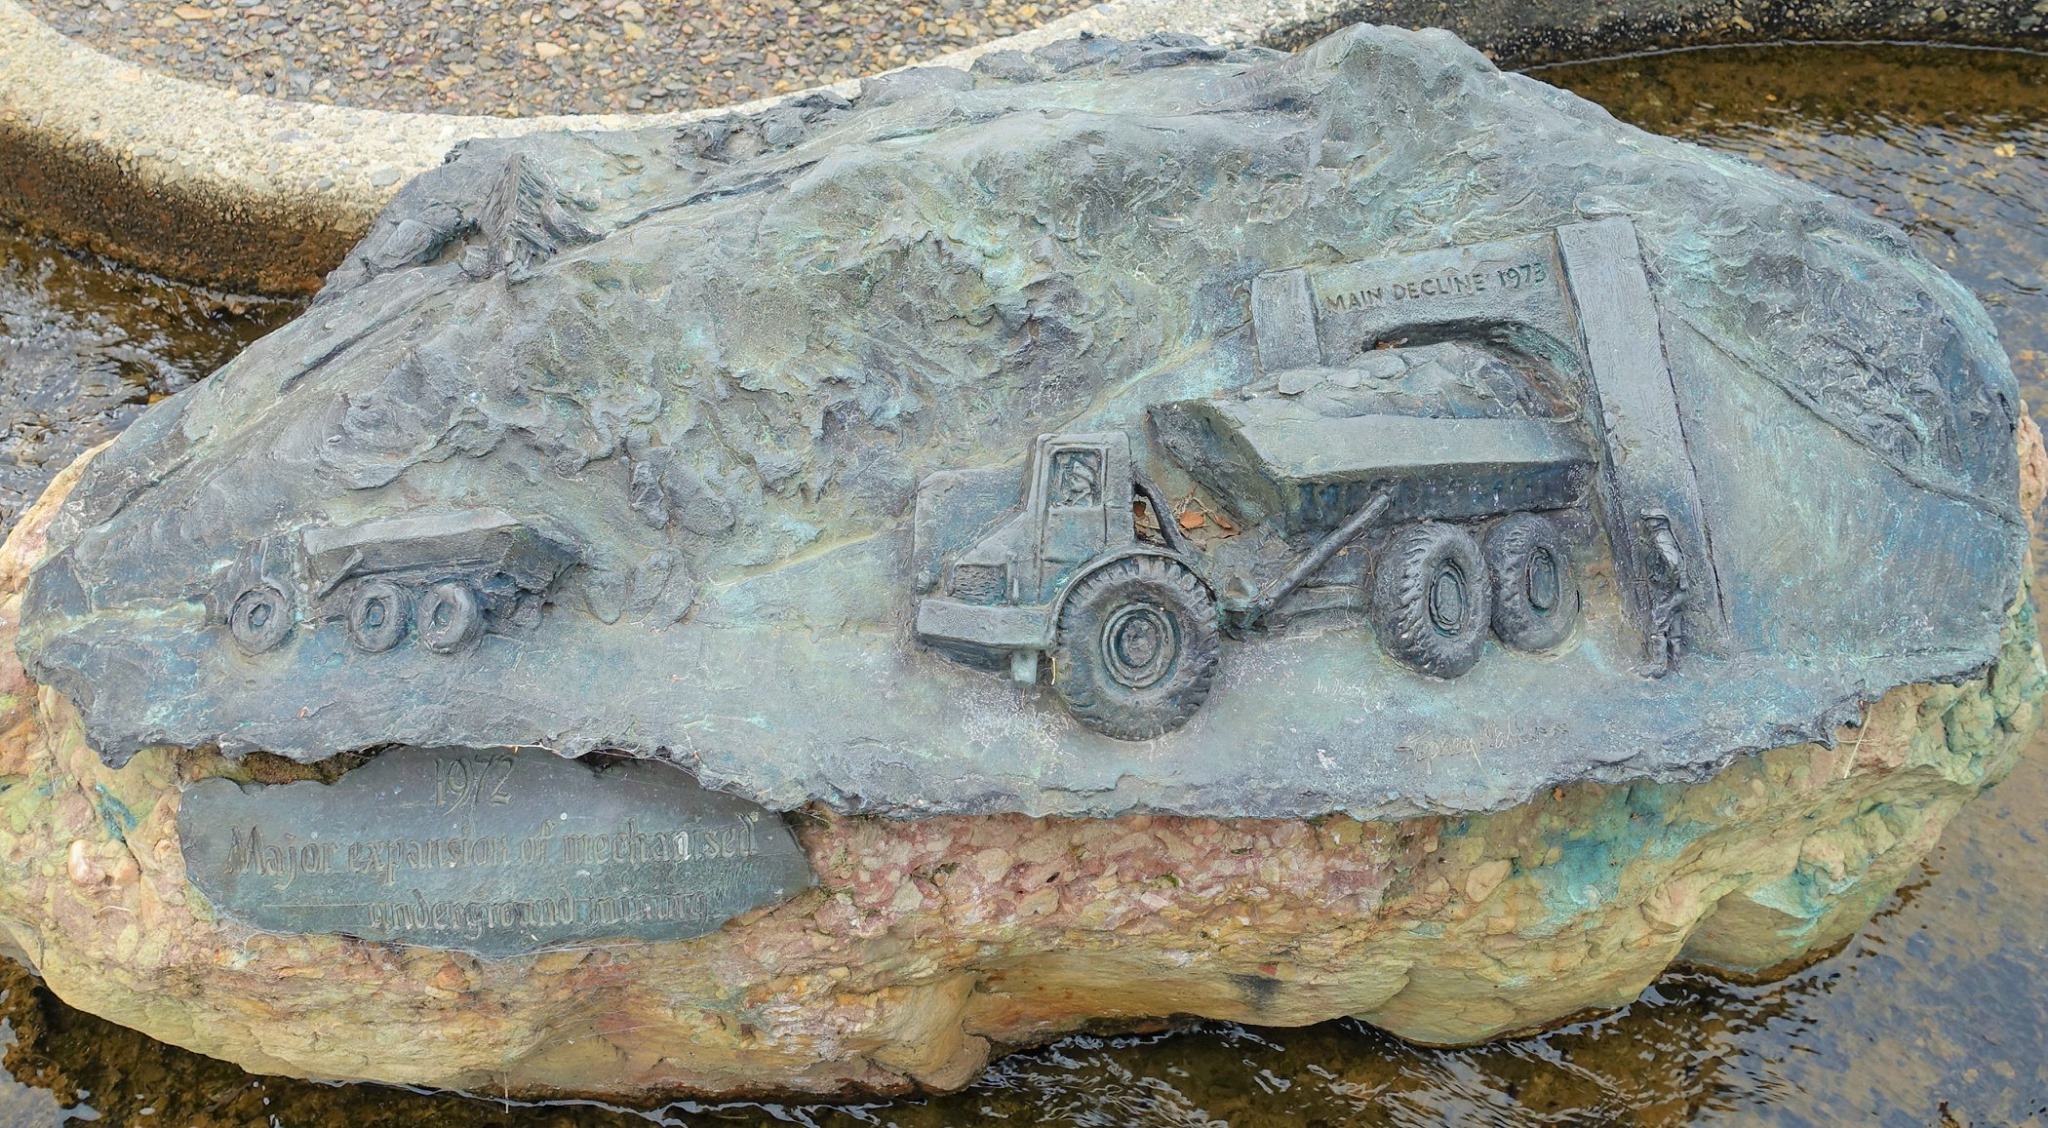
After breakfast walked 30 seconds down the road to the Miner’s Siding Monument. It features sculptures by Stephen Walker and tells the story of the mining history in the Lyell district. It is quite impressive, so I tried to get a photo of each sculpture if you want to follow their story through the years.
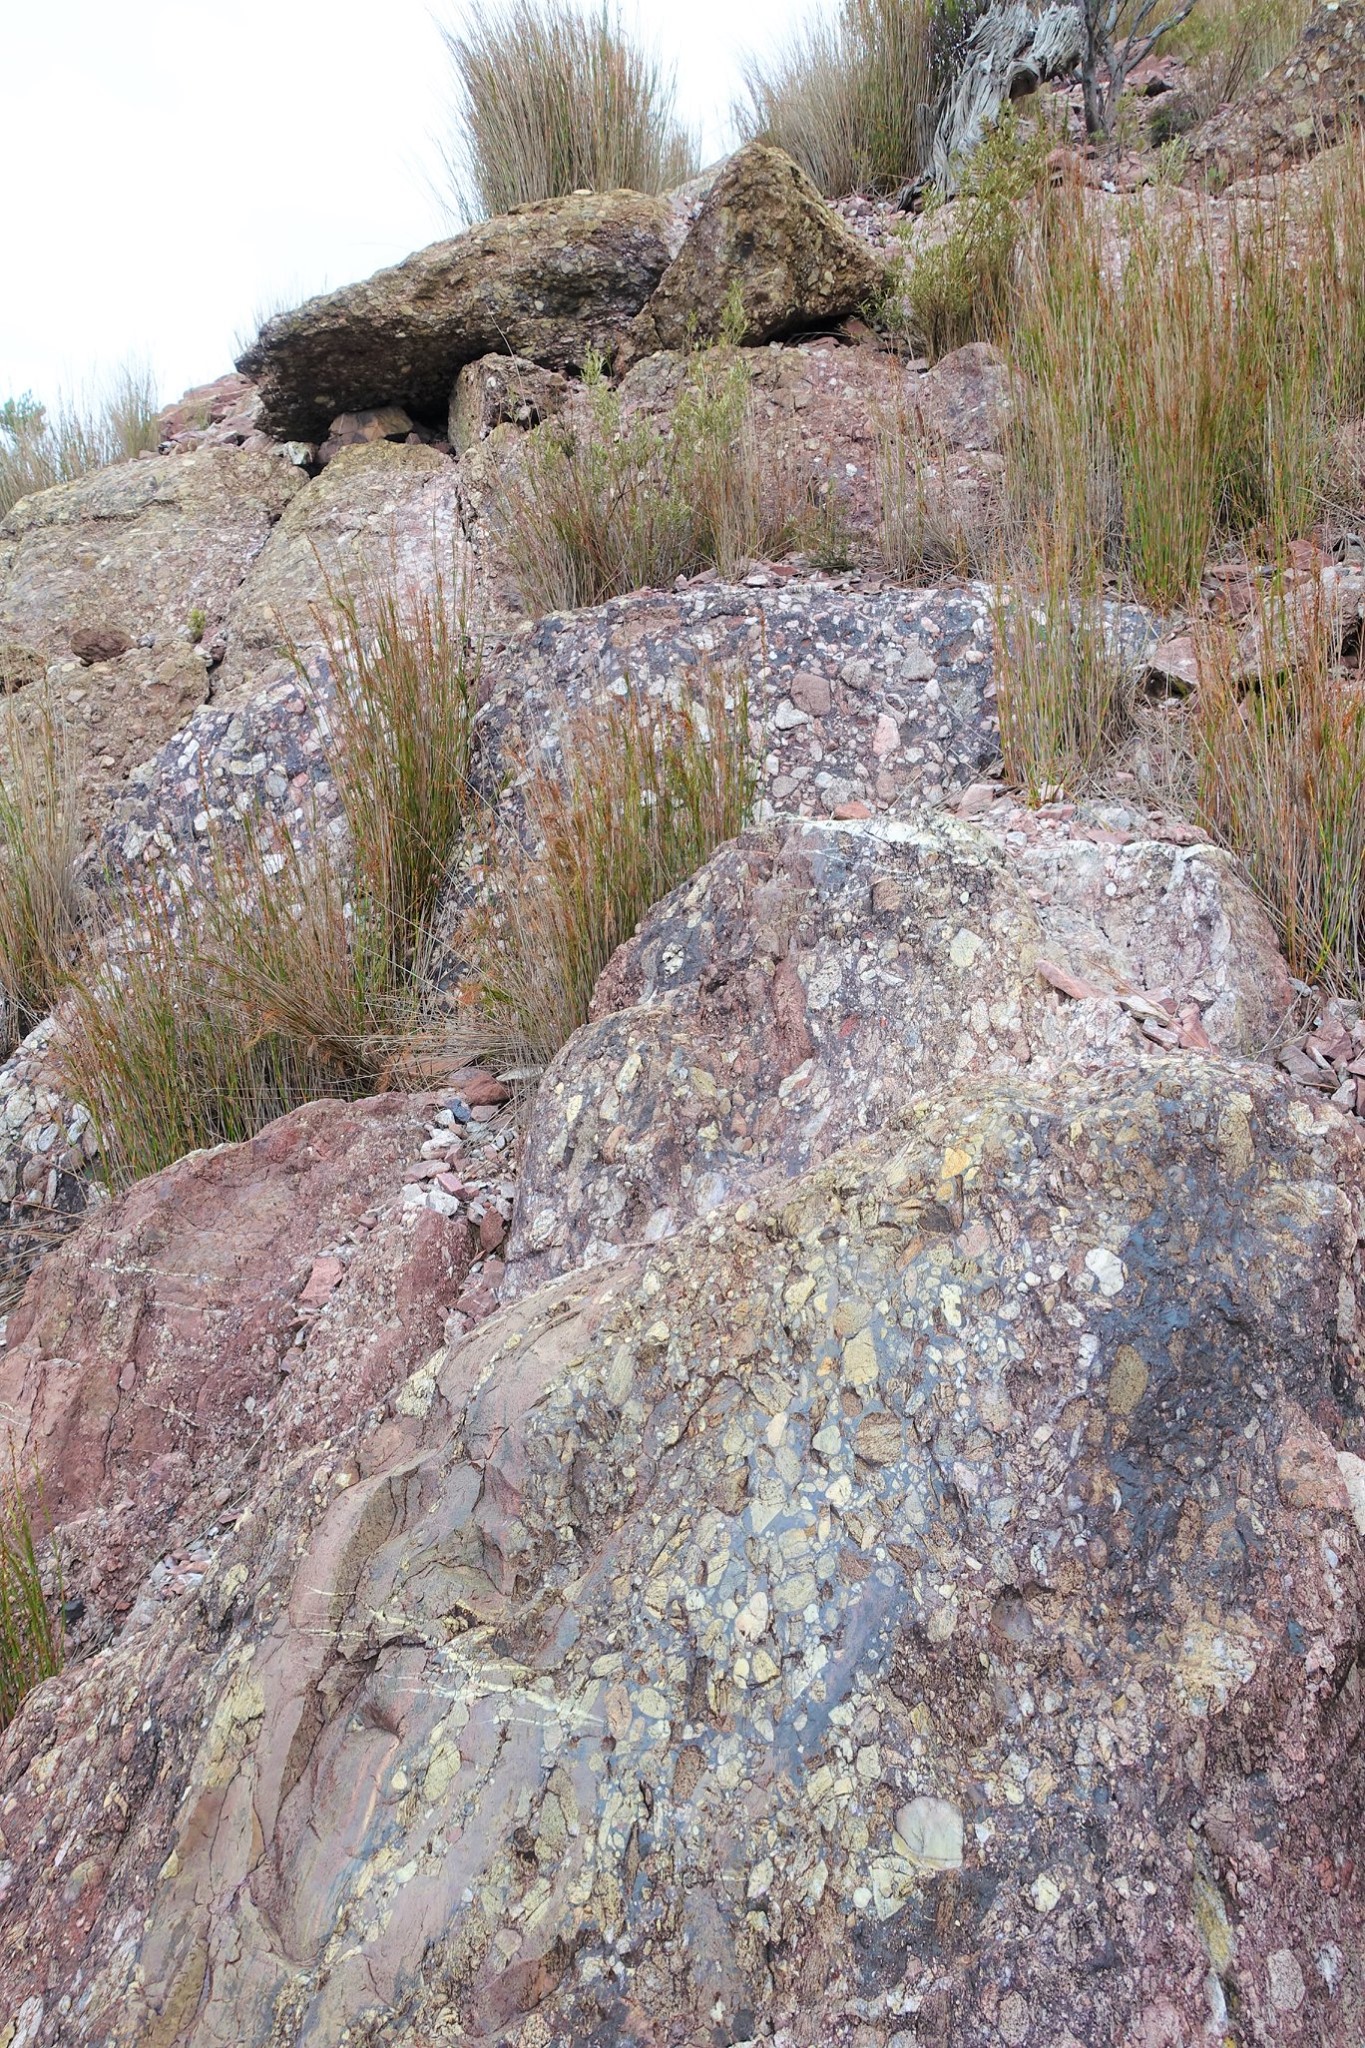
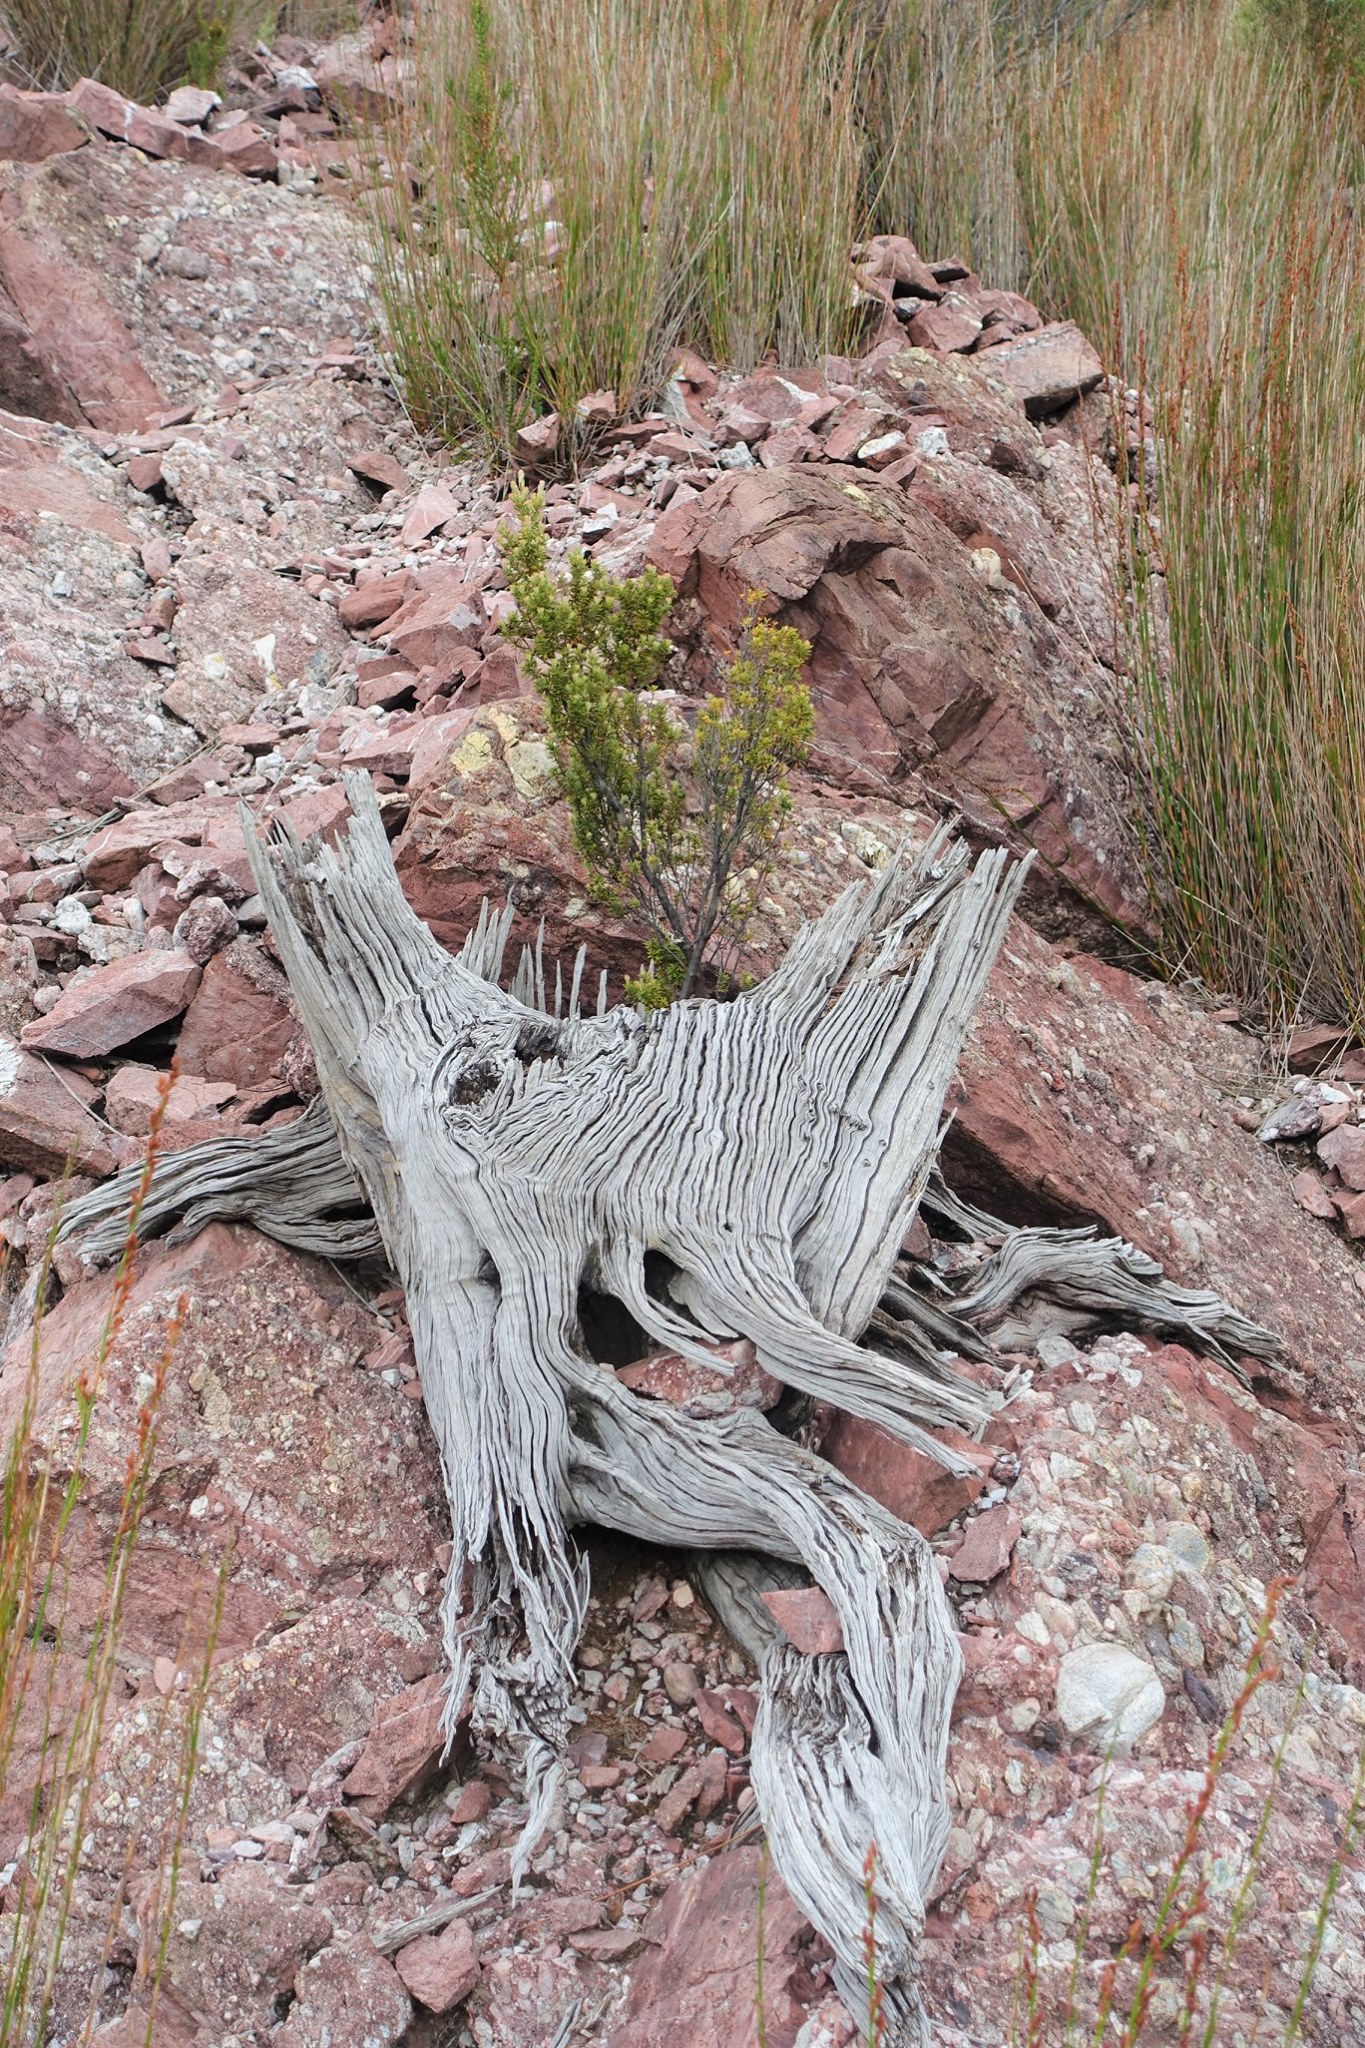
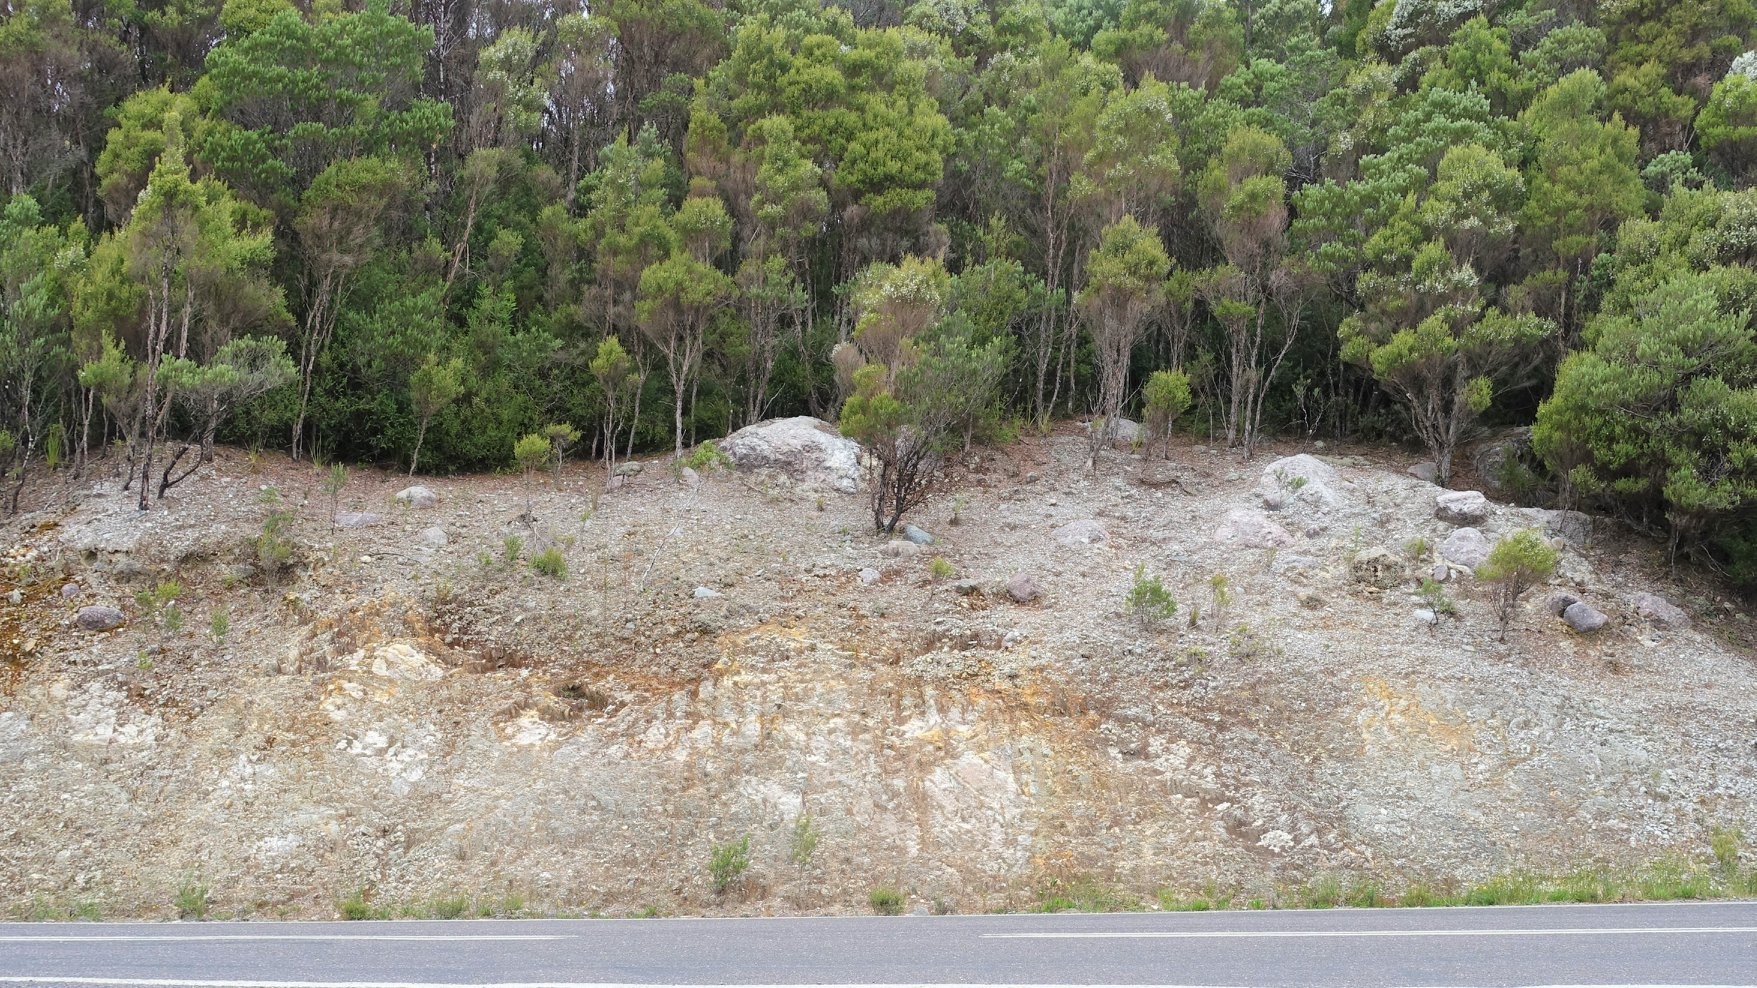
We had to leave quite early from Queenstown, to get to our next destination of Cradle Mountain. I will feature this amazing place in my next post. Below is just the stop, Henty Glacial Erratics State Reserve, which we came across 15 min out of Queenstown. It shows the geological transformation that took place, due to multiple periods of glacial activity. There is a walking track you can do from here. The photo I took is just of the rock from the opposite side of the highway.
Hi all, a bit over a month ago I went on holiday to Tasmania with my little family. This was the first time any of us had been to the tiny island state of Australia. We did an 8-day road trip to celebrate my Babymoon and O’s new start to the school year.
For this trip, I designed a road trip, which began and ended in Hobart. This took us to Queenstown, Cradle Mountain, Devonport, Launceston, Campbell Town, Oatlands, Richmond and Port Arthur. We stayed in different accommodations every night and saw a variety of different landscapes. Although this is only a snapshot of what Tasmania has to offer, this itinerary gave us a pretty good overview in a short time with a child in tow.
I really didn’t know much about Tasmania before planning this trip. I didn’t know what the landscape would look like or what the climate would feel like. We were travelling in January during the hottest time of the year in Australia. But I had heard from others that it can get pretty cold here. So we just packed everything.
Our first stop was Hobart, which is the capital city and the most populous place in Tasmania. It was founded in 1804 as a British Penal colony and is the second oldest capital city in Australia. We arrive at the tiny Hobart airport just after midday. After picking up our rental car and we made our way into Hobart. This was our first impression of Tasmania. It looked quite rural and relatively flat. The climate was quite a bit cooler than where we came from and very windy.
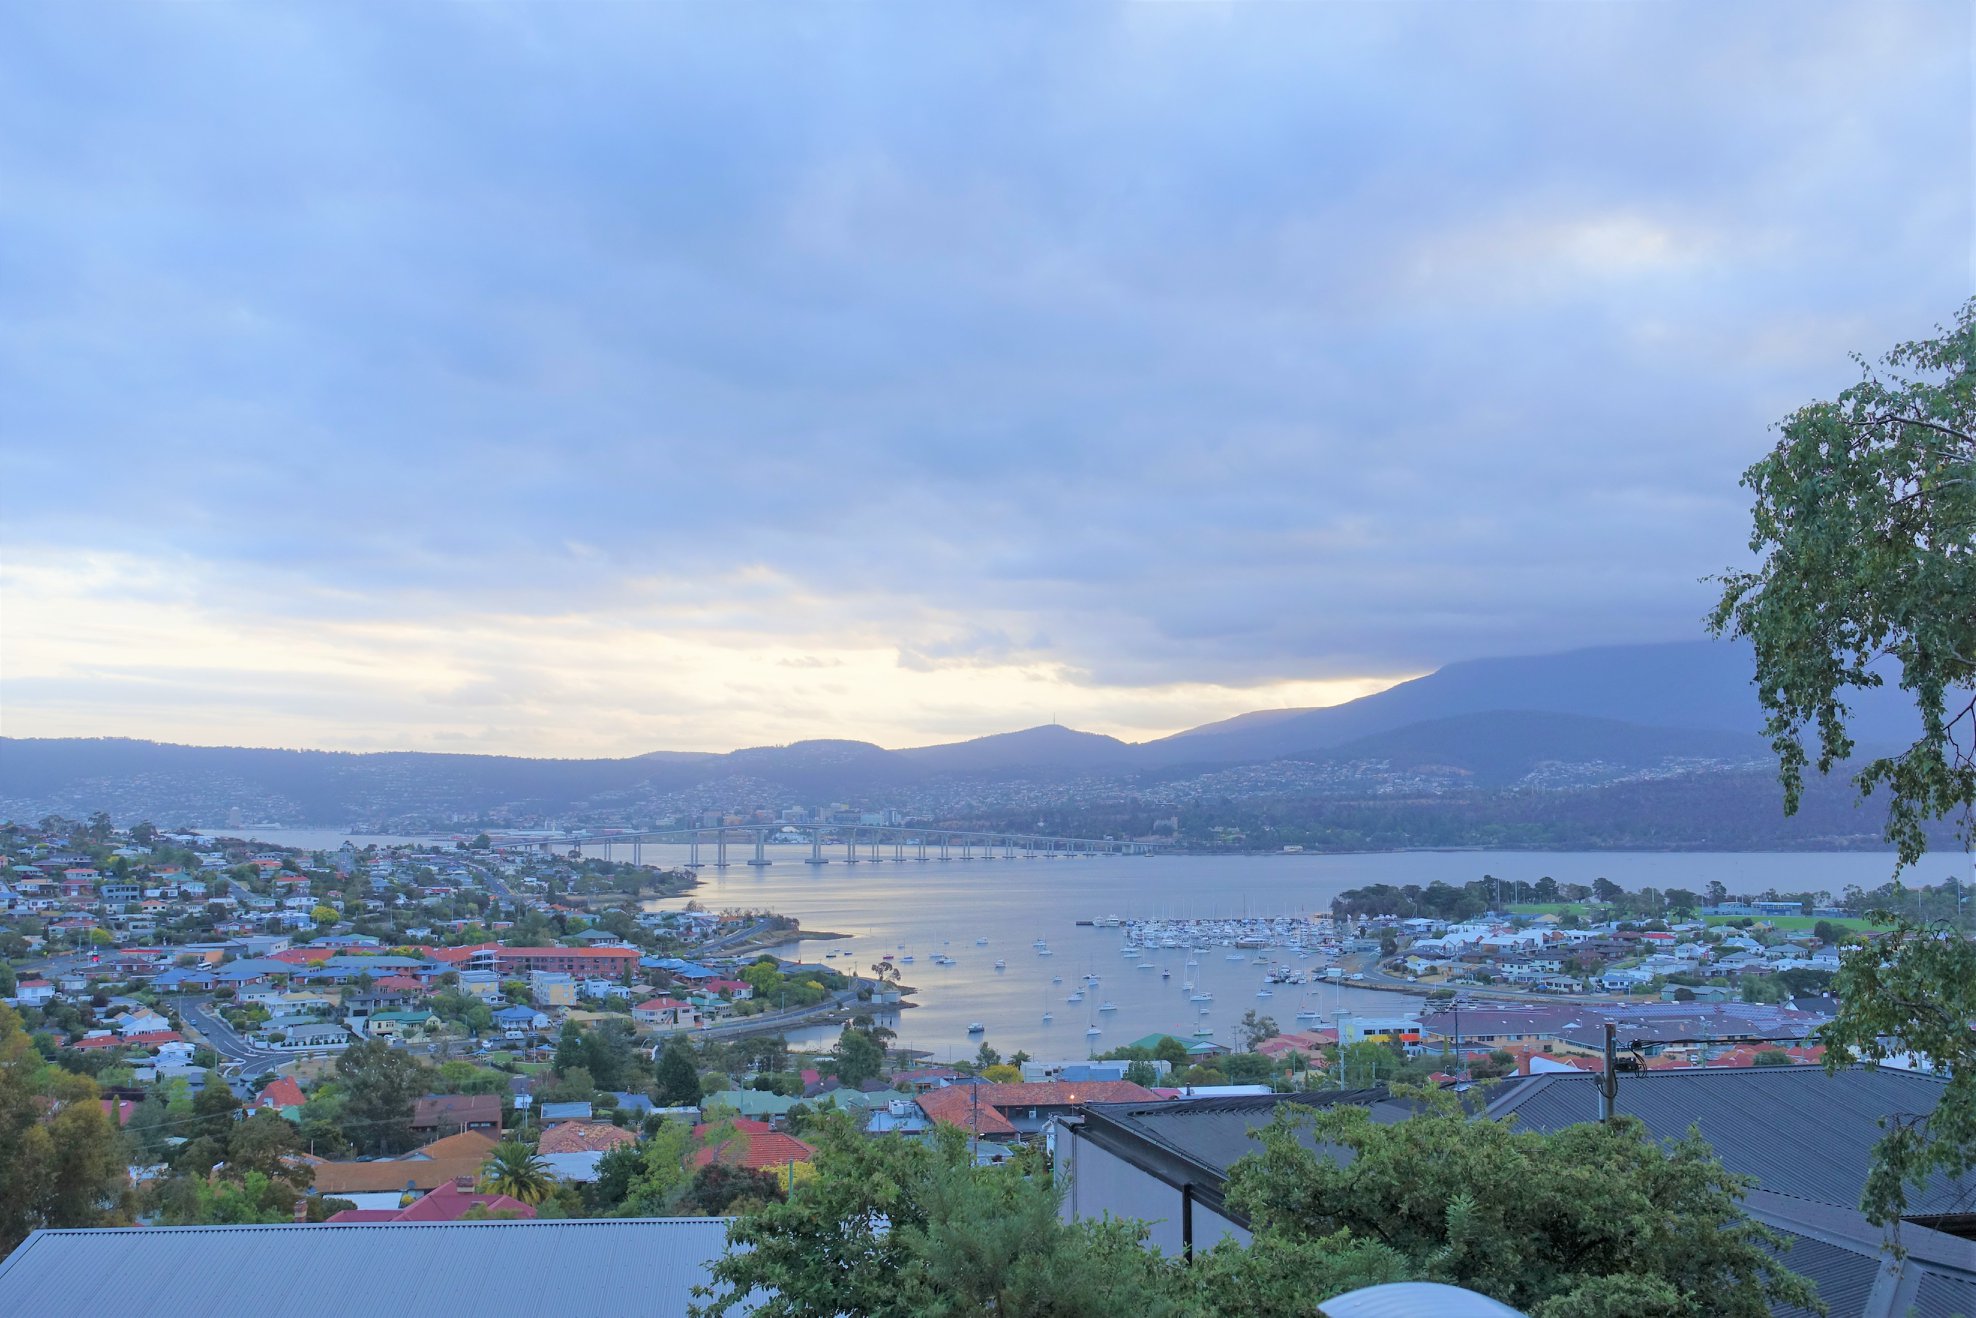
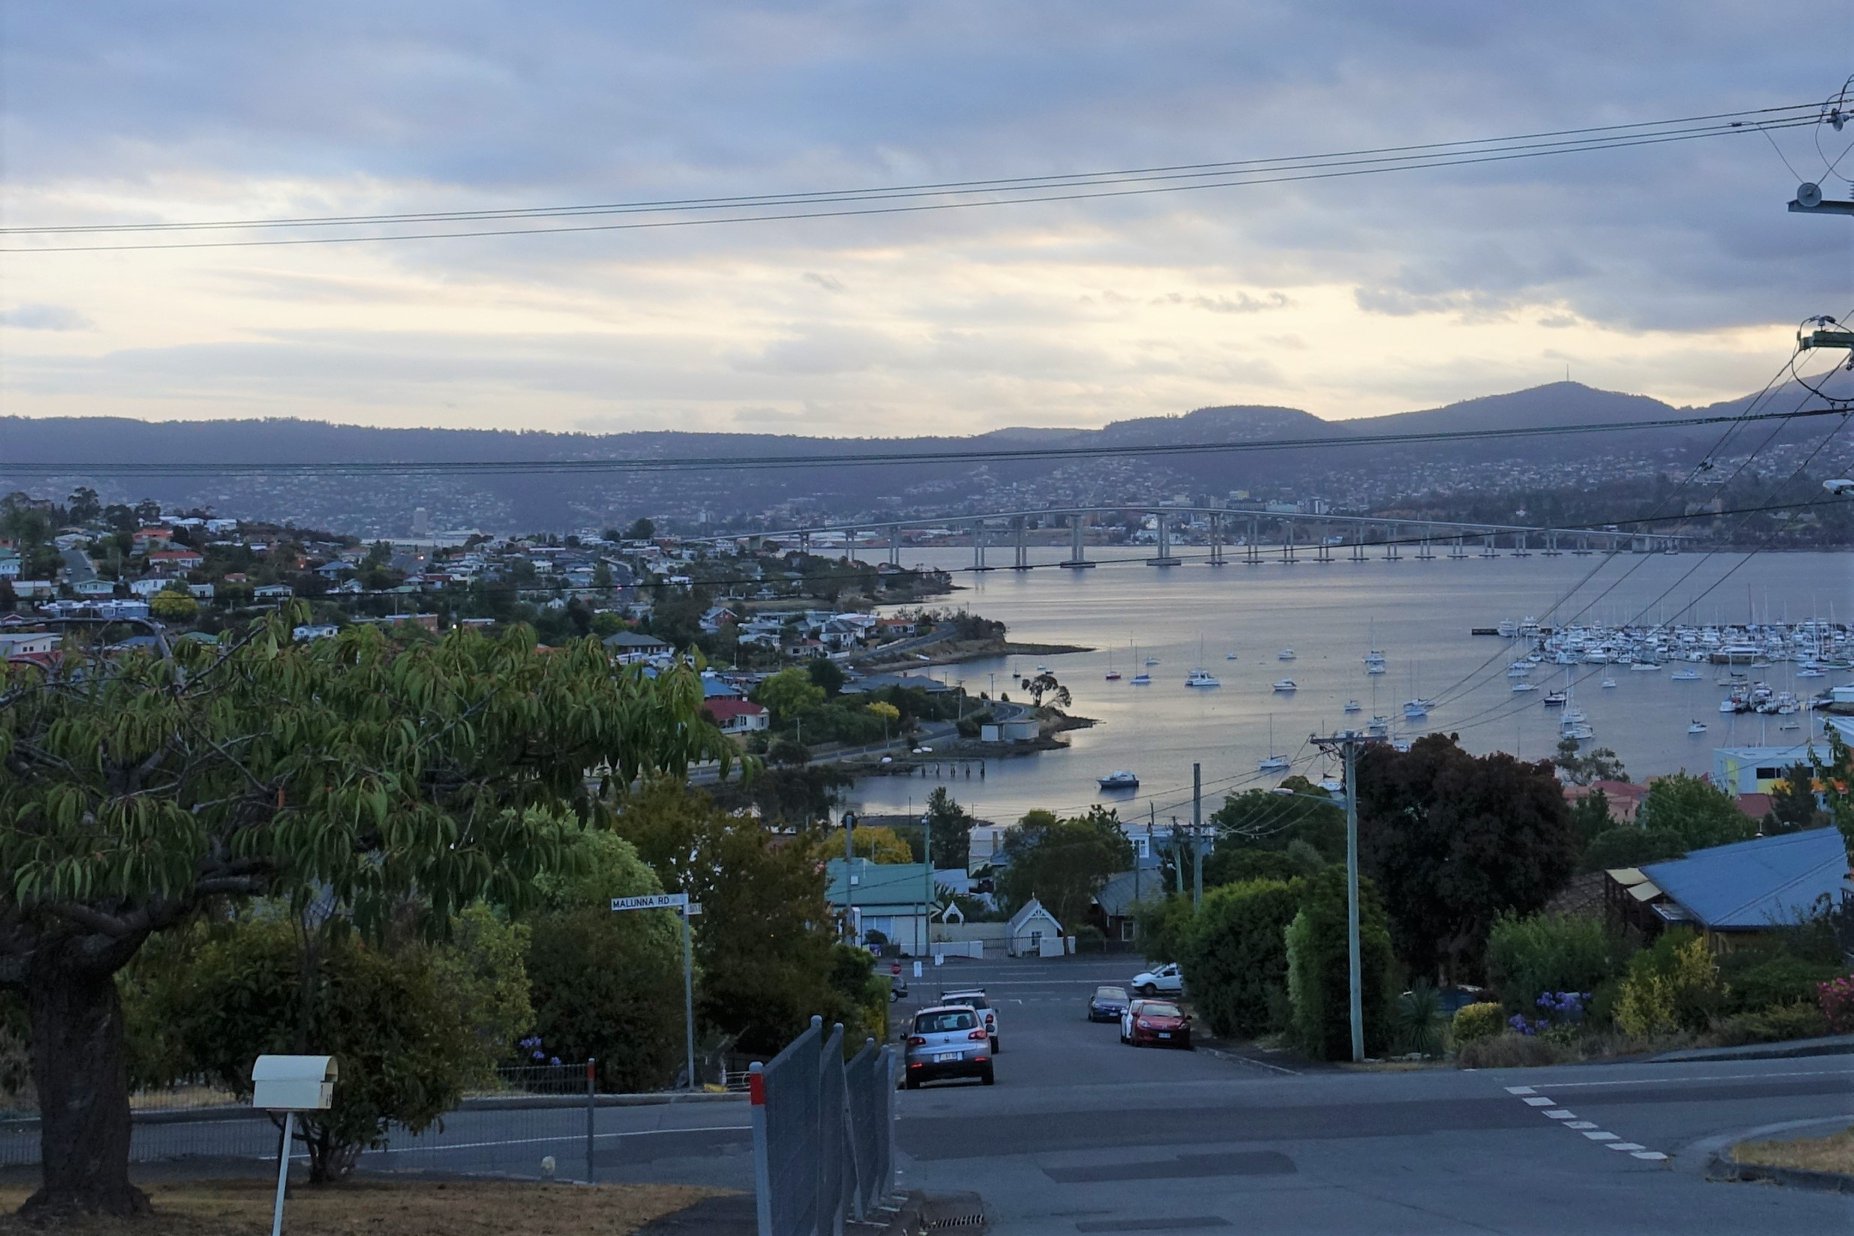
It took about 20 minutes to get to our accommodation, located in the suburb of Lindisfarne on Hobart’s Eastern Shore. It’s only about 6 km from the centre of the city, but you do need a car to travel across the water. This suburb didn’t seem very affluent, as the homes were quite small but they did have amazing views of the River Derwent.
We stayed in the Honeymoon Suite at the Possums Spa Apartments. It was quite private and relatively clean. For the price and it was quite reasonable, but it was a little dated. The bed was extremely comfortable, so I can’t complain too much.
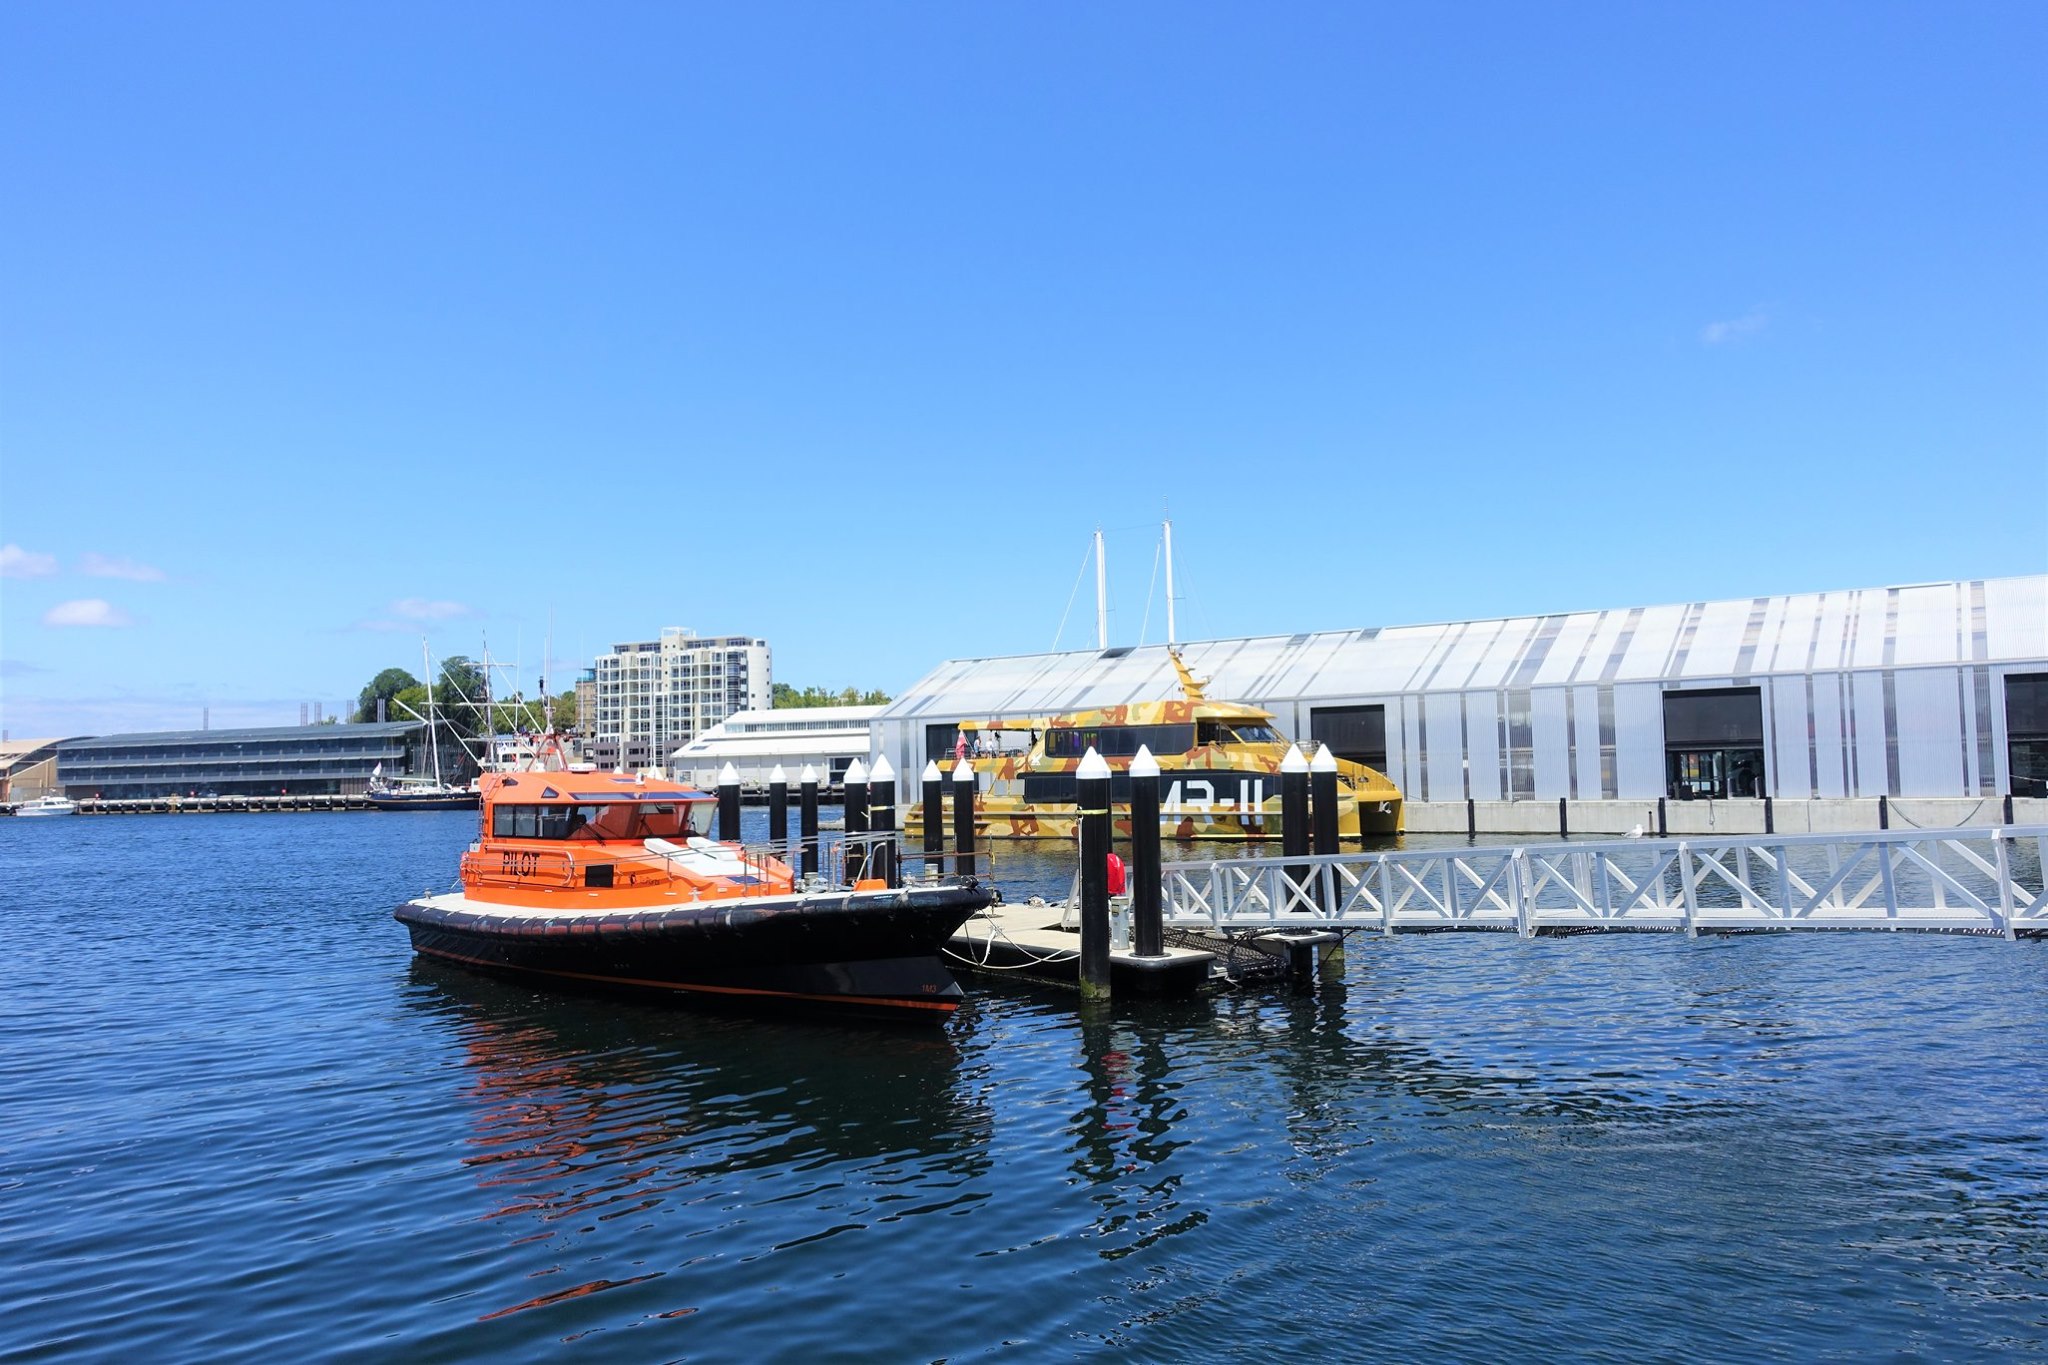
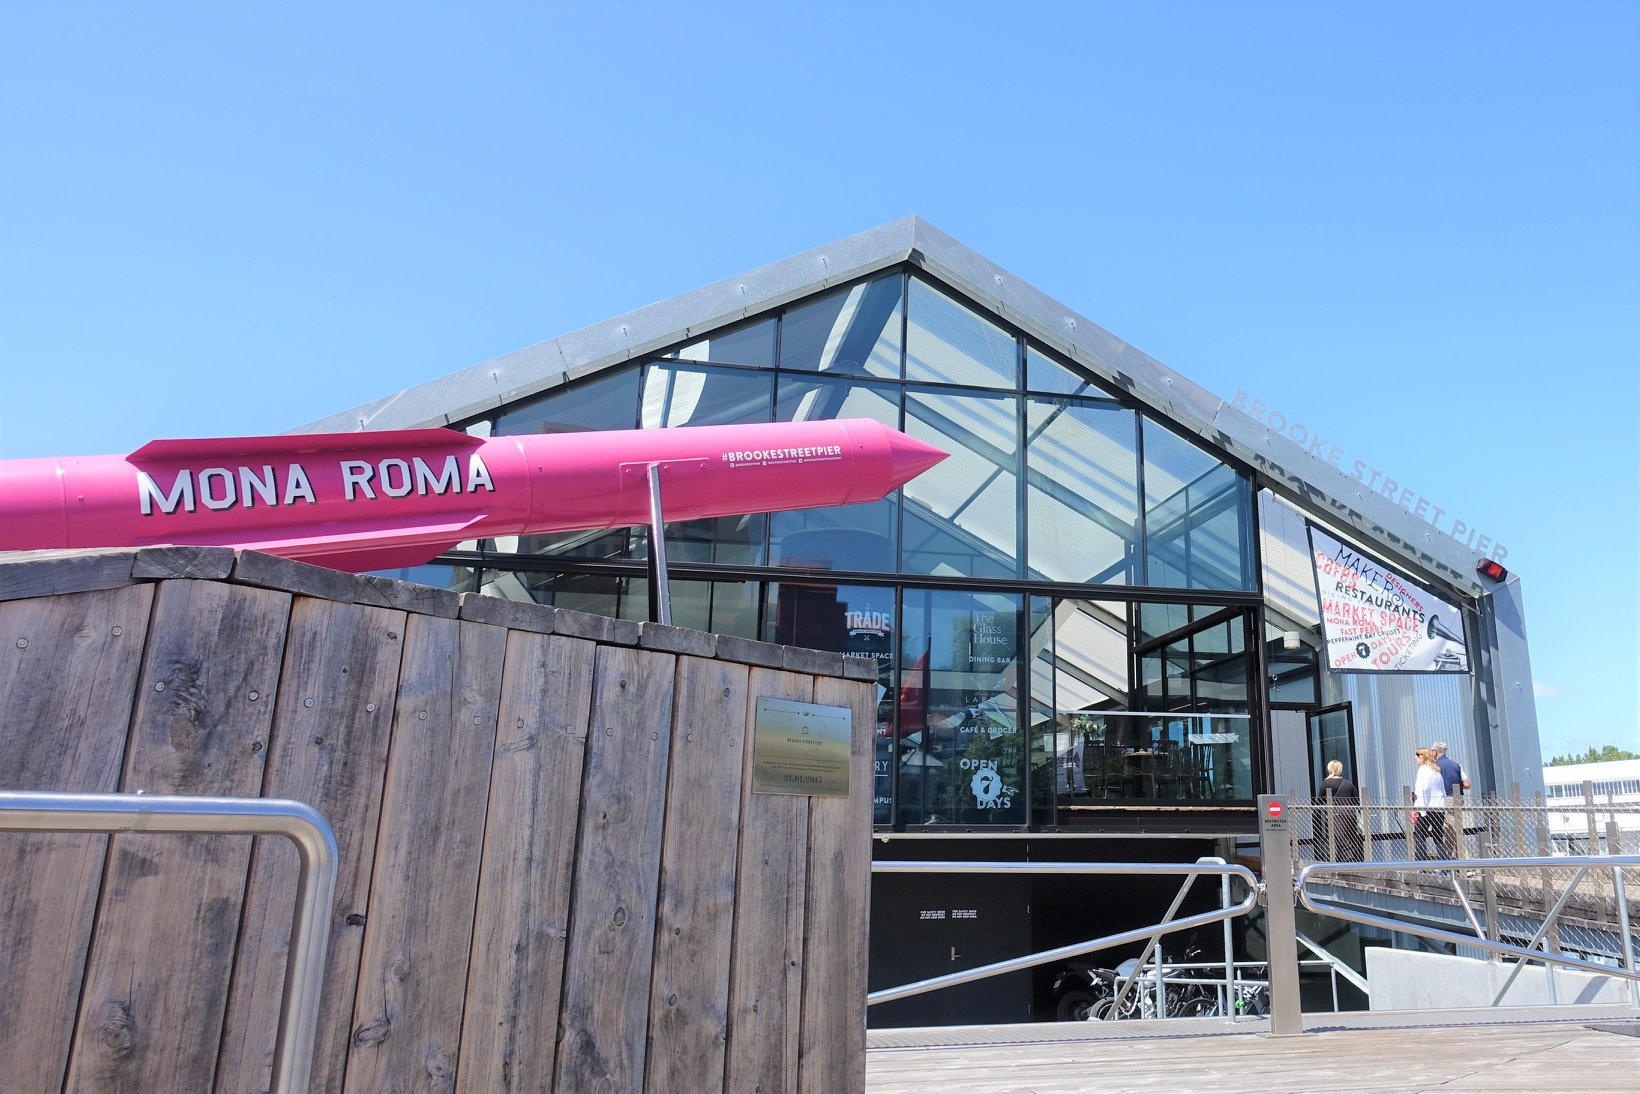
We were eager to drive across to the centre of Hobart to see as much as we could before everything closed. We parked on Franklin Wharf car park, just adjacent to Elizabeth Street Pier. There are quite a few dining options here. We had a little look but then decided to keep walking towards the Salamanca Markets. We did duck into the Brooke Street Pier building. Inside there are a few small stalls selling Tasmanian produce and tourism operators. If you are wanting to go to MONA Art Gallery on the Berriedale peninsula, you can buy your tickets for the ferry from here. The ferry itself is highly recommended on Trip Adviser. However, the tickets for the ferry and the museum weren’t cheap, so we decided to give it a miss on this trip.
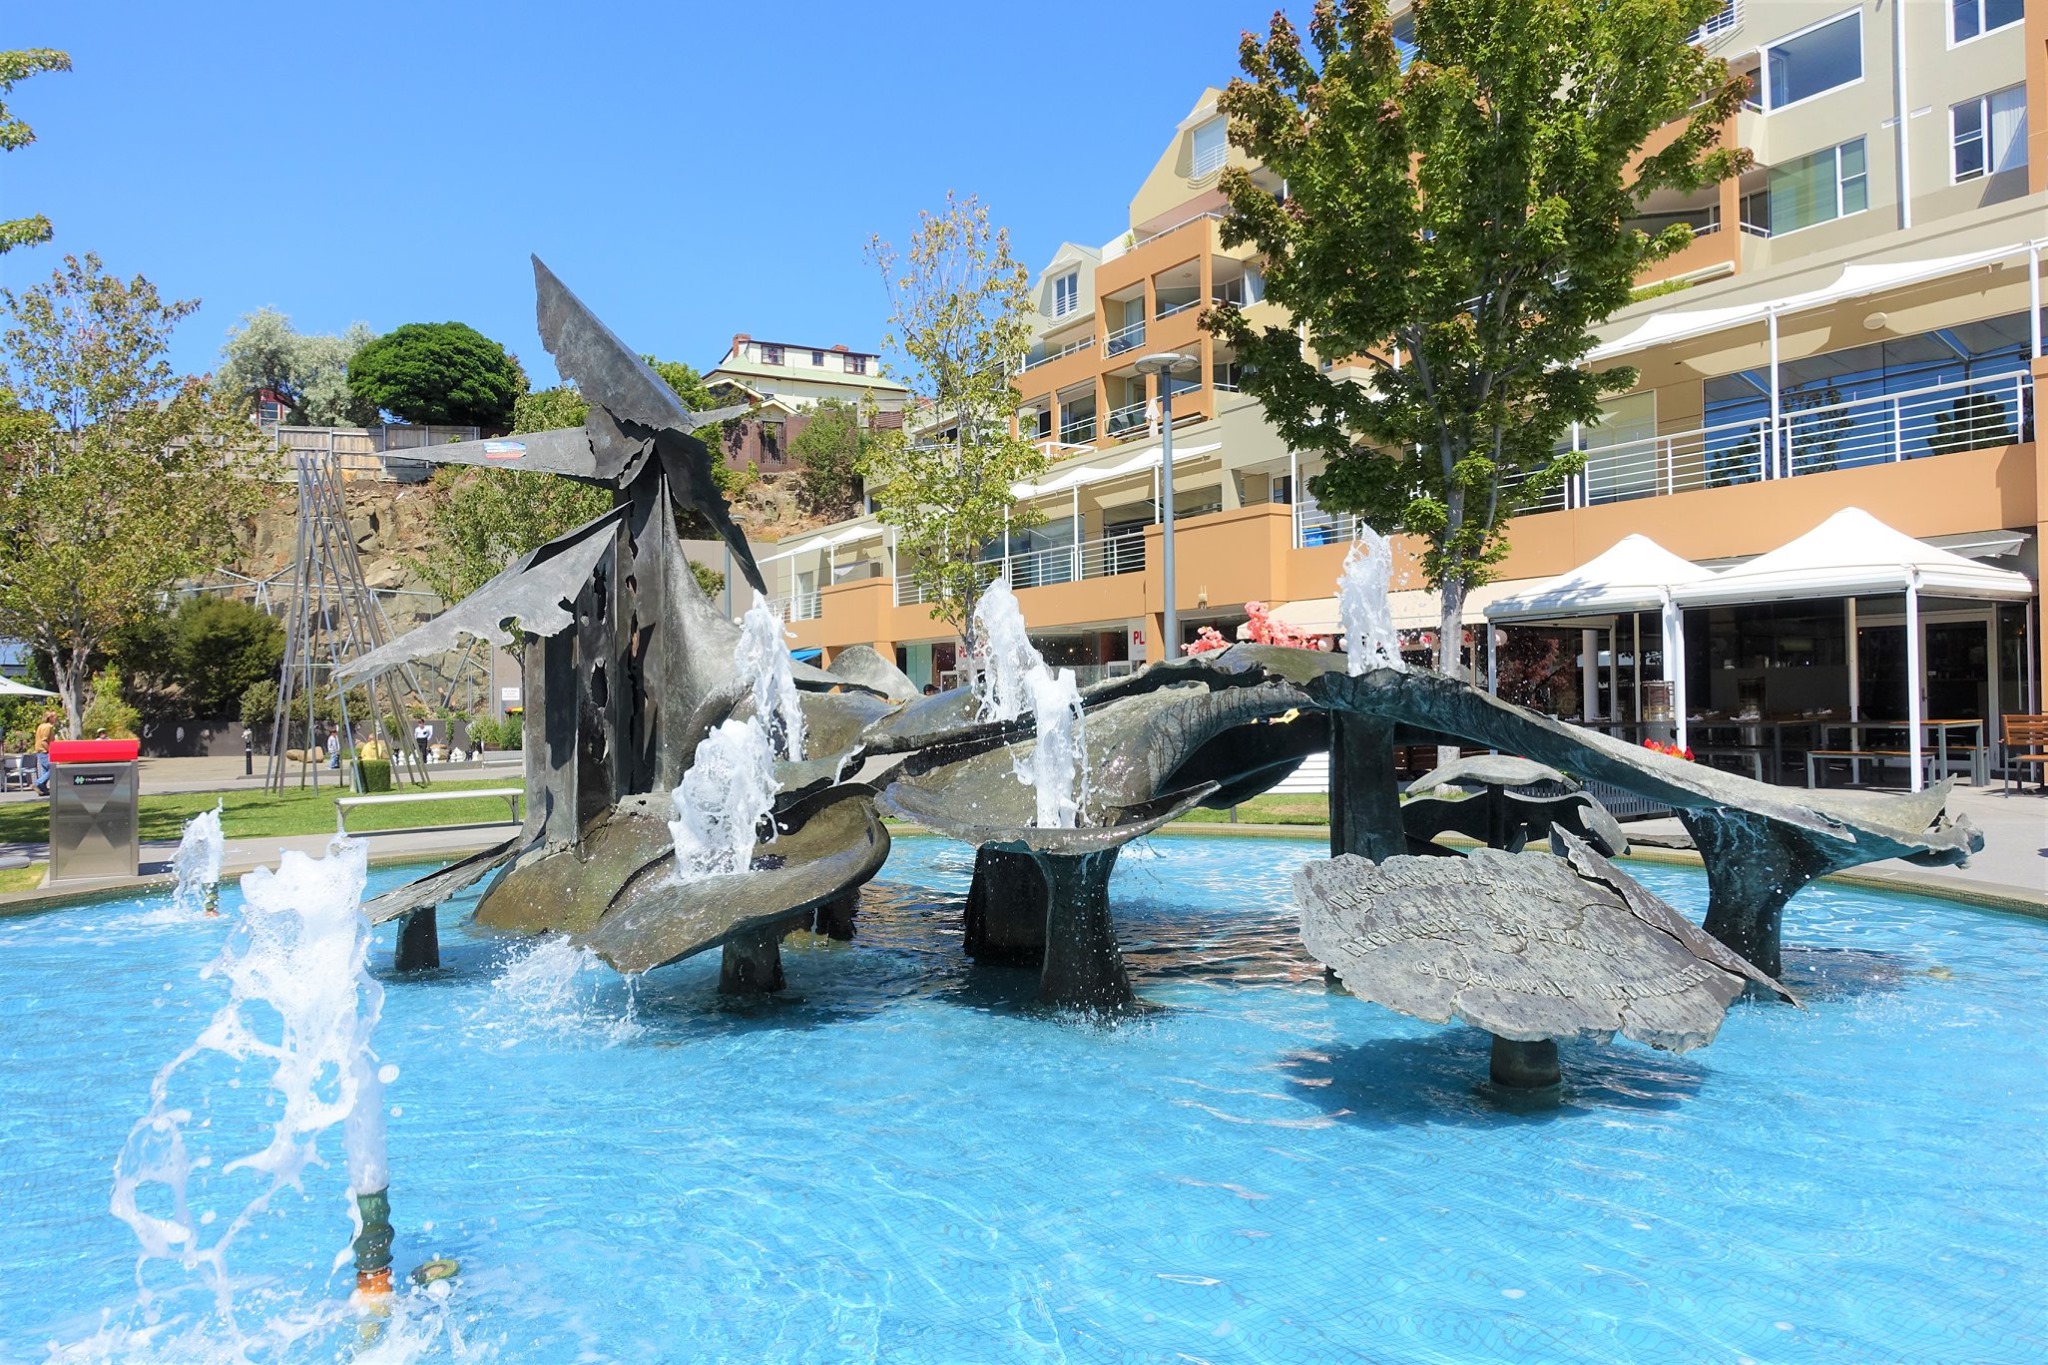
On our way to the markets, we crossed through the Parliament House Gardens. It overlooks the Parliament House of Tasmania, which is still used today and offers public tours on non-sitting days. The park itself is quite plush green space. Unfortunately, it didn’t have a playground, which would have been ideal for us. Between the gardens and the Salamanca Place, you can find the Tasman Memorial and Fountain (1988). It was designed by local sculpture, Stephen Walker and features a plinth of white rock with the Southern Cross overlooking a white concrete fountain with three bronze ships and a bronze sculpture of Abel Janszoon Tasman (1603 – 1659). Tasman was a Dutch seafarer, explorer, merchant and first known European explorer to reach Tasmania and New Zealand.
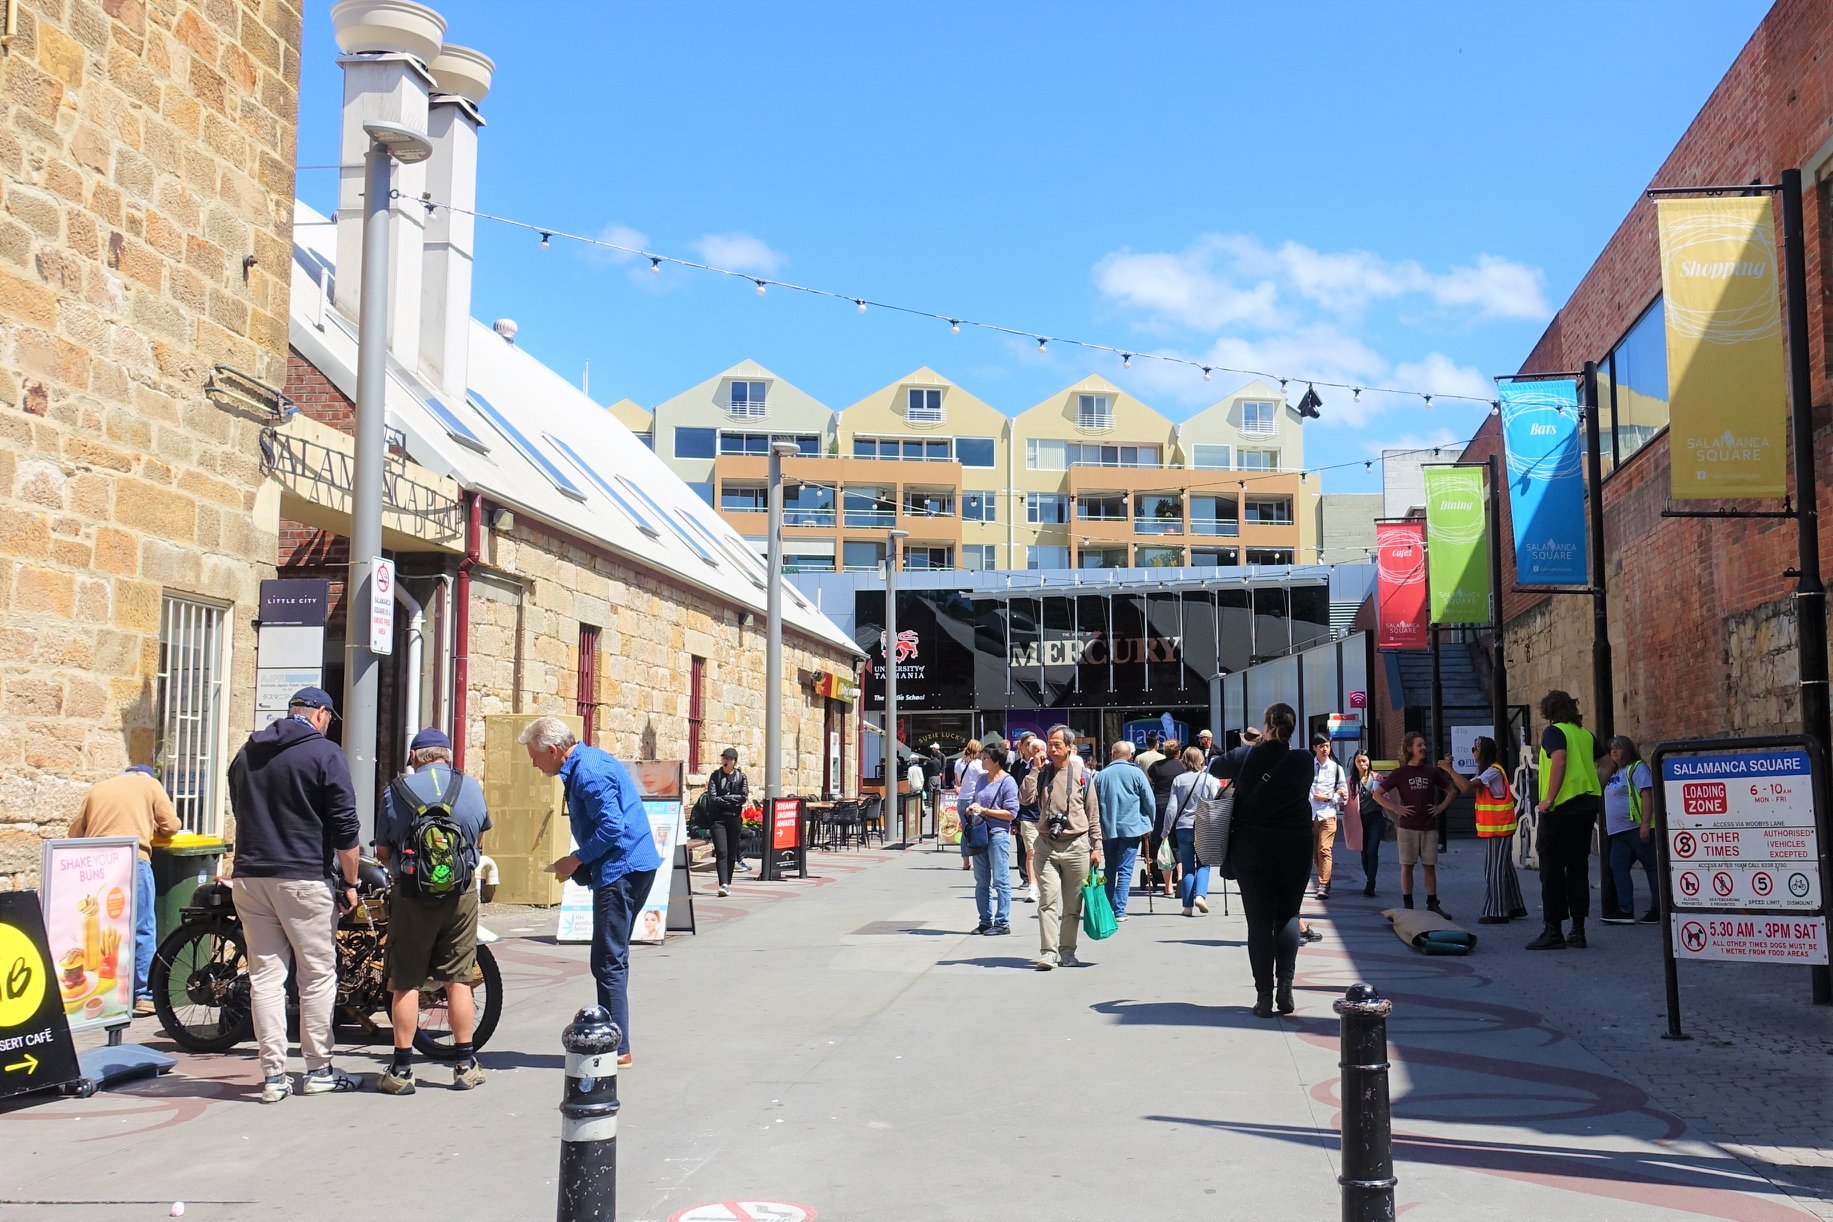
The Salamanca Market is located at Salamanca Place and operates on Saturdays between 8:30 am-3 pm. It is Tasmania’s most visited tourist attractions and features over 300 stalls of local Tasmanian fresh food and produce, handmade arts and crafts, clothing, antiques, beauty products, souvenirs and more. We didn’t have much time until closing, so we had a quite look around for some lunch. If you’re after something in particular you can see the Market map. We didn’t end up eating here today, but we did return for our lunch on our last day, which you will see in a few more posts.
Salamanca Place a precinct of Hobart and features a row of picturesque three and four-storey sandstone buildings and a square. These buildings were previously warehouses for the port of Hobart, but today it is home to a variety of restaurants, bars, shops, the Spacebar Gallery, Salamanca Arts Centre and the Peacock Theatre.
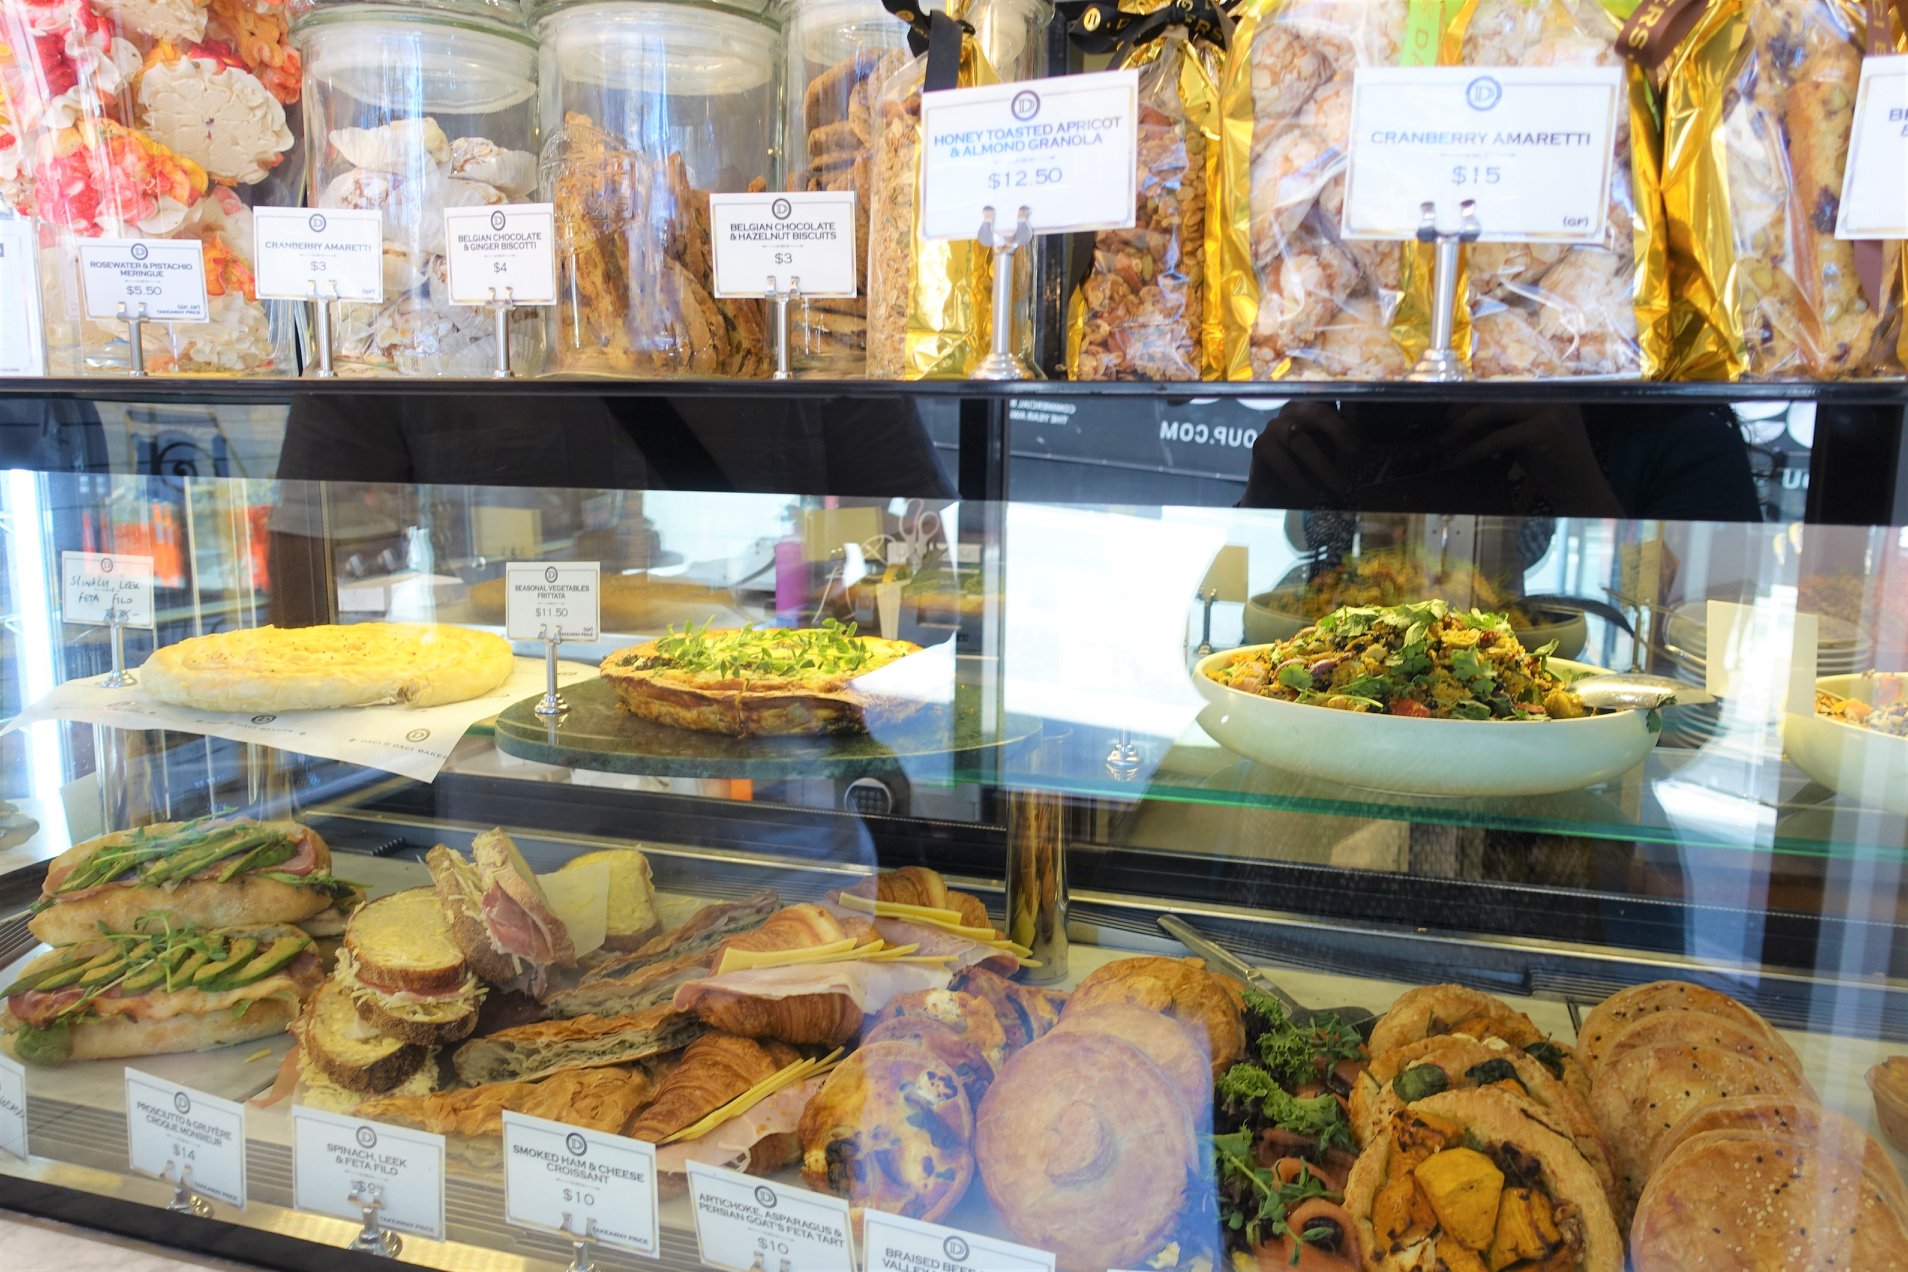
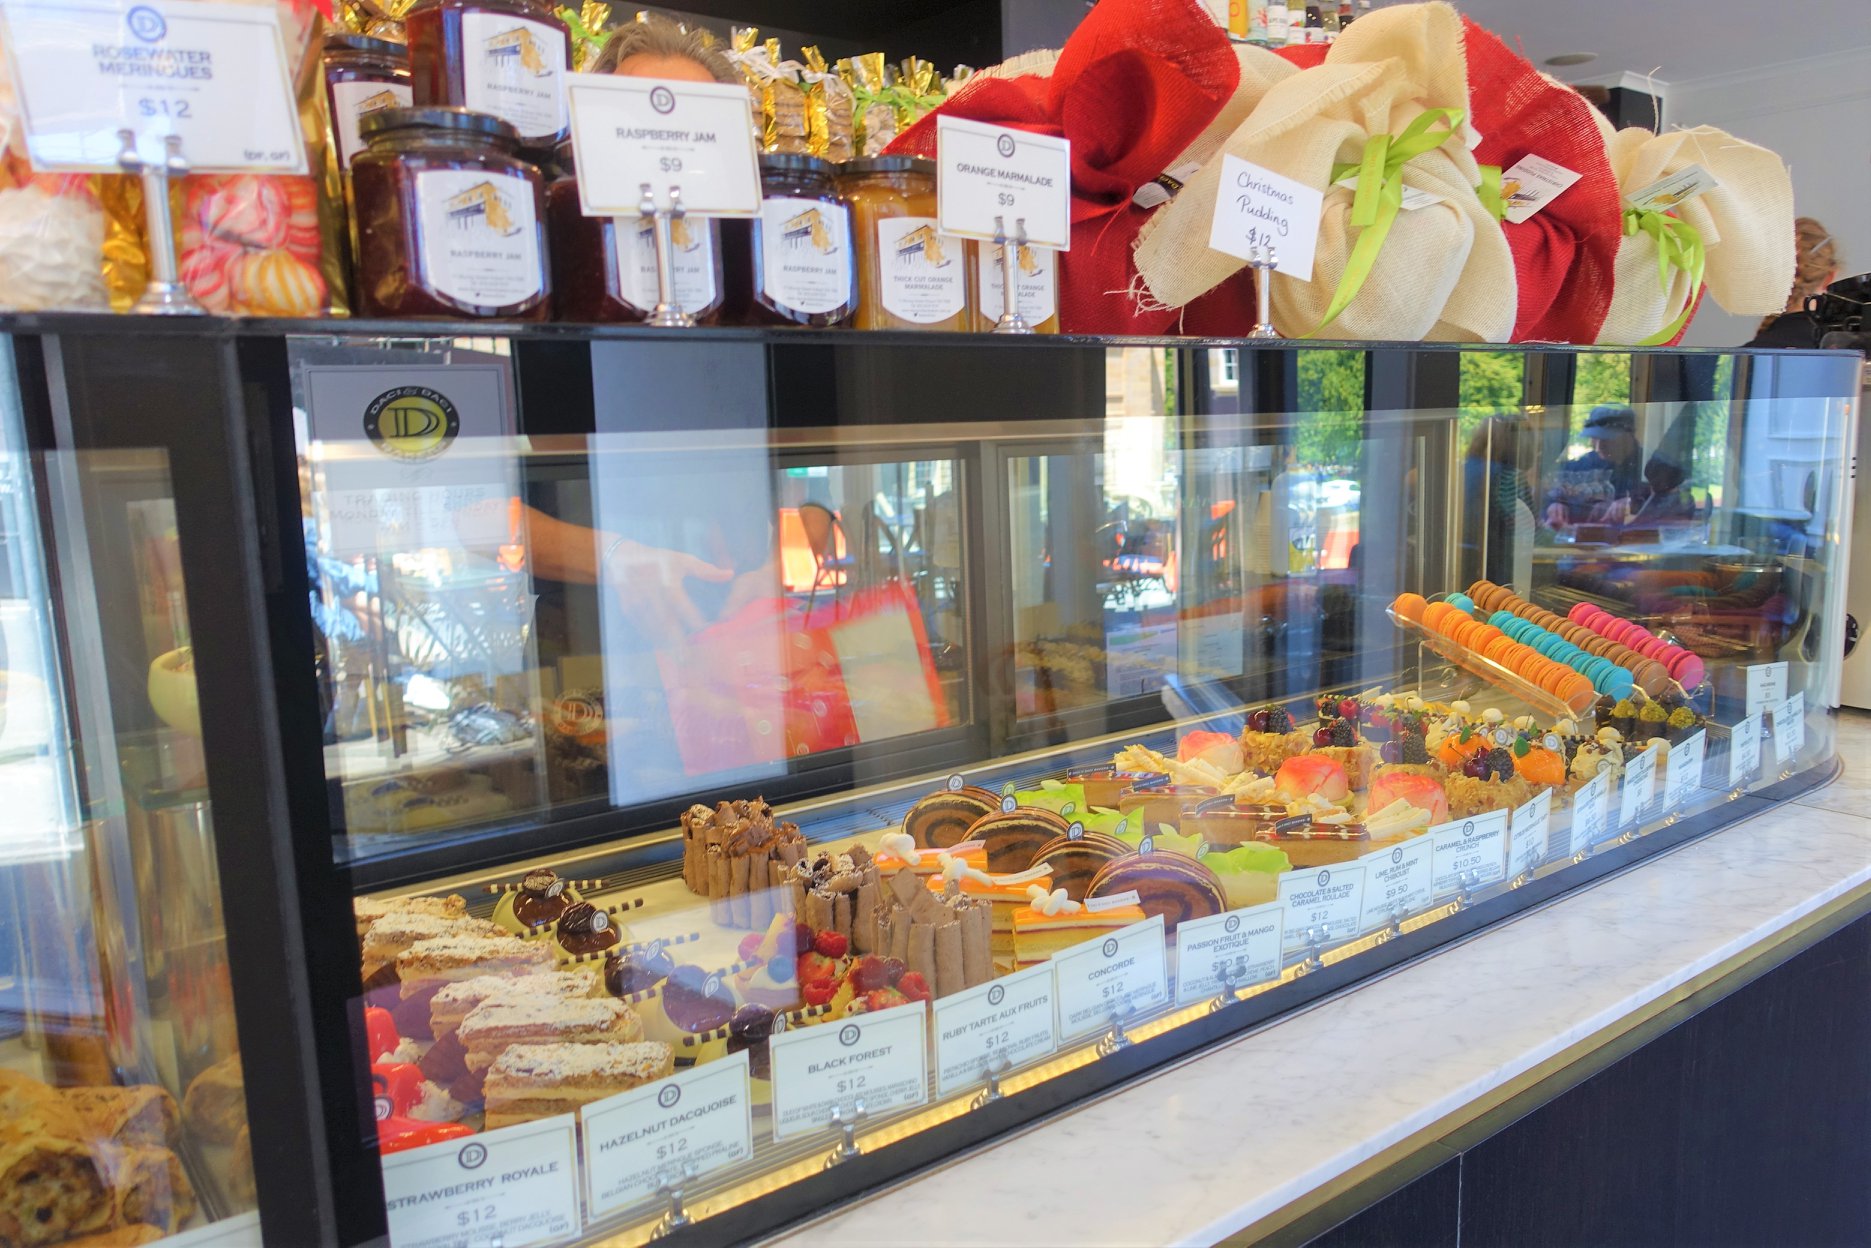
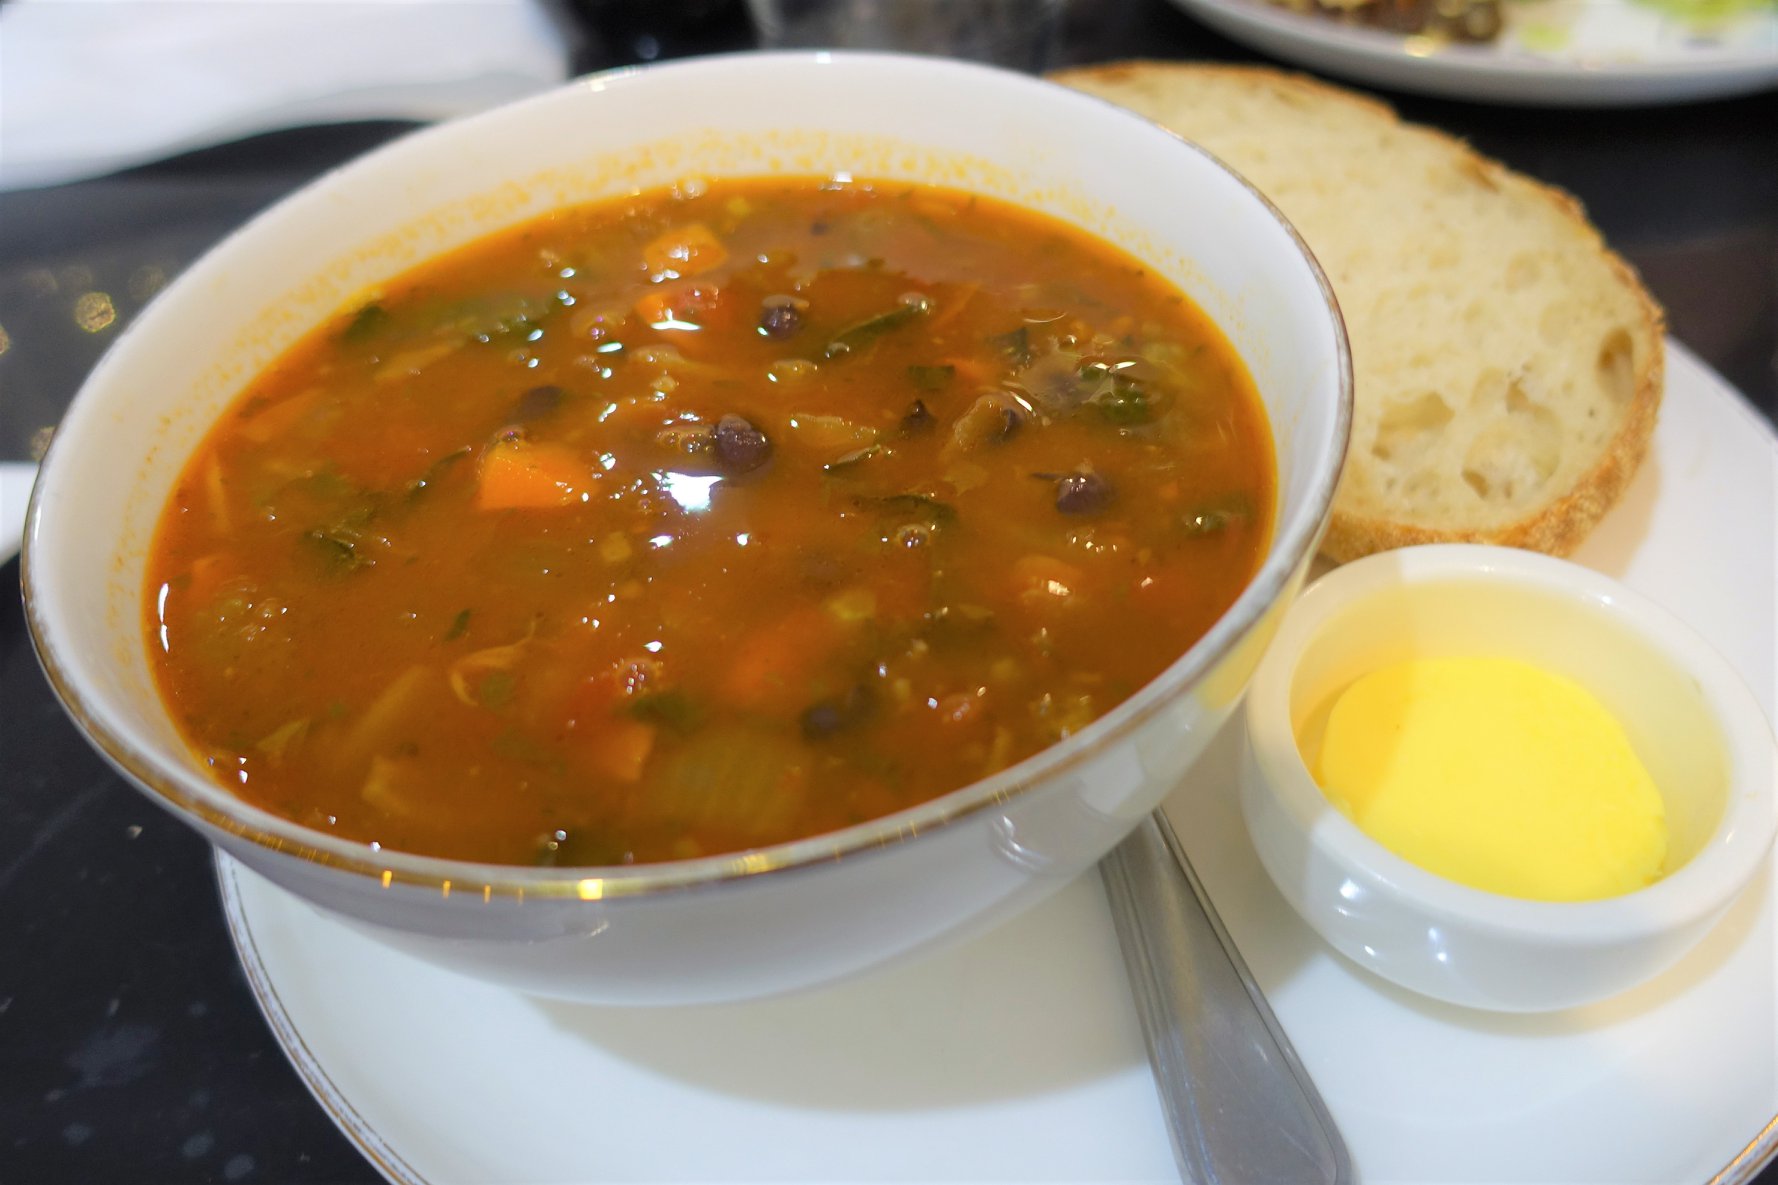
For lunch, I had planned to visit Daci & Daci Bakers, which is where we headed next. It is only a few minutes walk from Salamanca market. They have an amazing array of sweet and savoury pastries, cakes, bread, etc. Most of the menu is on display in the glass cabinets, including the breakfast and lunch dishes. Since I was pregnant I wasn’t about to order any of those. So instead I order the Seasonal soup, which was Black bean and vegetable soup and it came with house bread and farmhouse butter. Marco and Octavia shared a Croque Monsieur. After a bit of a wait due to some mix up, we finally got our meals. They were both pretty nice. My soup was exactly what my body needed and a good healthy start to this holiday.
Next, we wanted to visit Hobart’s inner-city laneways, which have been transformed into works of art. They were an initiative by the city council, called Love our Laneways. Many of these laneways are short cuts, which allow people a more scenic route, as they cut across town.
The first laneway we found was Harrington Lane. When we first arrived we didn’t see anything there, but once we walked around the corner a bit we came to this amazing Batman mural. Besides that there was a brightly coloured bird-inspired piece. These artworks were done by Tasmanian street artist and UTAS alum Jamin. He has produced murals across Tasmania, Australia and Internationally and won countless awards.
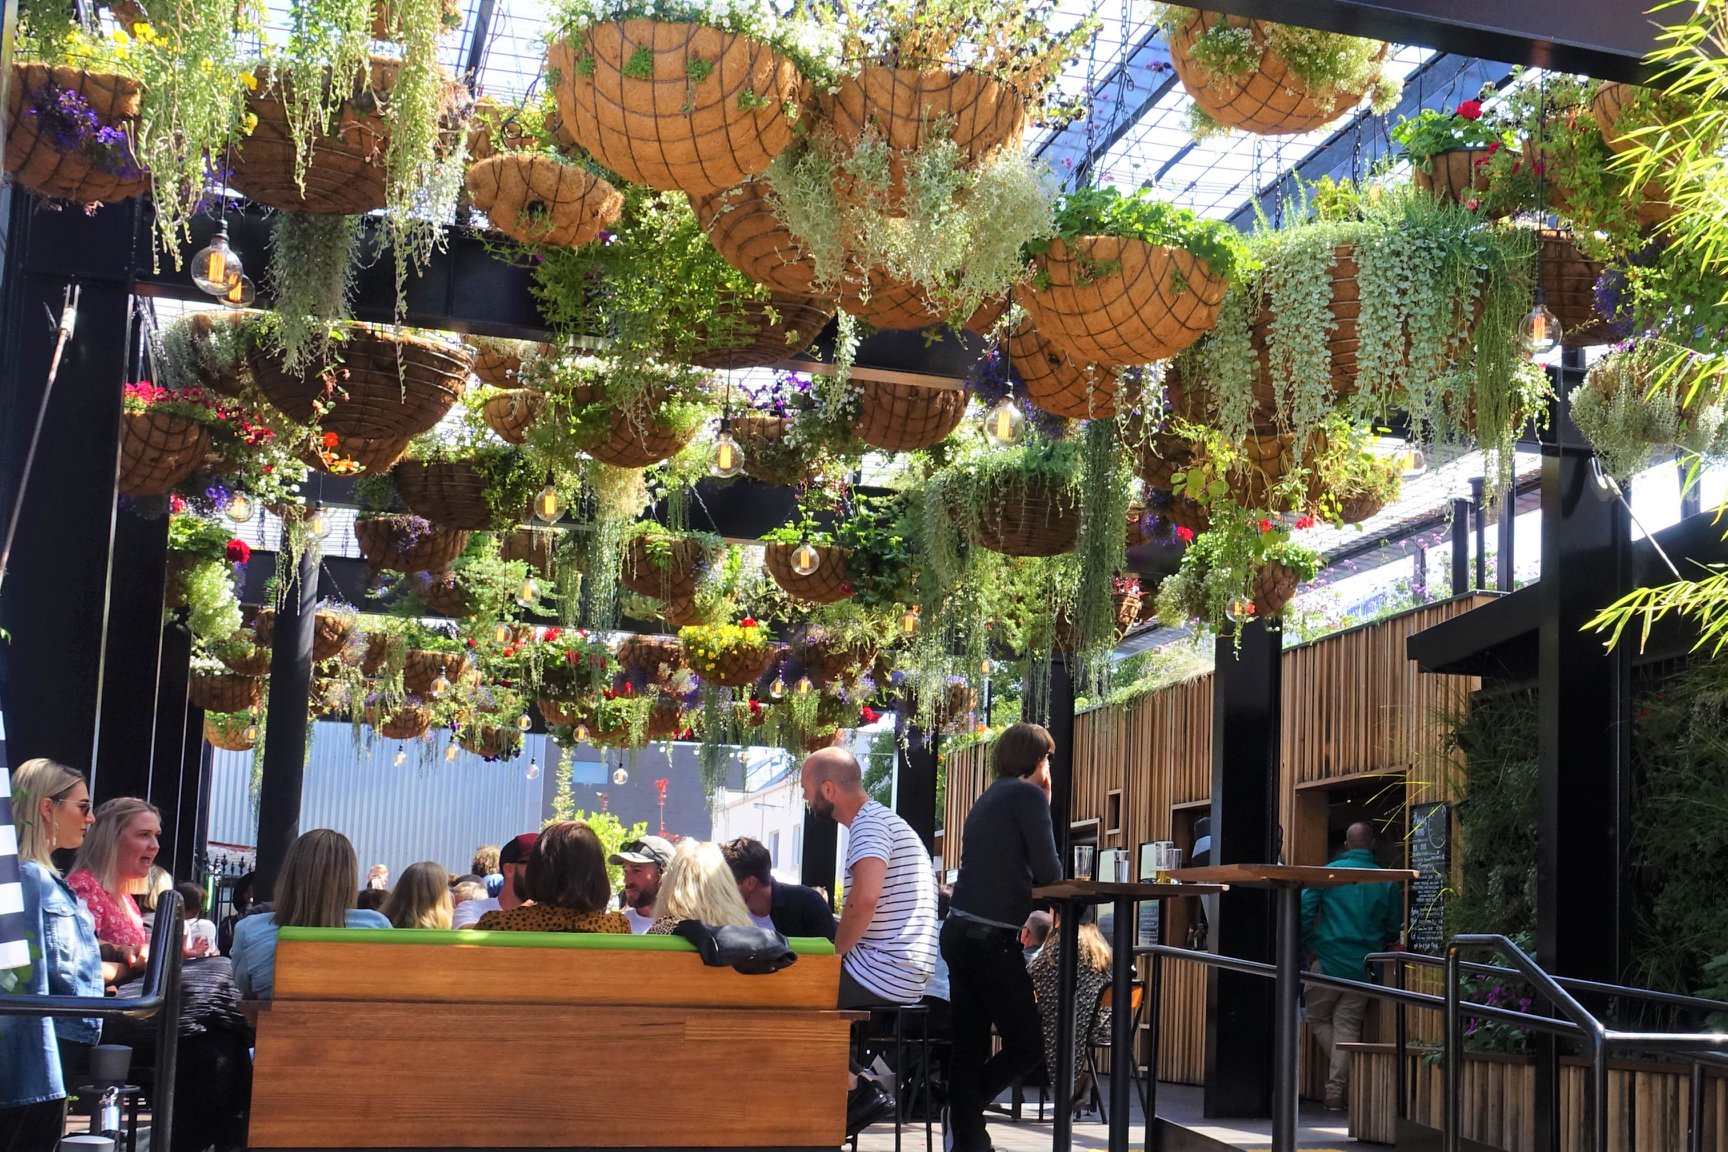
On our journey, we came across the little cafe Pilgrim Pies. This little slice of heaven offers pies, doughnuts and coffee 24-hour a day. We weren’t too hungry so Marco and I shared an Apple pie and O got a Strawberry glazed doughnut. Since the cafe was full, we went around the back to sit In the Hanging Garden. This area amazing little block is a beer garden with outdoor dining, bar and live music. There are two little restaurants offering Malaysian and Basque-inspired food.
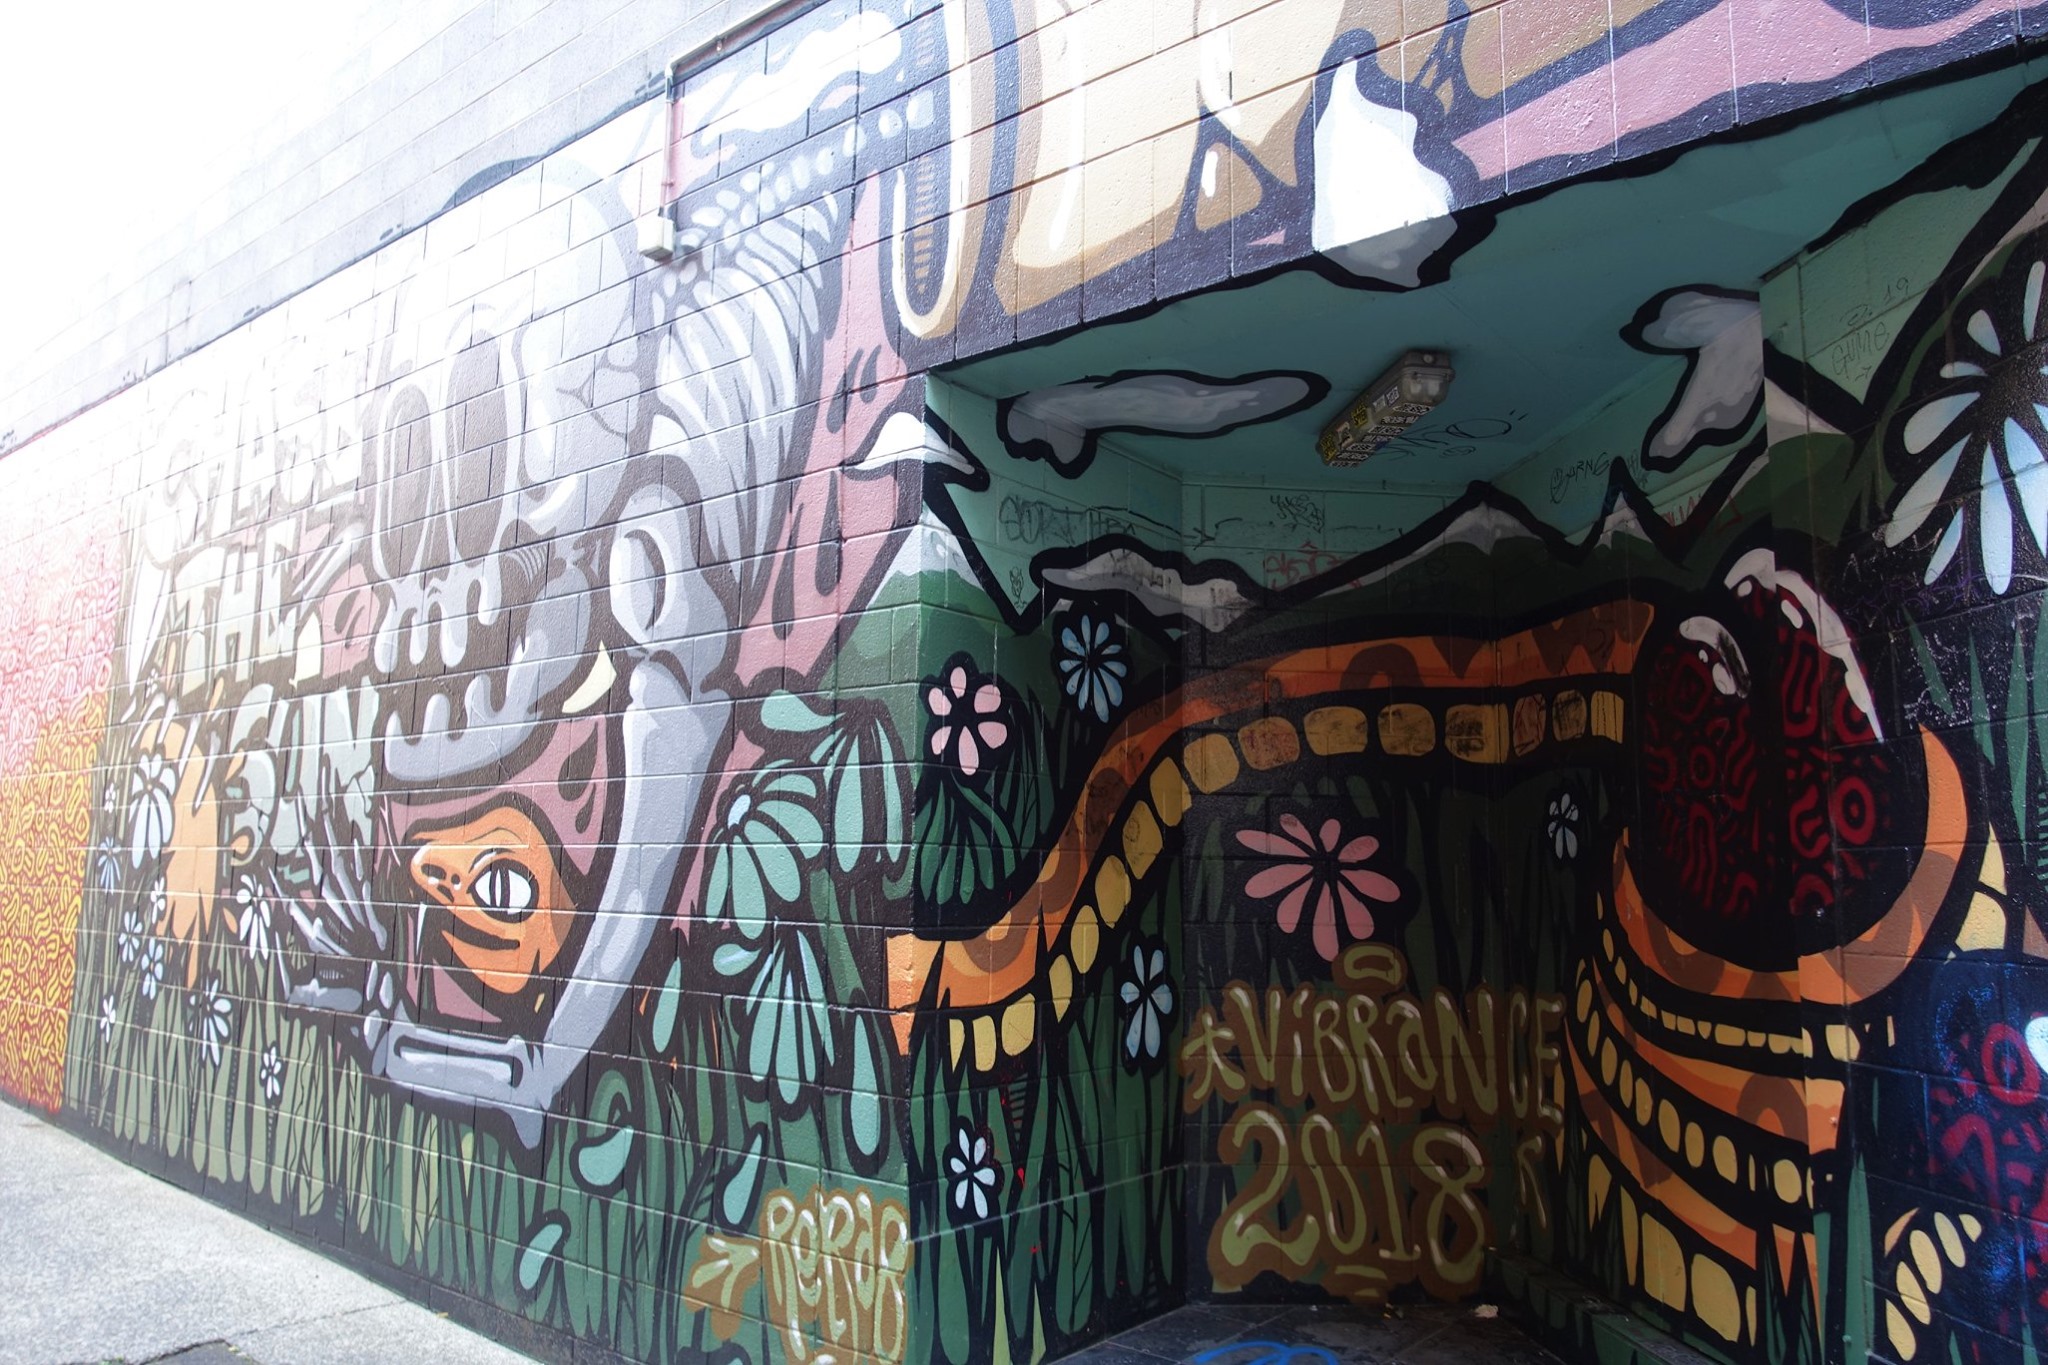
Next, we visited one of the most impressive laneways, Bidencopes Lane. It was previously a favourite place for street taggers but was transformed during the 2018 Vibrance Festival by over 20 different artists. Here you can find work by artists Jamin, Tom O’Hern, and Brain Foetus aka Laura McMahon, Tom Gerrard, Lukan Smith, Jonny Scholes, Seven, Sam Dobransky, Ling, Mimi, and Stormie Mills. This is probably the longest laneway I came across with the most work, so definitely one you should visit. I realized the following day that I hadn’t seen the entire lane when I came across the other end on Liverpool street. You can see the rest at the end of this post.
Finally, we found the city, but unfortunately, everything was just about to close. We did visit the Cat & Fiddle Arcade, which had a clock that plays an English melody when the clock strikes the hour. To be honest the city centre weren’t that interesting. The store fronts were quite dated and there wasn’t many interesting things to see. It did feel a bit like I had falling back in time when I consider how far Brisbane Queen Street Mall has come. We continued to walk as far as Franklin Square, but that was about it. I may have had a better experience if my daughter hadn’t been complaining the whole time that she wanted a Tasmanian devil, like the one she saw at the Salamanca markets. She was relentless and besides a cheap one I found in a tourist store on the mall, we didn’t come across another one. She would eventually get one a couple of days later after exhausting us.
Along Murray Street, we came across some mural in a between Micheal Hill Jewellers and Routley’s. The right side was commissioned to the local artists TOPSK by the Antarctic and South Ocean Coalition. It illustrates the marine animals of the Antarctic ocean ecosystem. TOPSK also painted the left side which, depicting the bees, wombat and Tasmanian devil. He is known as one of the godfathers of Hobart’s street art and has had his work regularly exhibited. Unfortunately, someone had taken a leak in here, so I couldn’t admire the works for too long.
Not far from Murray Street is another laneway, Mathers Lane. This laneway on a pocket park, which is also known as Mathers place. This work was also done by Hobart street artist and UTAS alum Tom O’Hern called Terraform. It was originally a black and white mural, but he later added colour.
After our big walk, we headed back to our accommodation to freshen up for dinner. I took these photos from Lindisfarne of Hobart’s Eastern Shore. It was so picturesque and much more beautiful in this light.
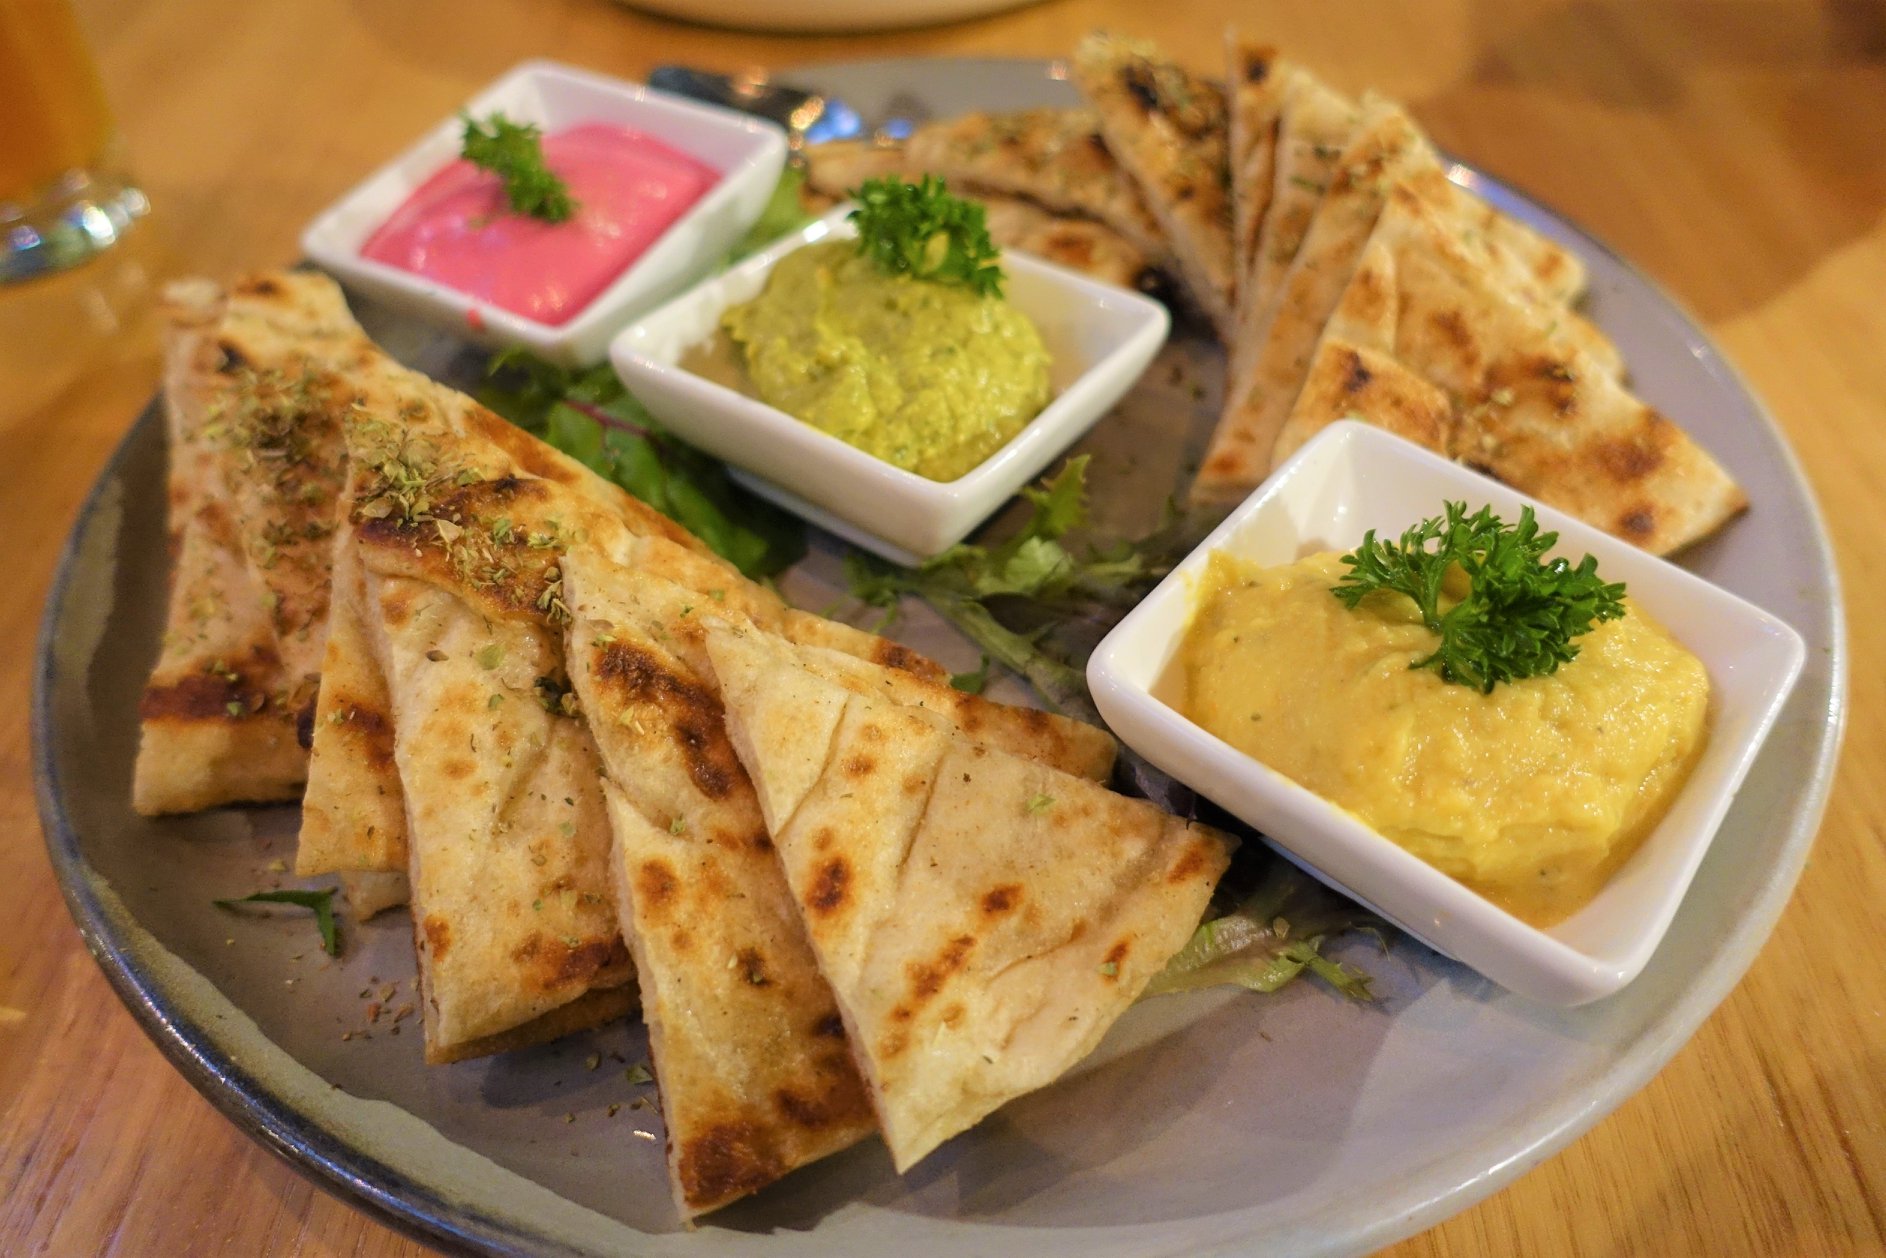
Our last stop for the night was dinner at Urban Greek. I did a bit of research before choosing this place and found that it was said to be one of the best if not the best restaurant in Hobart. We absolutely loved this place and would come back to Hobart just to eat here again. It was definitely the best meal we had on this trip.
We don’t normally order banquets at restaurants, but tonight Marco and I were eager to try everything. The waitress was very accommodating and made sure that all the dishes were pregnancy-friendly.
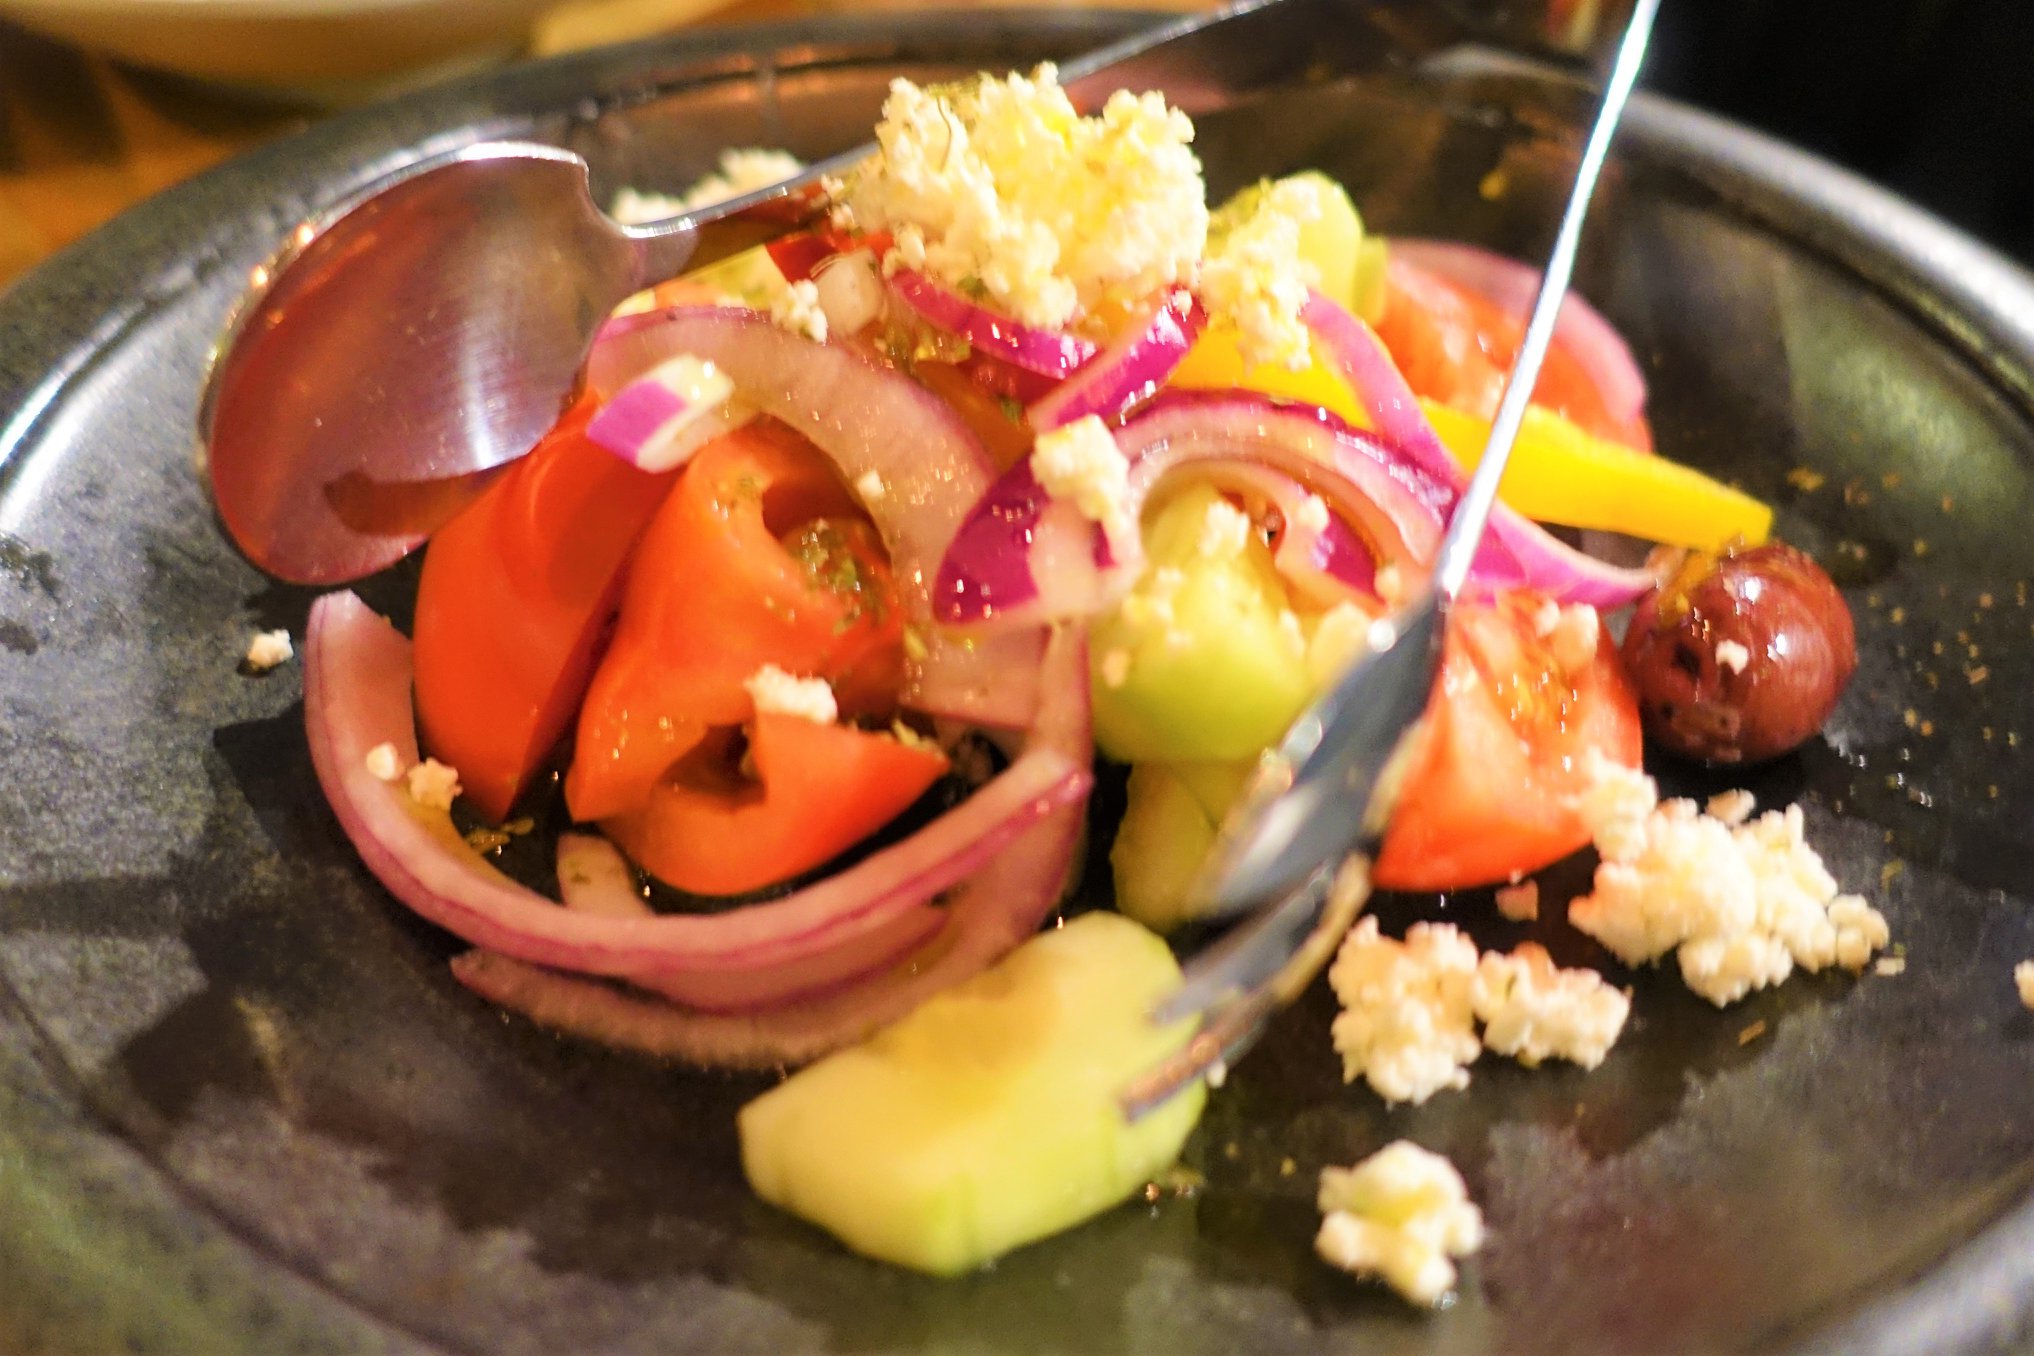
So we started off with Pita with Pantzari (beetroot & yogurt dip), Cretan Hommus and Fava (yellow split peas dip). Next, we had the Meze Plate of Dolmades and dill yogurt, Tirokroketes (cheese croquettes), and Kolokithokeftedes (zucchini croquettes). We already ate half this platter before I photographed it and all of the 3rd course which was the Saganaki Cheese served with homemade jam. After that, we were had the Soutzoukakia (Greek Meat Balls) and Cretan Village Salad, followed by the Cretan style Lamb & Chicken with Lemon Roast Potatoes. While we consumed all this delicious food, Octavia enjoyed her child meal of Cretan style Chicken lemon potatoes, pita and yogurt, as well as a few bits and pieces of our meal.
For dessert, our banquet came with Galaktoboureko (Greek Custard pie) and Octavia had some complimentary ice cream. The cake was amazing and a nice sweet end to the night.
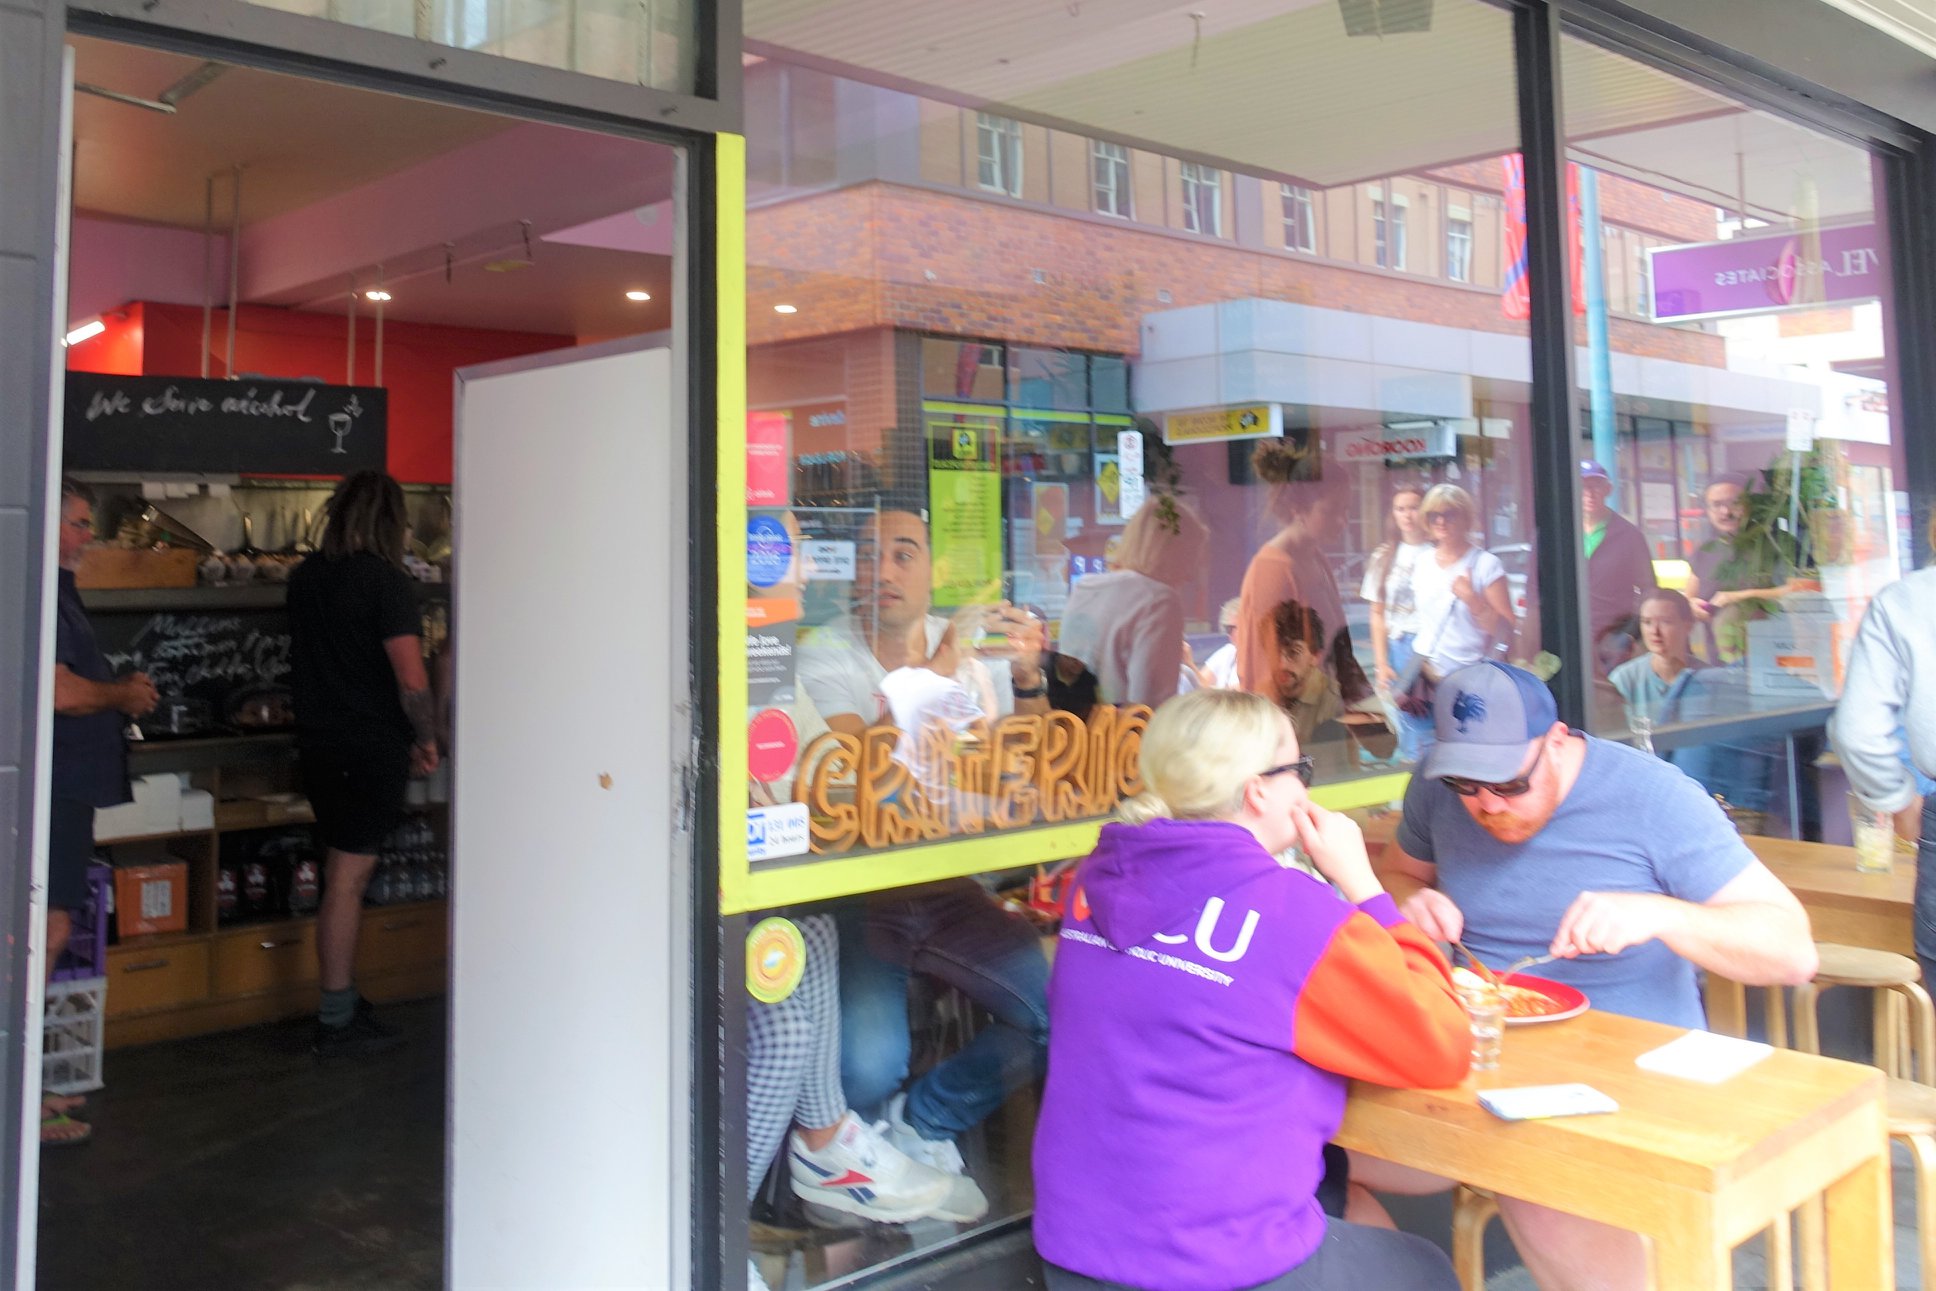
The next day we woke up bright and early and ready for breakfast. There are so many amazing brunch spots in Hobart. A place that is known as one of the best brunches in Hobart is Criterion Street Cafe. It was also one of the most reasonably priced. They offer a variety of breakfast and lunch options, including eggs, waffles, salads and sandwiches. Although they didn’t have a kids menu, they did offer half-size portions for little people or smaller appetites.
I ordered Aunt Mabel’s Porridge, which had rhubarb compote and apple crumble and Orange juice; Marco had the French Toast (three cheese, dijon mustard, caramelized onion, pancetta, roasted tomato and rocket and a cappuccino; and O had eggs on toast. My porridge was amazing! It was so creamy and decadent. Marco’s french toast was also out of this world, well the tiny bit he let me try. Octavia was the only unsatisfied one. She was a bit upset that there was pepper on her egg and was just in a general mood about not having a Tasmanian devil.
On our way back to the car I spotted some more street art just off 162 Liverpool Street. This actually linked to Bidencopes Lane, which we had seen yesterday. At the beginning, it features the Trapdoor by Jade Pollard, which was inspired by the 1990s TV show. There is also murals by Ling, Mimi, Sam Dobransky, Pichu, Rebak mail, Kreamart, Kannina Langford and more.
It was now time to leaving Hobart. We had to travel to our next destination of Queenstown, which is where I will take you on my next post. Hope you enjoyed getting a snapshot of Hobart!
Hi all, I trialled a new recipe this past week for my daughter and I am happy to say it was a success. She loves broccoli, but you still never if she’s going to eat it if I’m not there. I tried them for afternoon tea and then again for her school lunch and she ate them no problem both times. Her dad also loved it, so I thought I better share this recipe.
I adapted this recipe from Baked Cheddar Broccoli Tots by Sabrina of Dinner then Dessert. I never intended on altering the recipe but made a few minor changes to suit my family and my style of cooking. Firstly, I blanched the vegetables instead of microwaving them. I don’t have a microwave in my kitchen. I don’t like using them at all. We do actually have one, but my partner has to go into the garage to use it on occasion. I prefer to use my stove or a small oven. I also added fresh grated carrot, red onion and Nutritional yeast. My family are more accustom to these ingredients and the Nutritional yeast gives a nice cheesy taste with extra health benefits. I also preferred to use my homemade breadcrumbs, since the panko crumbs and other breadcrumbs in general from the supermarket, are full of nasty ingredients. My homemade breadcrumbs are so quick and easy to make and they really do makes a difference the flavour of anything I add them too. They are also not so dry, so I don’t need to add spray oil to whatever I coat them in. Lastly, I had to add a little olive oil, as my batch of tots were way too crumbly. The oil made them lovely and moist and probably helped brown better when baking.
These tater tots are delicious on their own, but they also pair well with a good quality tomato sauce. They are perfect for lunchboxes, kids meal, appetiser or as party food. They also freeze well. If serving them re-warmed, I recommend placing them in the oven or air-fryer for a few minutes. This will keep them crisp, opposed to the microwave, which seems to make things soggy.
Broccoli Cheese Tater Tots
(nut free, gluten free option)
Ingredients:
2 cups of broccoli florets, don’t include hard stems
1/4 cup finely grated carrots
sea salt
1/4 cup red onion, diced
1 cup good quality store-bought or homemade bread crumbs (sourdough, garlic, lemon zest, sea salt), or use gluten free breadcrumbs if you prefer.
1/2 cup organic shredded cheddar cheese or other shredded/grated cheese
2 organic free-range eggs, lightly beaten.
1-2 tbsp Nutritional Yeast
1 tbsp extra virgin olive oil
Method:
Preheat the oven to 200 degrees and prepare a baking tray with parchment paper
Place broccoli in a small pan with a tiny bit of water. Cook for 2 minutes, add a pinch of sea salt and add carrot and cook for 2 more minutes. The broccoli should be tender and bright green in colour.
Strain the broccoli and carrot in a fine mesh strainer and press lightly to remove any excess water and allow to cool a little.
Place the broccoli and carrot mixture on a chopping board and mince, so that the broccoli is in smaller pieces. Then add to a large mixing bowl.
Add red onion, bread crumbs, cheese, eggs, nutritional yeast and olive oil. Mix until combined
Take about 1 tbsp size of the mixture into your hand and squeeze into a tater tot shaped ball and place the baking tray.
Bake for 7 minutes. Remove from the oven, turn the tater tots. Return to the oven and bake for a further 7 minutes.
*Makes about 26 tater tots
*If freezing, wrap in small batches in an airtight bag or container and defrost overnight. If you want to serve them hot, reheat in an air-fryer or small oven. Serve immediately or place in a thermos.
Hi all, I hope you’ve had a good start to the week. Today I have a recipe inspired by another that I really wanted to cook, but lacked the main ingredients. This happens to me all the time because I’m not great at planning when I’m food shopping. I have a standing order for fresh fruit and veg that is delivered weekly. So when I go to the supermarket I don’t think about recipes to try or create. I just want to get in and out of there.
More recently, my favourite book is Dinner: Changing the Gameby New York Times food editor, Melissa Clark. This book is fantastic to elevate your usually diner fare. Most recipes don’t require too many ingredients and more often then not, I have the same or similar ingredients on-hand. So the recipe I was inspired by was Tomato-braised White beans with Chorizo. Since I had no white beans, chorizo, fresh herbs or canned tomatoes, I tried to elevate a couple of cans of baked beans. I love baked beans, but the healthier, BPA free ones are often really flavourless. I end up having to add more salt, sugar or maple syrup when I cook them for breakfast or I get complains that they don’t taste like Heinz. I have been curious for a while what I could add to my baked beans to make them a more complete meal. So what eventuated tonight was a delicious stewed, with a few more simple ingredients and a lot of flavour. It went perfectly with the Skillet Brown-Butter Cornbread, also from the same book. Luckily I had everything ready to go for that recipe.
For this recipe, you can alter the vegetables for what you have on hand. You can also make it vegetarian by omitting the ham for a vegan ham or just leave it out completely. You can also add more sweet smoked paprika if you like that smokey flavour. Cornbread goes really well with this, but keep it more savoury because this stew is quite sweet. Alternatively, you could have it with crusty bread or mash potatoes. My partner loved this recipe for the sweet and savoury flavour of the stew and the buttery cornbread. My daughter wasn’t so sold, because she likes her dinner completely savoury and her ‘cake’ sweet. My child does not like sweet potatoes, peas, carrots or any other sweet vegetable or sauce. I think her biggest gripe was that the cornbread was not a sweet cake and contained corn. However, I know three other young cousins who love sweet vegetables and cornbread. So this may be a better dish to make for them when they visit.
One-pot baked bean stew
(gluten free, nut free, vegan option)
Ingredients:
2 tbsp olive oil
150 g organic/free range leg ham (nitrate & gluten free) or vegan ham substitute (optional)
1 onion, diced
1 large carrot, diced
2 stalks of celery, diced
1 small red capsicum, diced
2 cloves of garlic diced
1 tbsp tomato paste
1/2 tsp ground cumin
1/2 tsp ground smoked sweet paprika
2 cans organic baked beans (BPA and gluten free, no added salt – I used Absolute Organic)
1 can-full of filtered water
1/2 tsp sea salt or more to taste
1 tbsp pure maple syrup
1-2 handfuls of baby spinach
Method:
Heat olive oil in a large pot and place on medium heat. Then add ham and cook for a few minutes until it starts to brown. Removed the ham from the pot and place in a bowl to the side.
Then add tomato paste, cumin, and smoked sweet paprika to the pot. Cook for a few minutes until it becomes fragrant and be careful not to burn it.
Immediately add onion, carrots, celery, red capsicum and garlic. Cook for about 5 minutes or until the vegetables start to soften.
Then add baked beans, a can full of water and salt. Bring the pot to a boil, then turn down to a simmer and add the ham and maple syrup. Cook for 25-30 minutes, to allow the stew to thicken.
Take off the heat and stir through the baby spinach. Once it has wilted you may serve.
Hi all, hope you had a wonderful summer holiday. Since my last post, we did our road trip in Tasmania and got through our first week of Prep. I have been so pumped up, getting up around 4-5 am. I’ve never been an early riser, but these pregnancy hormones are making me a bit of a Stepford wife. I don’t think I’ve ever been so productive in the home, but I have been getting a little burned out by the afternoon. So I’ve been a bit slow to get back to blogging and colouring. On the bright side, my fridge and freezer are loaded with healthy meal prep for everyone.
I spent most of last week preparing healthy homemade goods for my daughter and partners lunches. I’ve made chicken and veggie sausage rolls, baked chicken nuggets, spinach and feta scrolls, chicken and veggie meatballs and mini banana blueberry cupcakes. My little family really loved all of these homemade baked goods, but I didn’t think to photograph and take notes of my creations. However, I just prepare a healthy kid-friendly quiche that was also a hit with the family, so I took a few pictures before it was all gone, so I could share it with you all.
This quiche is really quick to prepare. It only took me about 10 minutes to put together before baking. It is perfect for a lunchbox, quick dinner or meal prepped breakfast. You can alter the vegetables depending on what you have on hand. I used broccoli and zucchini because they are my daughter’s favourite vegetables and they go well with eggs. However, steamed sliced potato or roasted pumpkin would also go really nicely. Ham is of course optional. I normally stay clear of deli meats, but my local organic butcher makes their leg ham. It is a good alternative treat for my ham-and-cheese loving child, as it doesn’t contain nitrate or preservatives. Since I try to keep dairy consumption low in my home I try to use alternatives that are more easy to digest. So I prefer to use natural sheep’s yogurt (Meredith Dairy), which will give the quiche a more creamy texture. As for cheese, you can go with what ever you like. I normally would go for freshly grated Pecorino Romano, which is made of sheep’s milk. But I found Barambah Organics Cheddar Cheese Shredded from the health food store, without preservatives and anti-caking. Although this quiche looks small, it is quite dense. It can cut into 4 serves or be halved again, as a protein snack. It is also unnecessary and not recommend reheating this quiche, simply because it’s not the healthy to reheat eggs. If you’re wondering why, see this article: 8 Foods You Shouldn’t Reheat (Because They Could Poison You).
Lunchbox Ham, Cheese and Veggie Quiche
Ingredients:
1 tbsp olive oil
4 slices of free range nitrate free leg ham, chopped
1/2 cup finely chopped broccoli florets
1/2 medium zucchini grated
5-6 organic free range eggs
2 tbsp organic natural sheep/cow yogurt
pinch of sea salt
1/4 cup organic shredded or grated cheedar/mozzarella/pecorino cheese
Method:
Preheat the oven to 180 degrees celsius.
Heat olive oil in a small pan, then add the ham. Saute for a few minutes until it’s cooked through.
Add broccoli and zucchini and cook for a couple more minutes, until the broccoli is bright green and tender.
Evenly spread out the ham and veggies into a prepared baking dish. I used 20cm x 24cm ceramic baking tray lined with parchment paper.
In a large bowl, beat the eggs and yogurt and add a pinch of sea salt.
Sprinkle half the cheese on top of the ham and veggies, then spread evenly with egg mixture and lastly top with leftover cheese.
Bake in the oven for 15-20 minutes or until cooked through.
Remove from the baking tray and once cool enough, slice to serve or store.
Probably one of my biggest highlights in New York was visiting the Metropolitan Museum of Art (the MET) on Fifth Avenue. This is the largest and third most visited museum in the world. So no trip to New York would be complete without a visit.
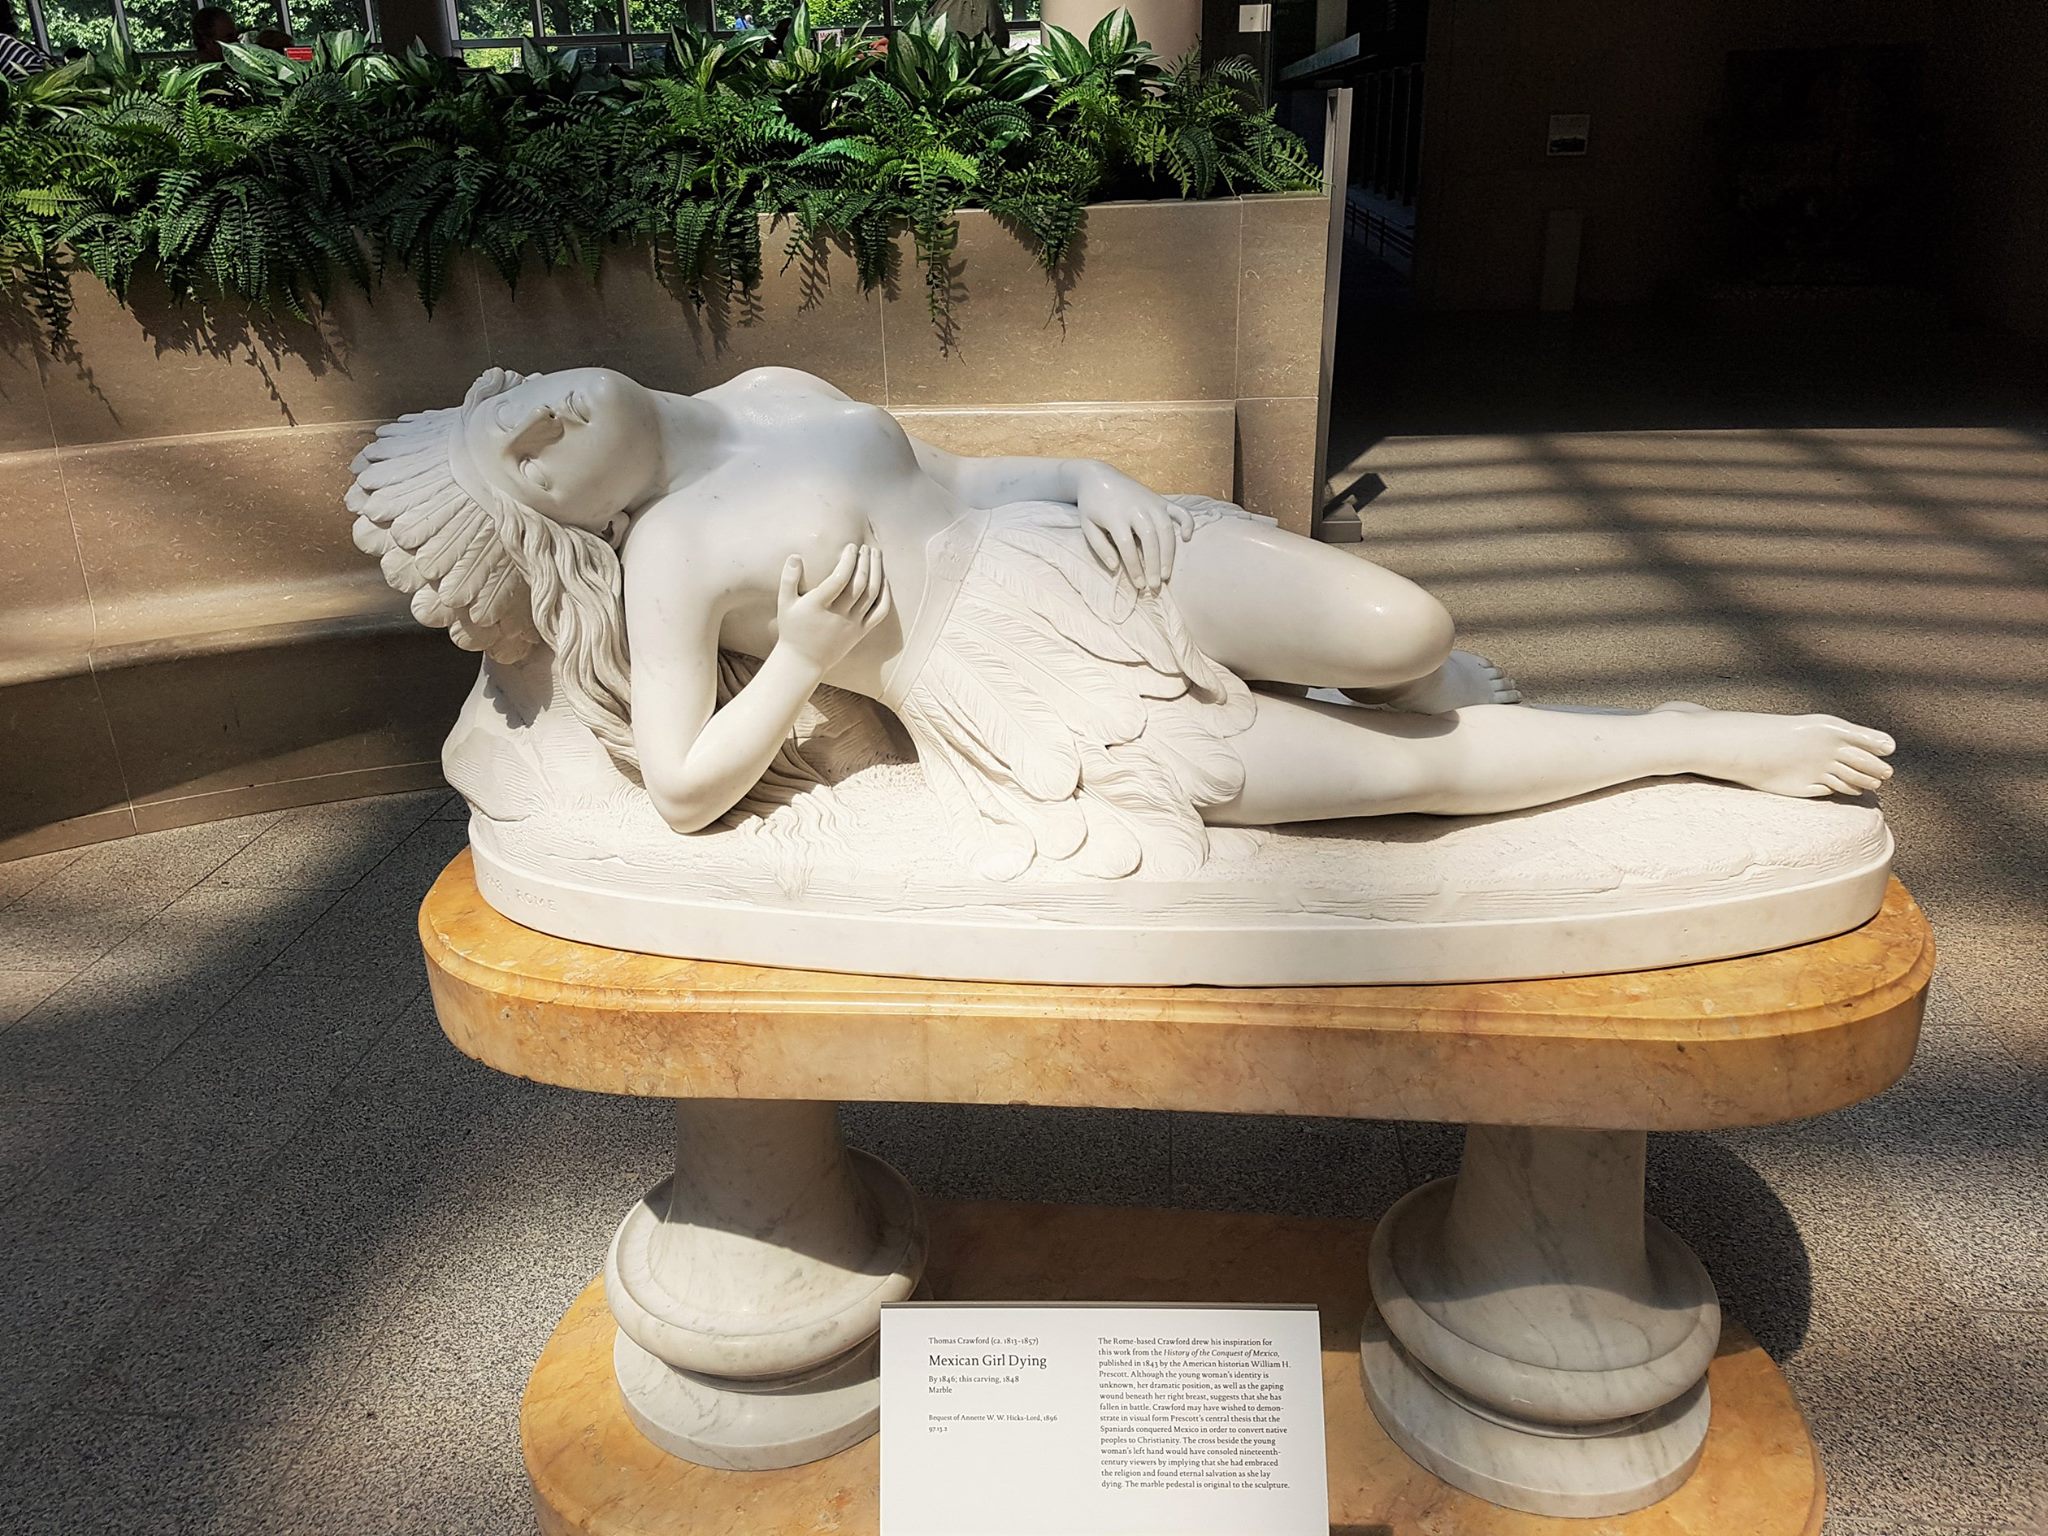
The MET has a collection that boasts two million works, which are split between 17 curatorial departments. The permanent collection includes art and sculpture from Greek and Roman antiquity, ancient Egypt, Middle age to Renaissance European masters, American and modern art, as well as African, Asian, Oceania, Byzantine and Islamic art. There are also various temporary exhibitions that change throughout the year. On my visit, I was only able to cover three quarters the permanent collection on level 1 and the temporary exhibition Manus x Machina. This took me about two hours. So if you plan on seeing it all I would allow for 4-5 hours. To see the extensive size of the museum, see the map.
General admission for the MET is quite reasonable and valid for three consecutive days for all three MET locations. However, depending on if you purchased a New York pass, you may have your entry included. Audio guides are also available in a variety of languages for an additional rate. There are also free guided tours available in a variety of languages throughout the day. You can also find several restaurants and cafes in the museum.
Greek and Roman Art
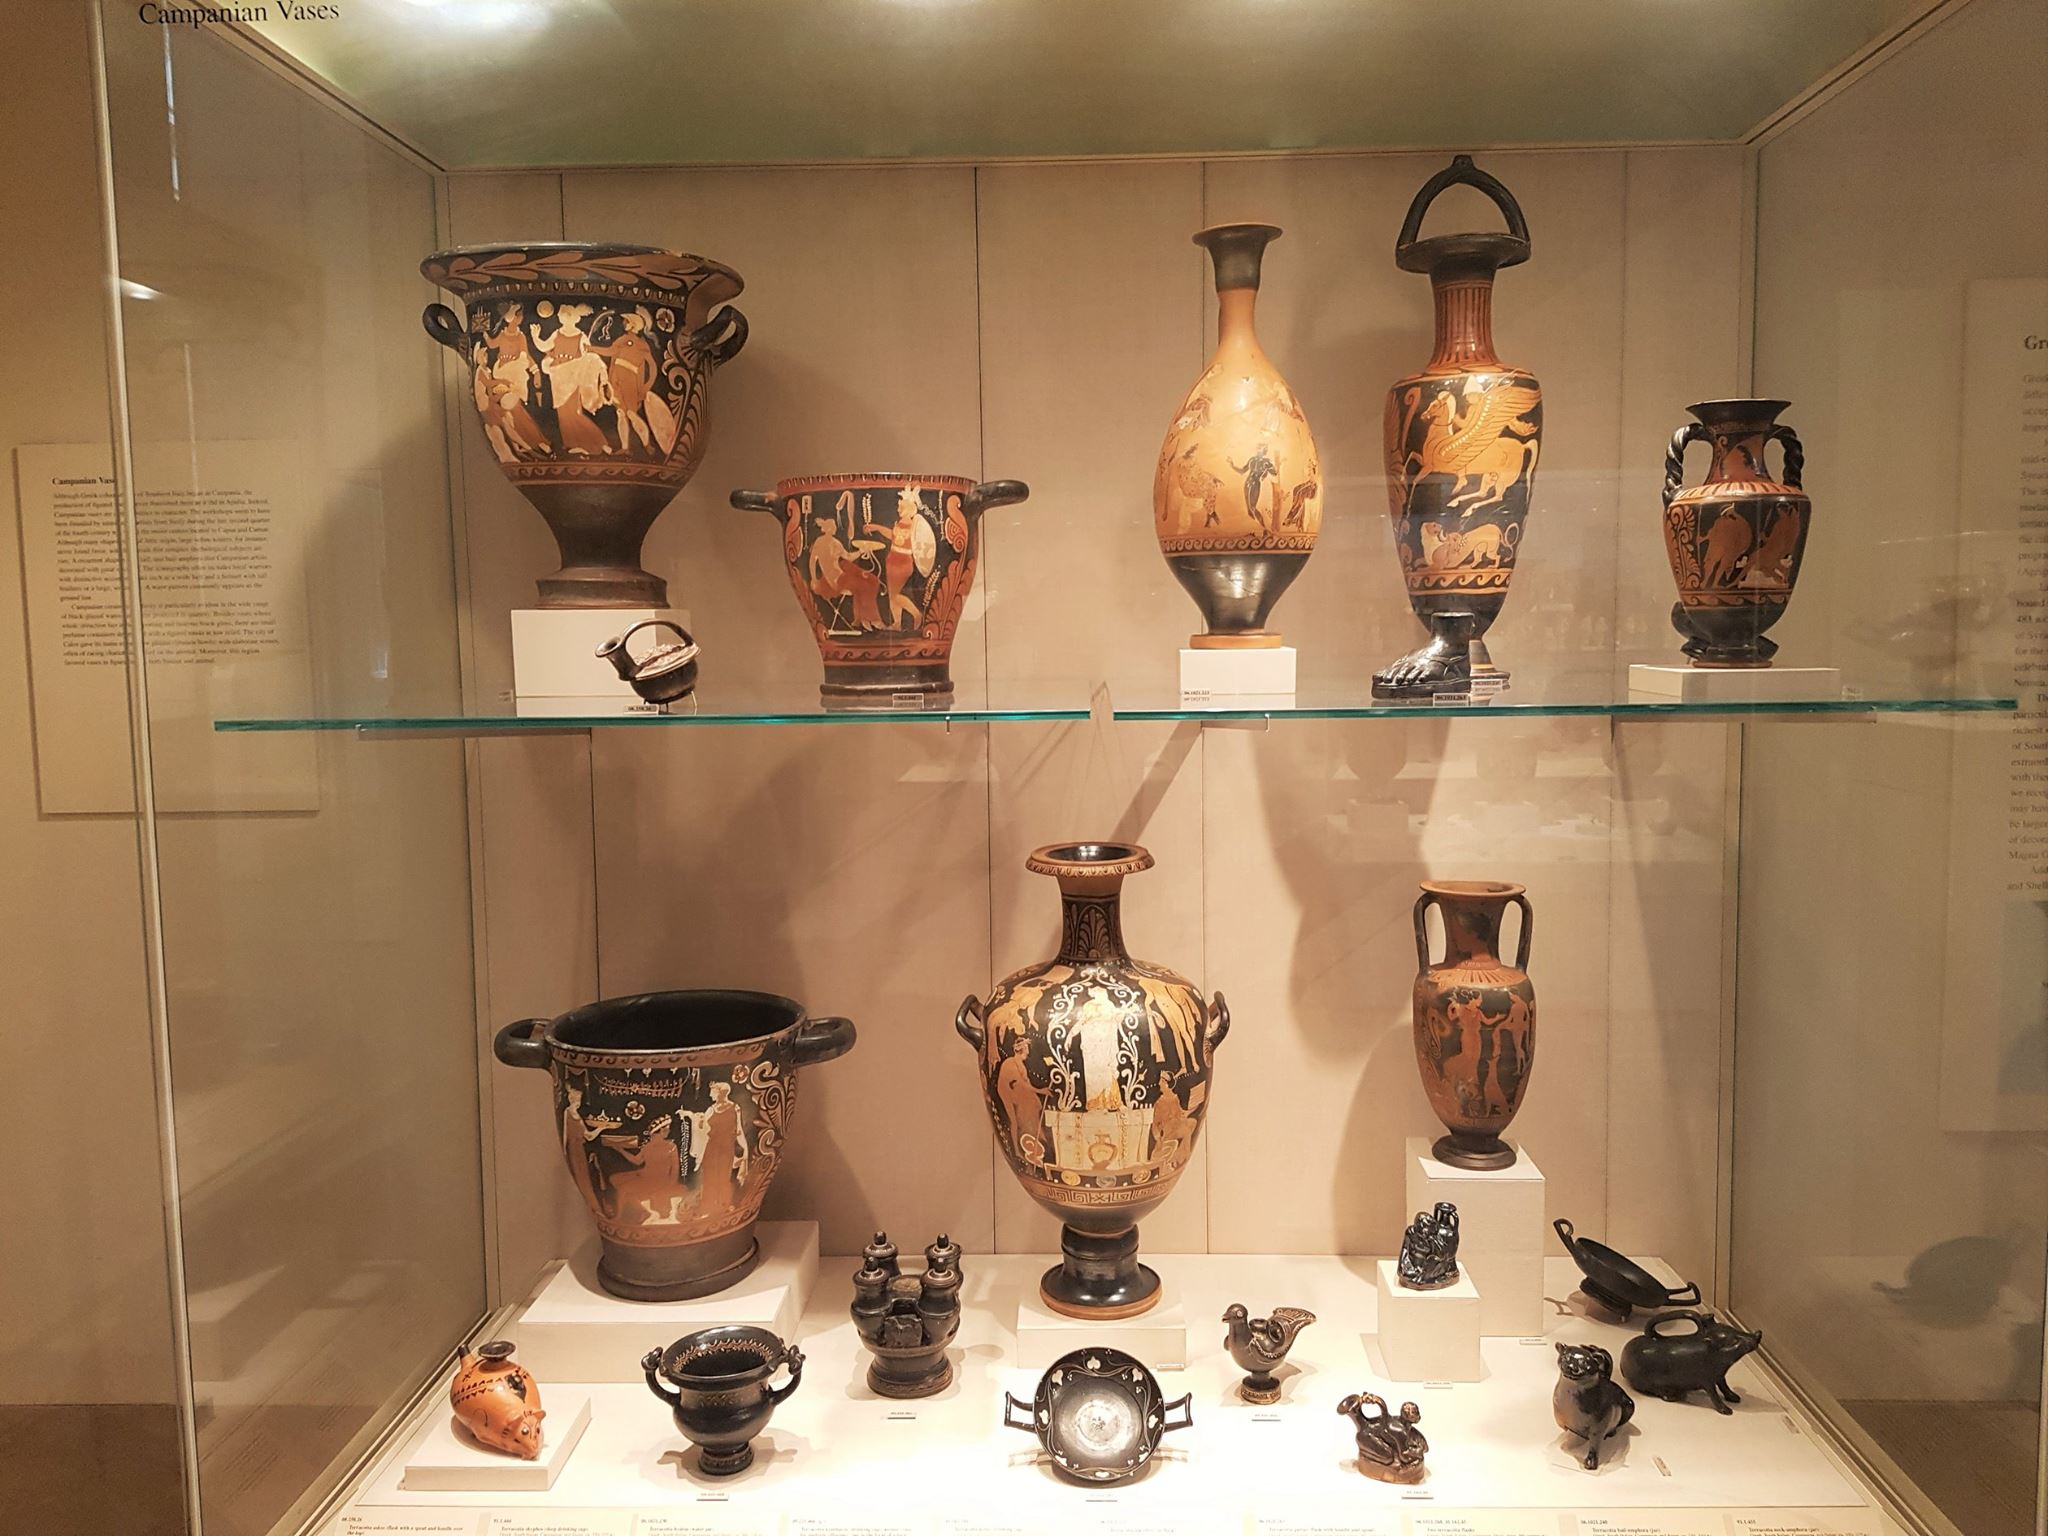
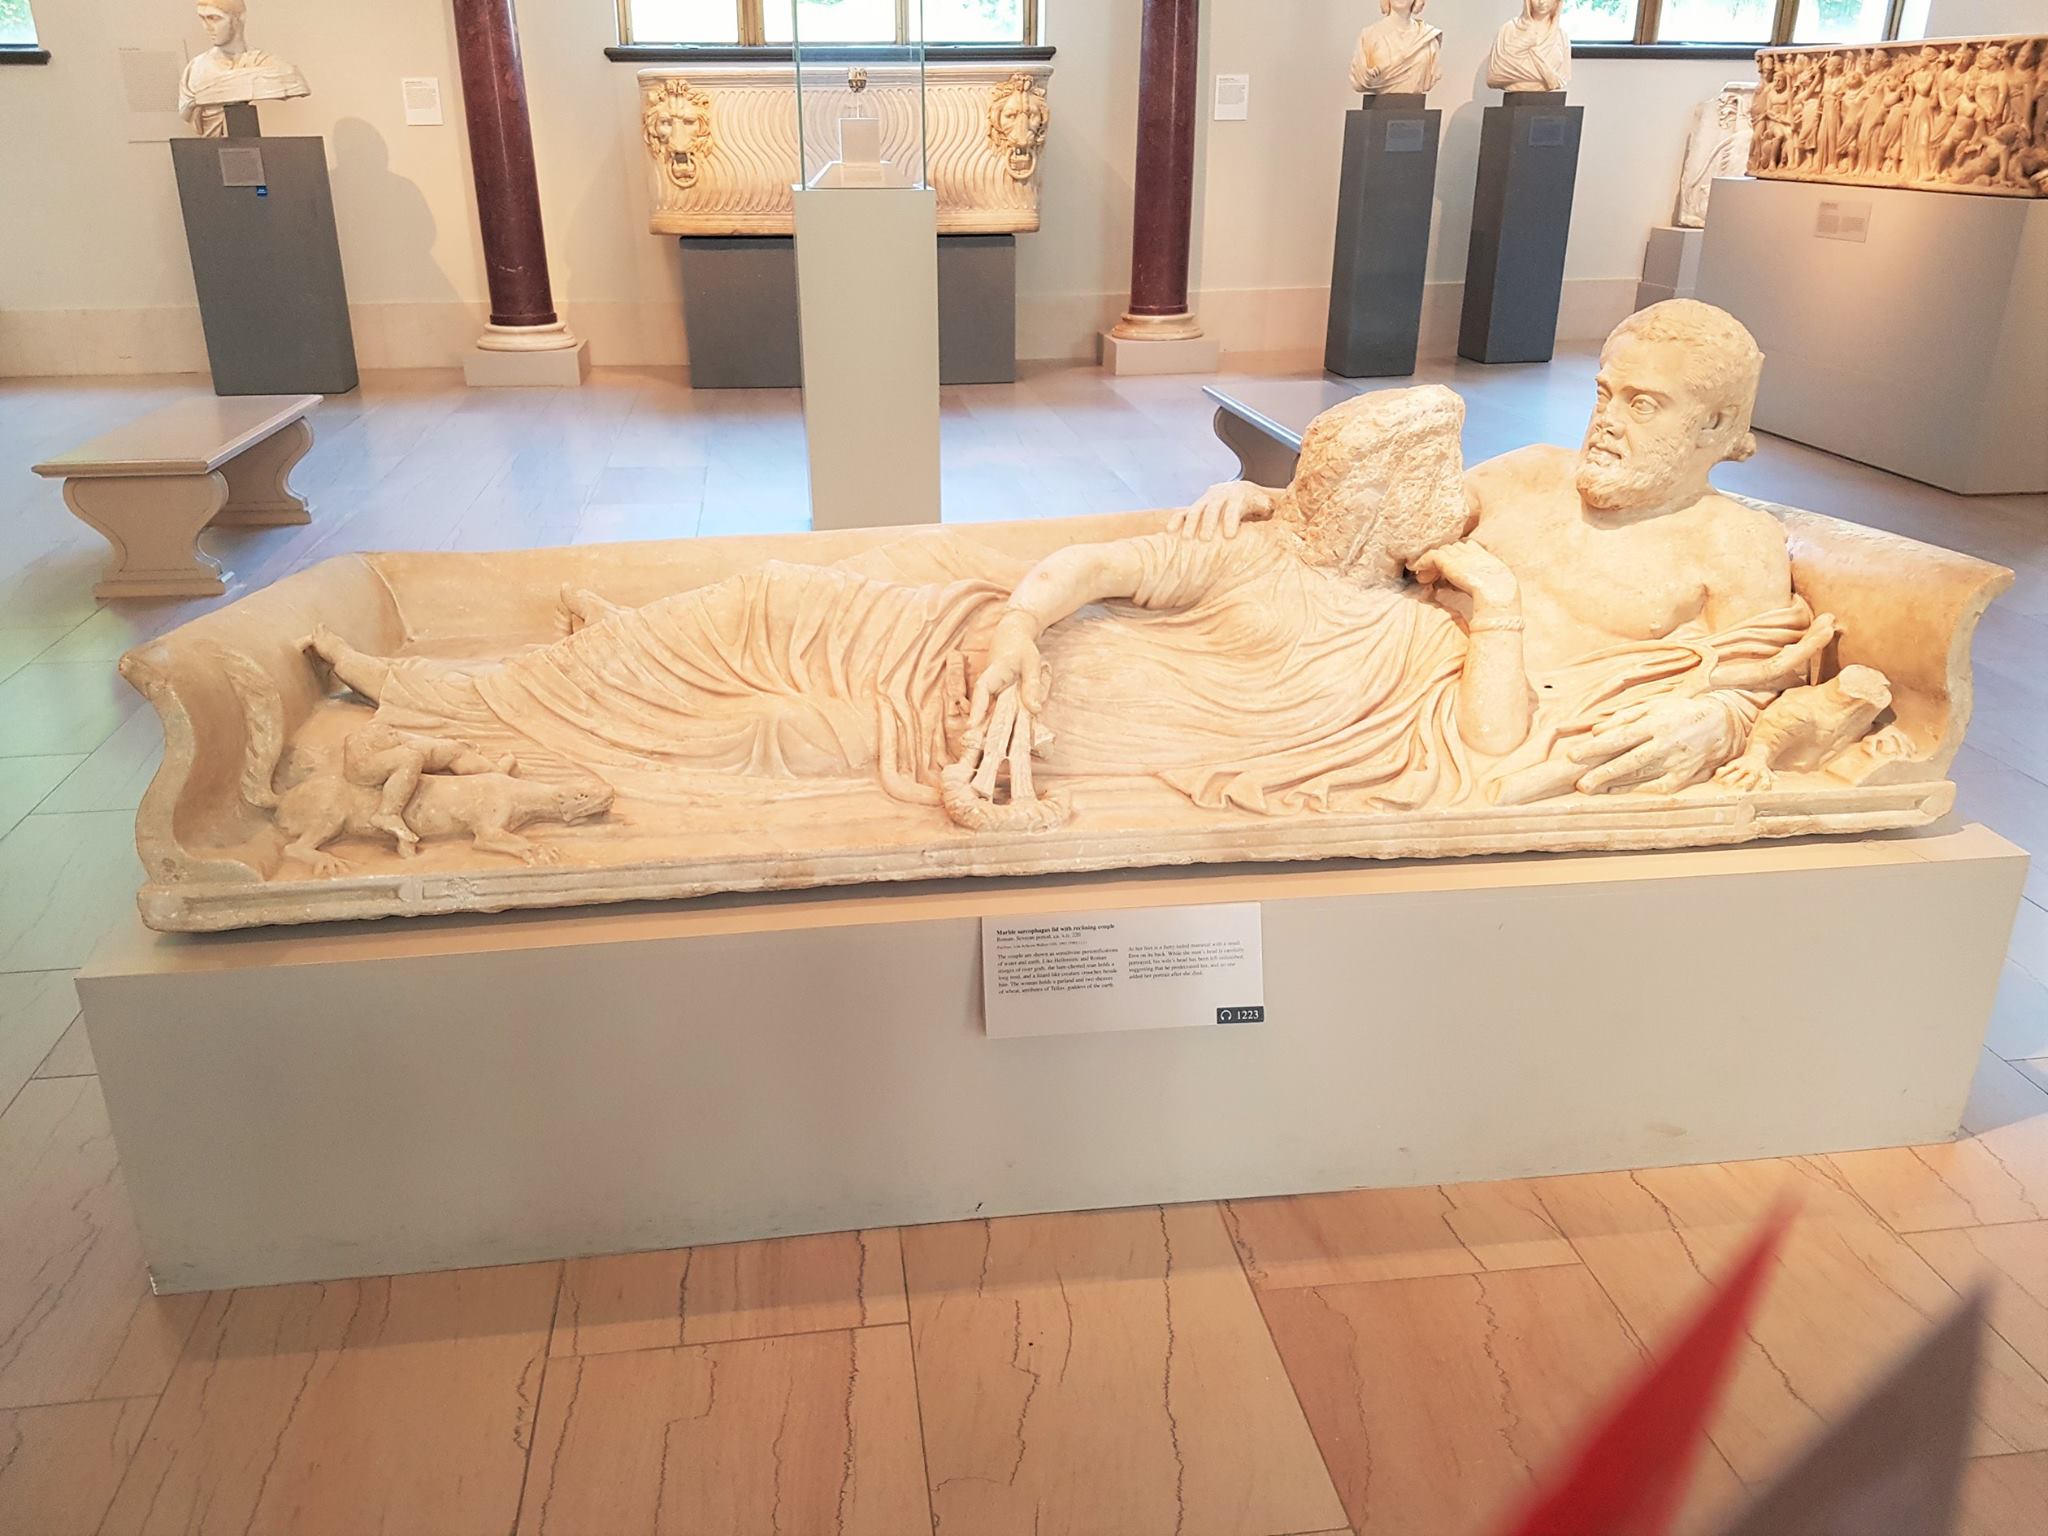
I started my tour from the left of the Great hall, which began in the Greek and Roman Art galleries. These galleries are bright and airy with plenty of natural light and an extensive collection throughout the age of antiquity. This was probably one of my favourite wings and luckily many people passed through it quickly, allowing me to marvel at these ancient treasures.
Prehistoric and Early Greek Art
Greek Art: Sixth–Fourth Century B.C.
Mid 2nd-1st century, 3rd–1st Century B.C.
Roman Sculpture Court
Later Roman Empire: Third Century A.D
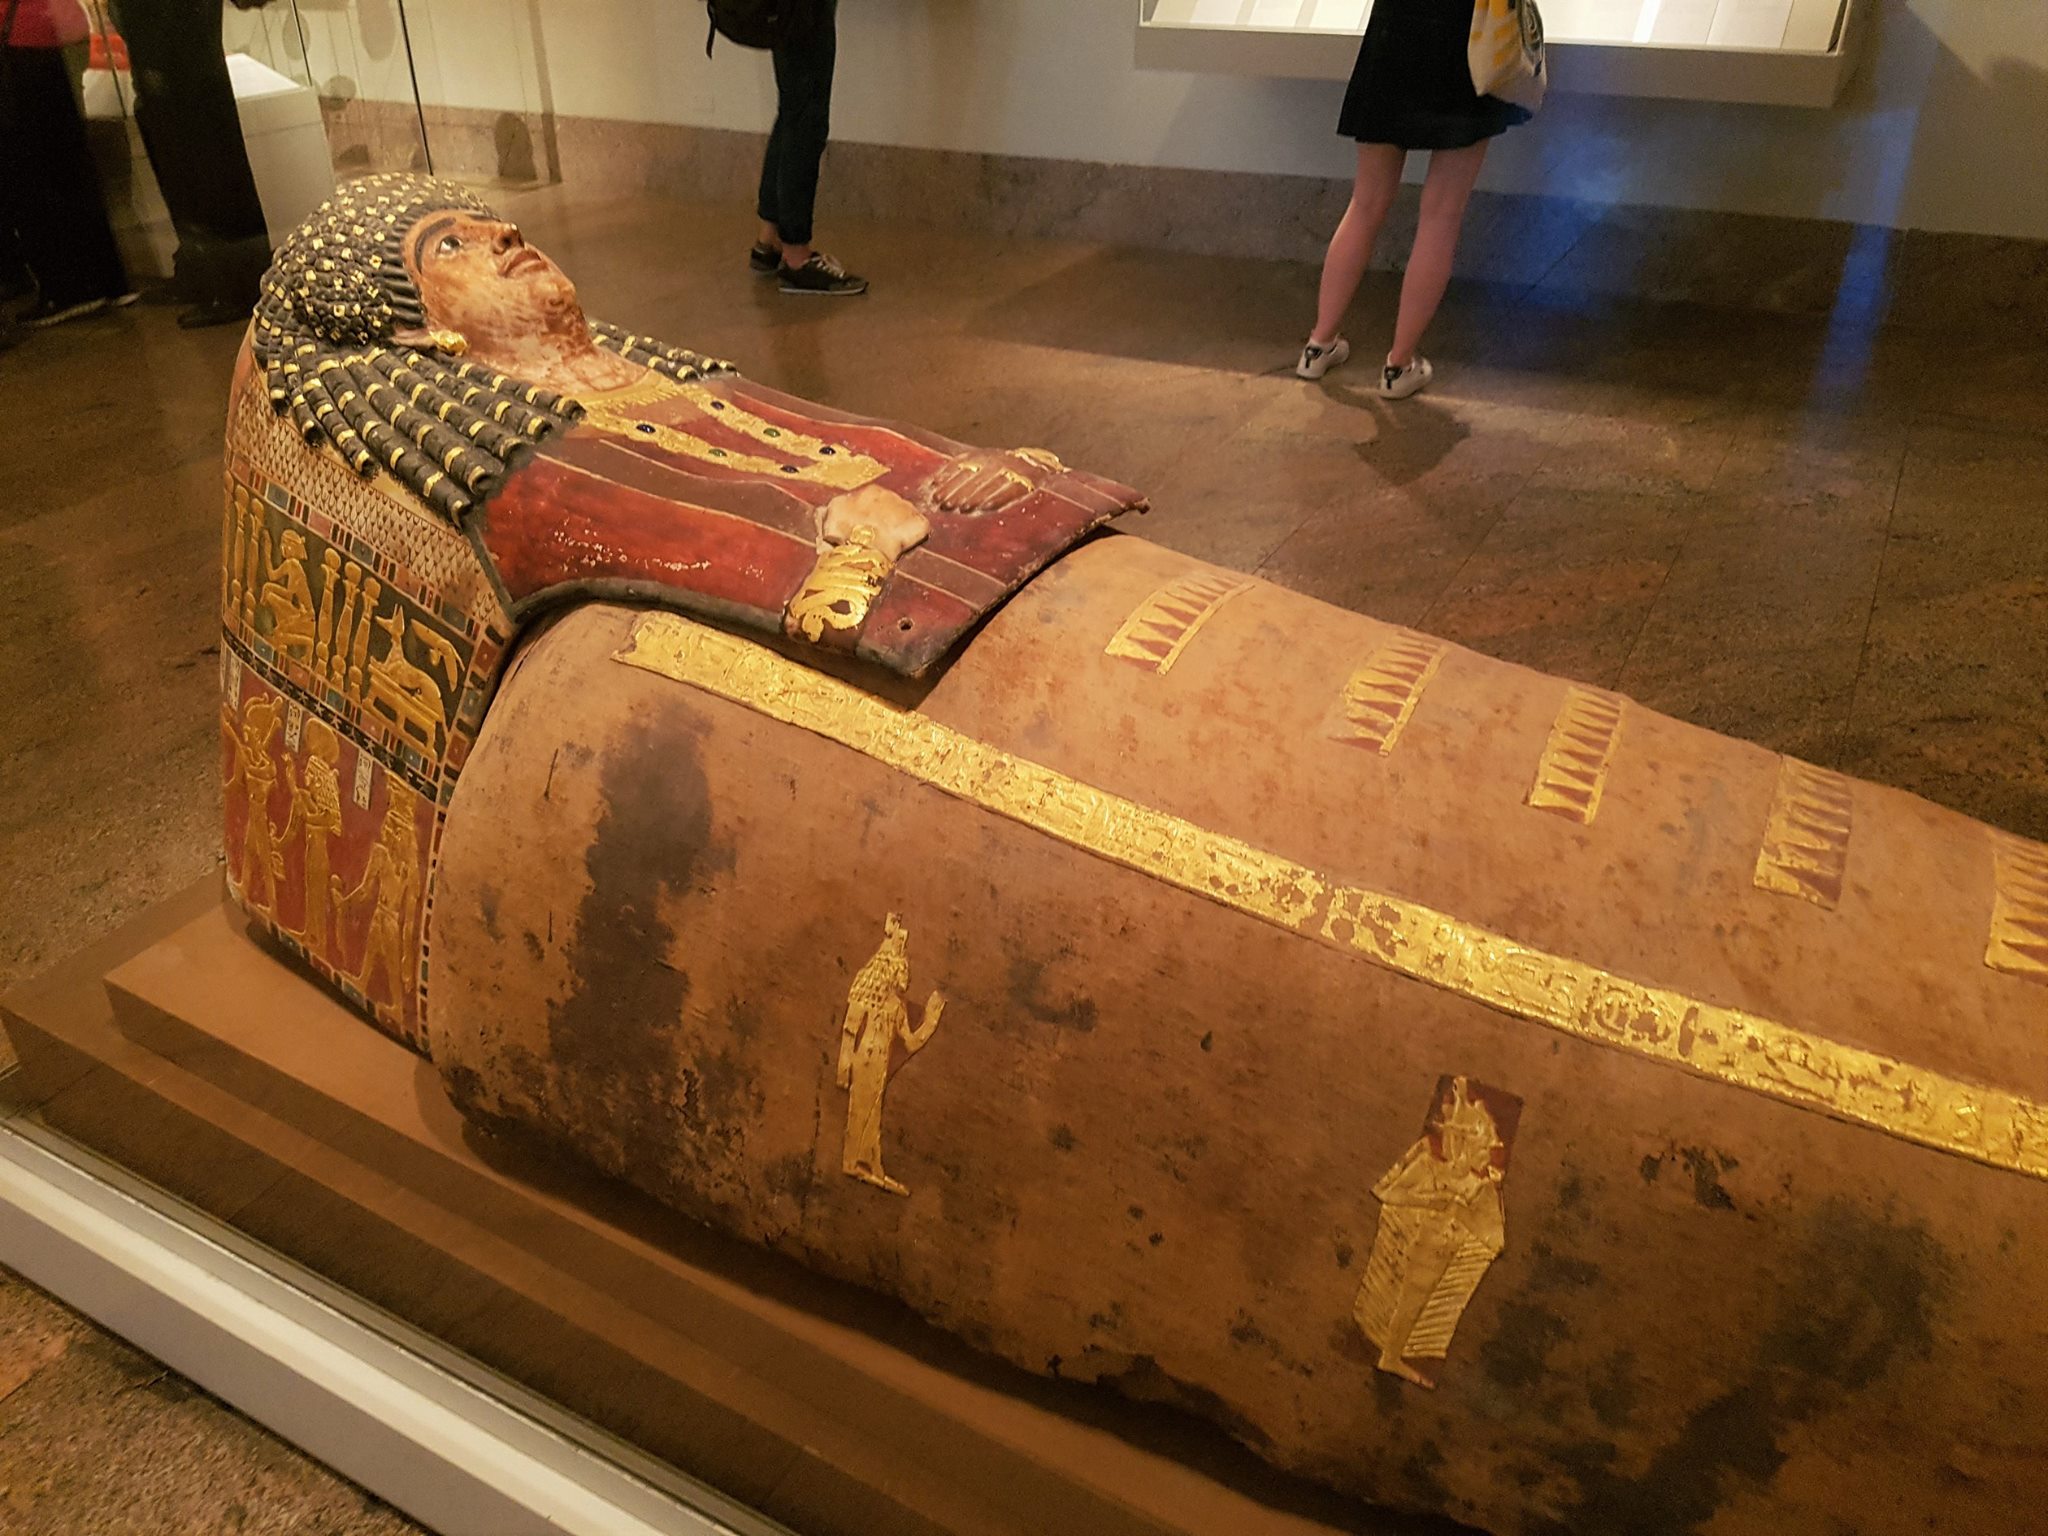
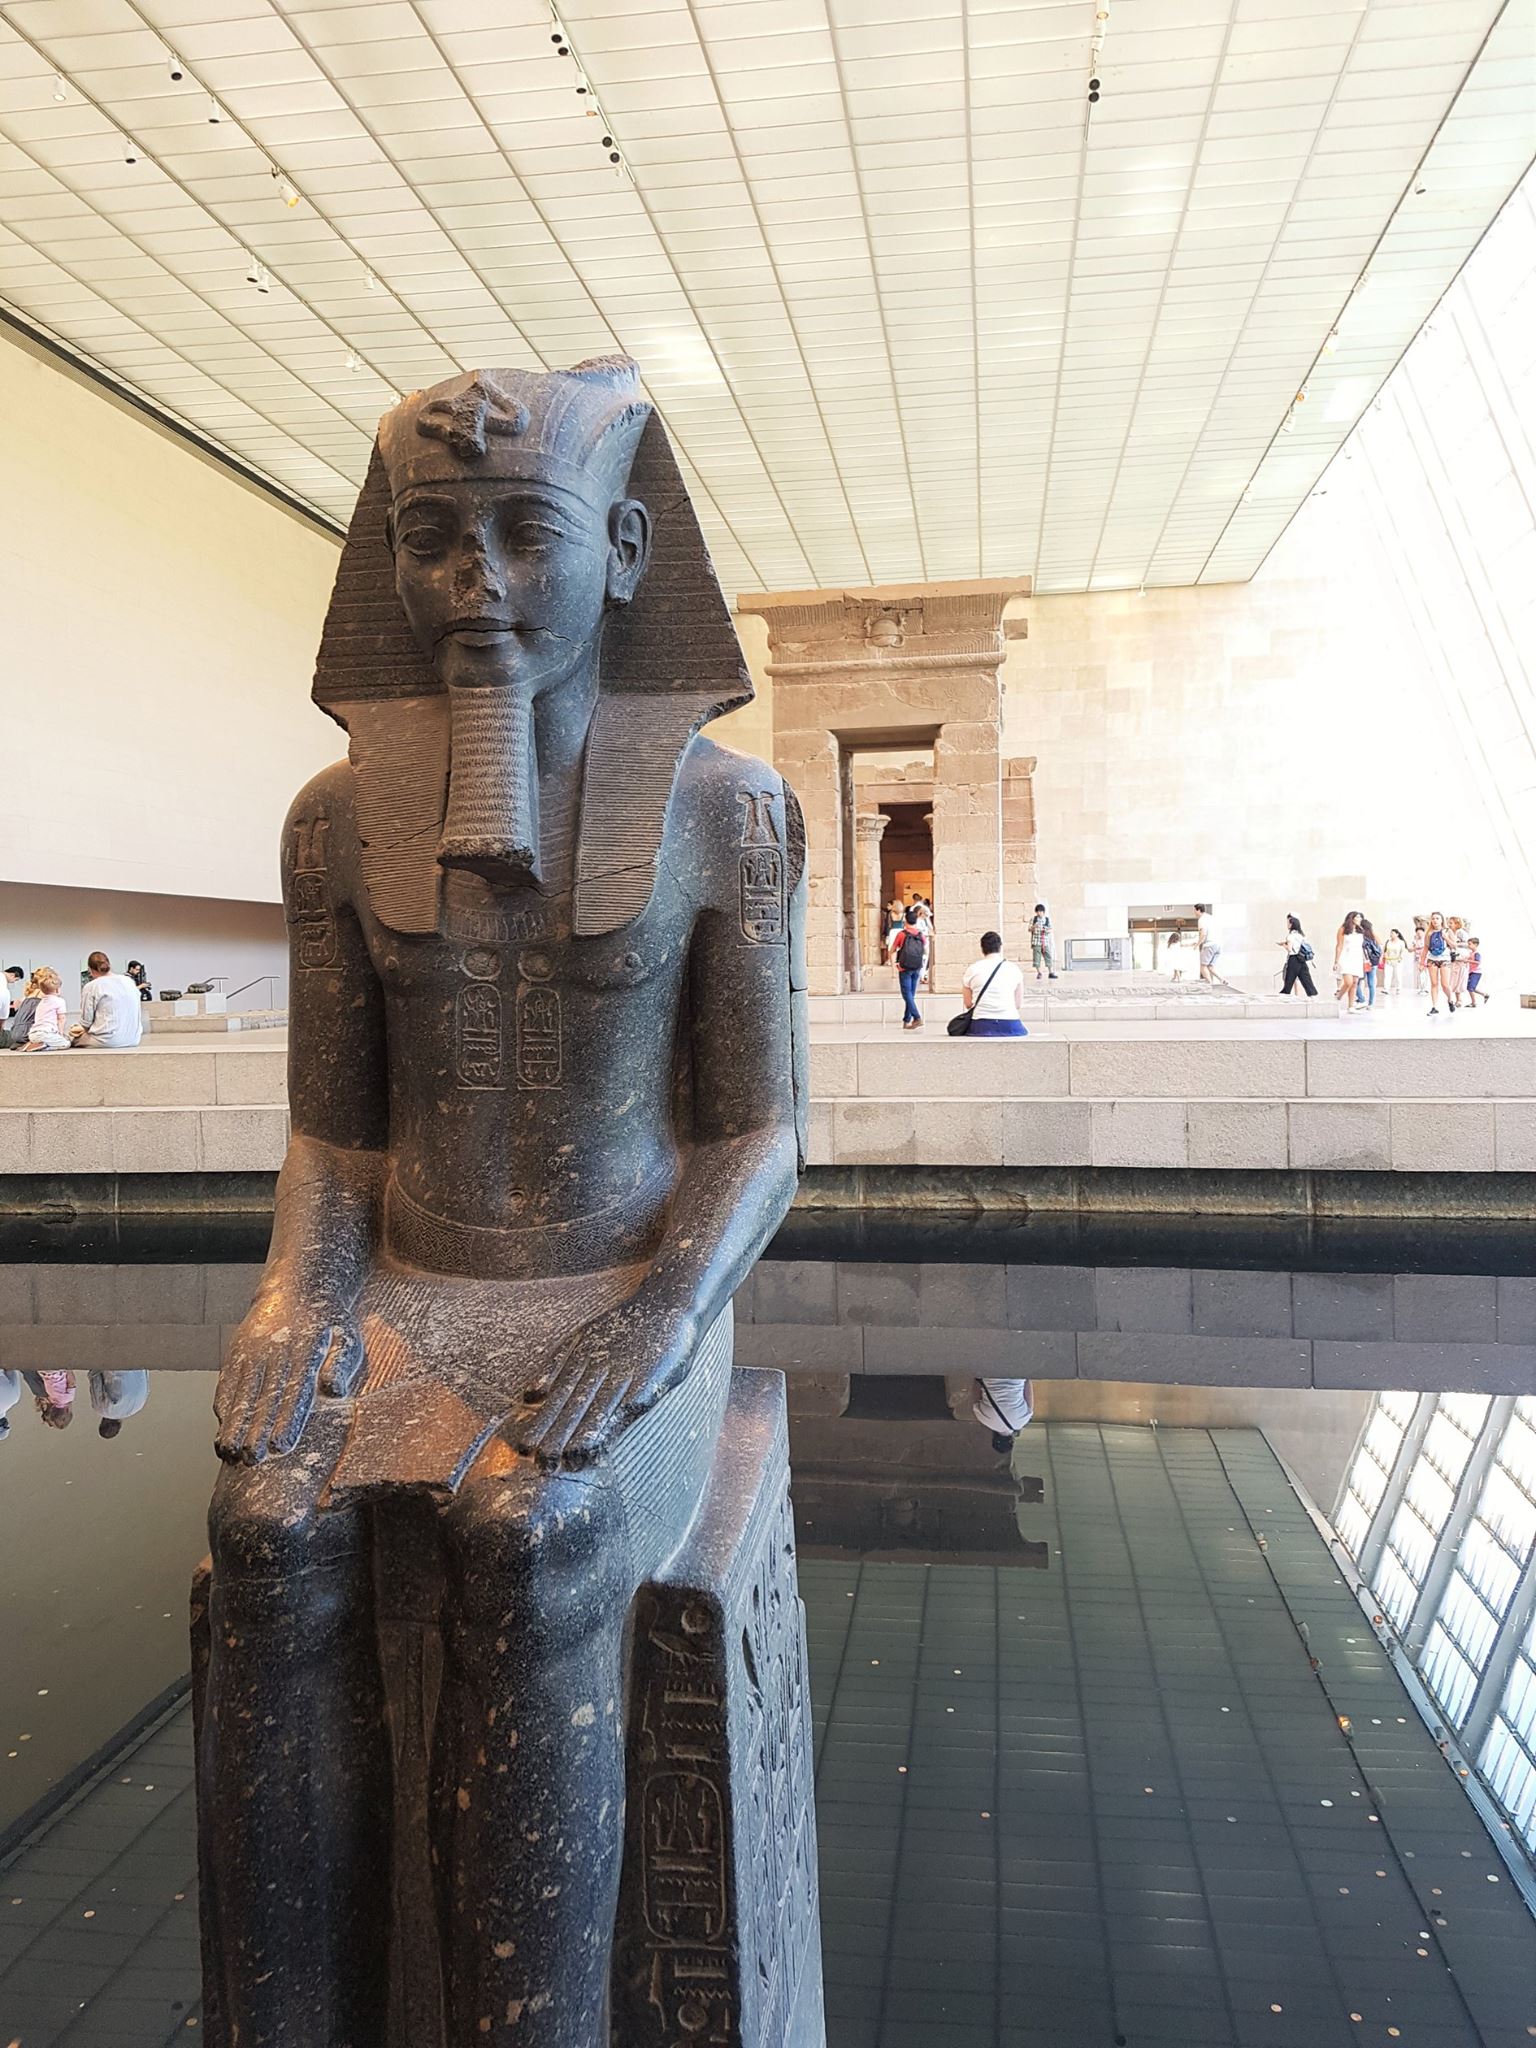
Egyptian Art
The Egyptian art is found in a gallery from the left of the Great hall and continues into The Sackler wing. The main gallery is quite dark, but the various pieces are quite well lite. I was quite impressed by this collection, as it was quite different other travelling Egyptian collections. I particularly liked the paintings and decorative sarcophagus.
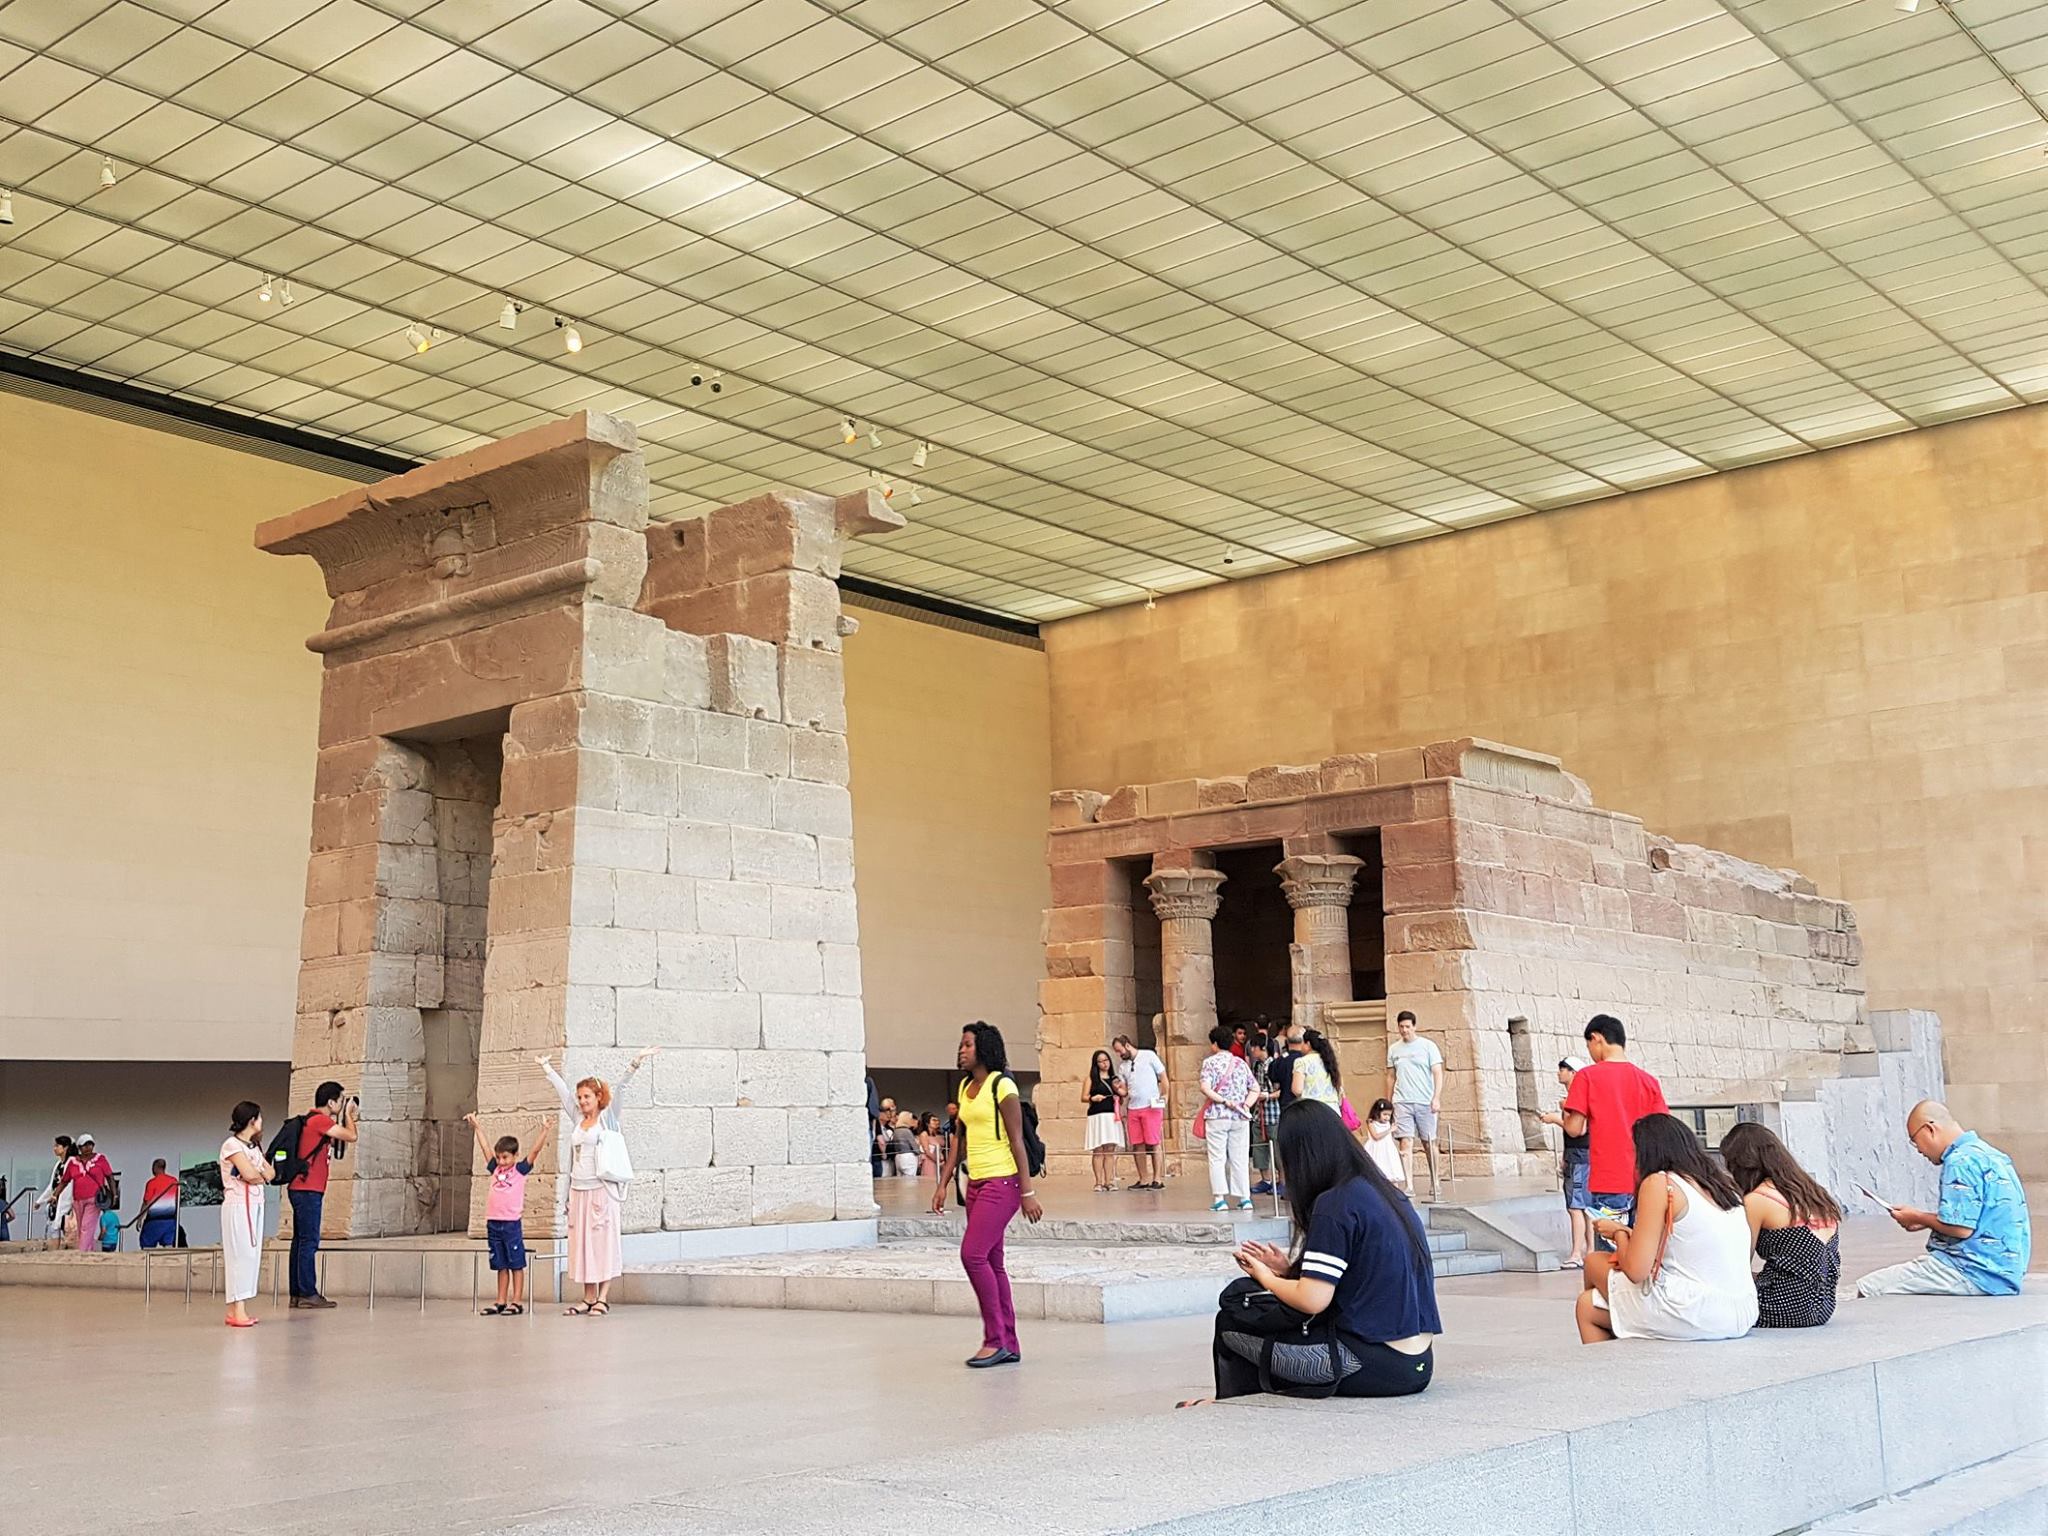
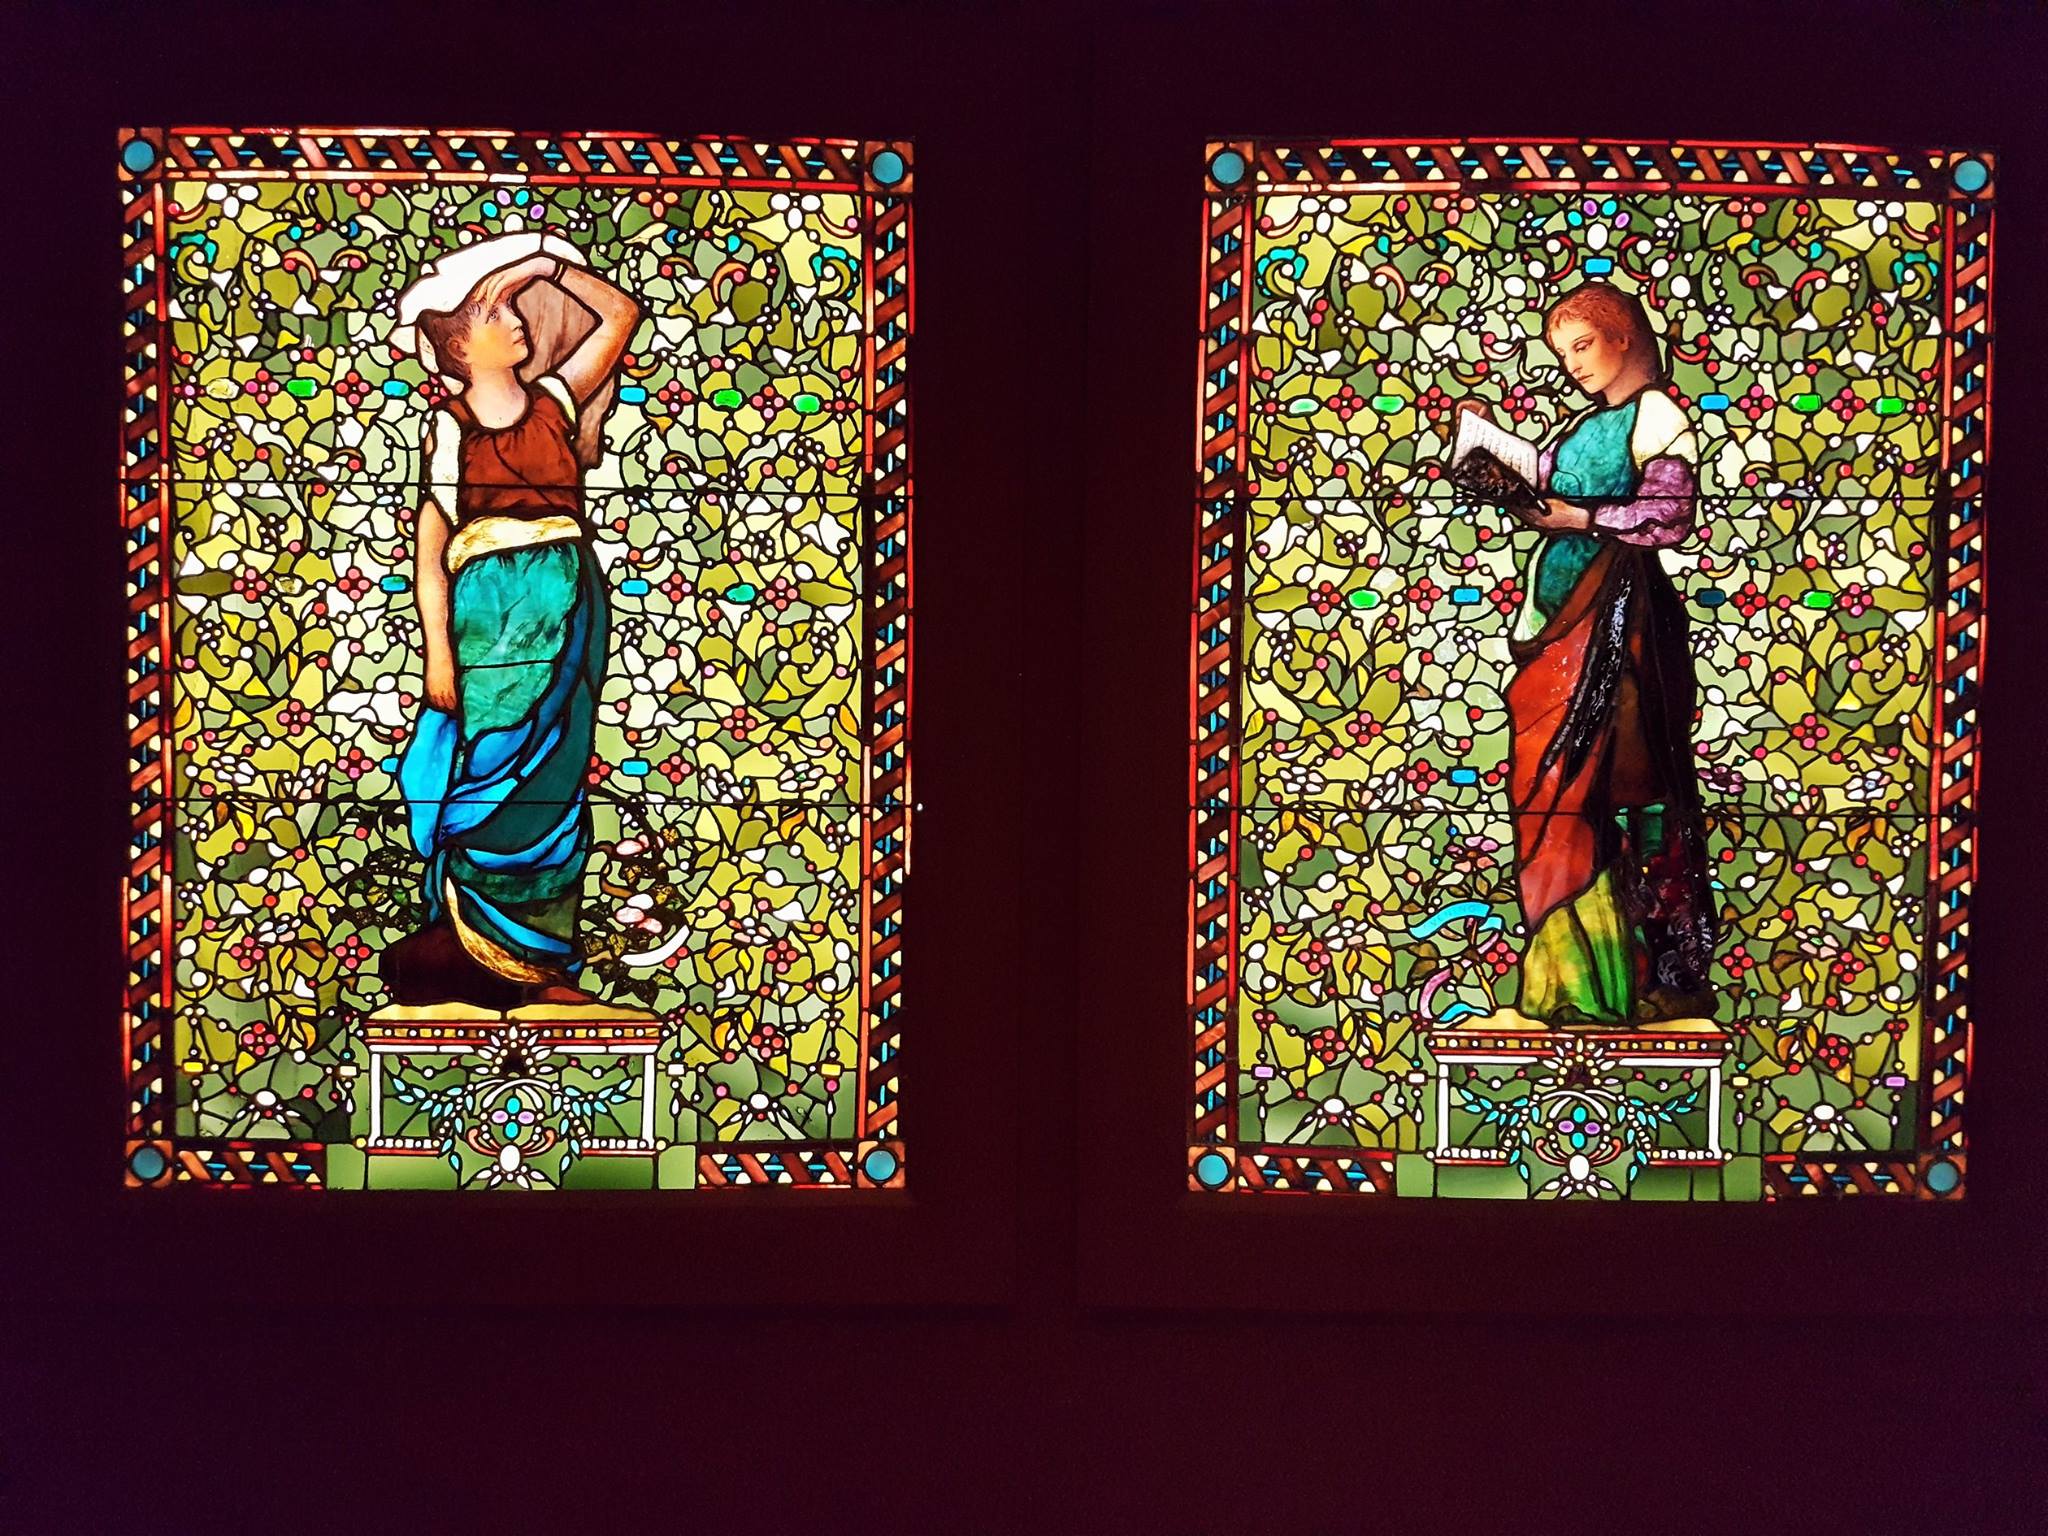
The Temple of Dendur in The Sackler Wing
American Wing
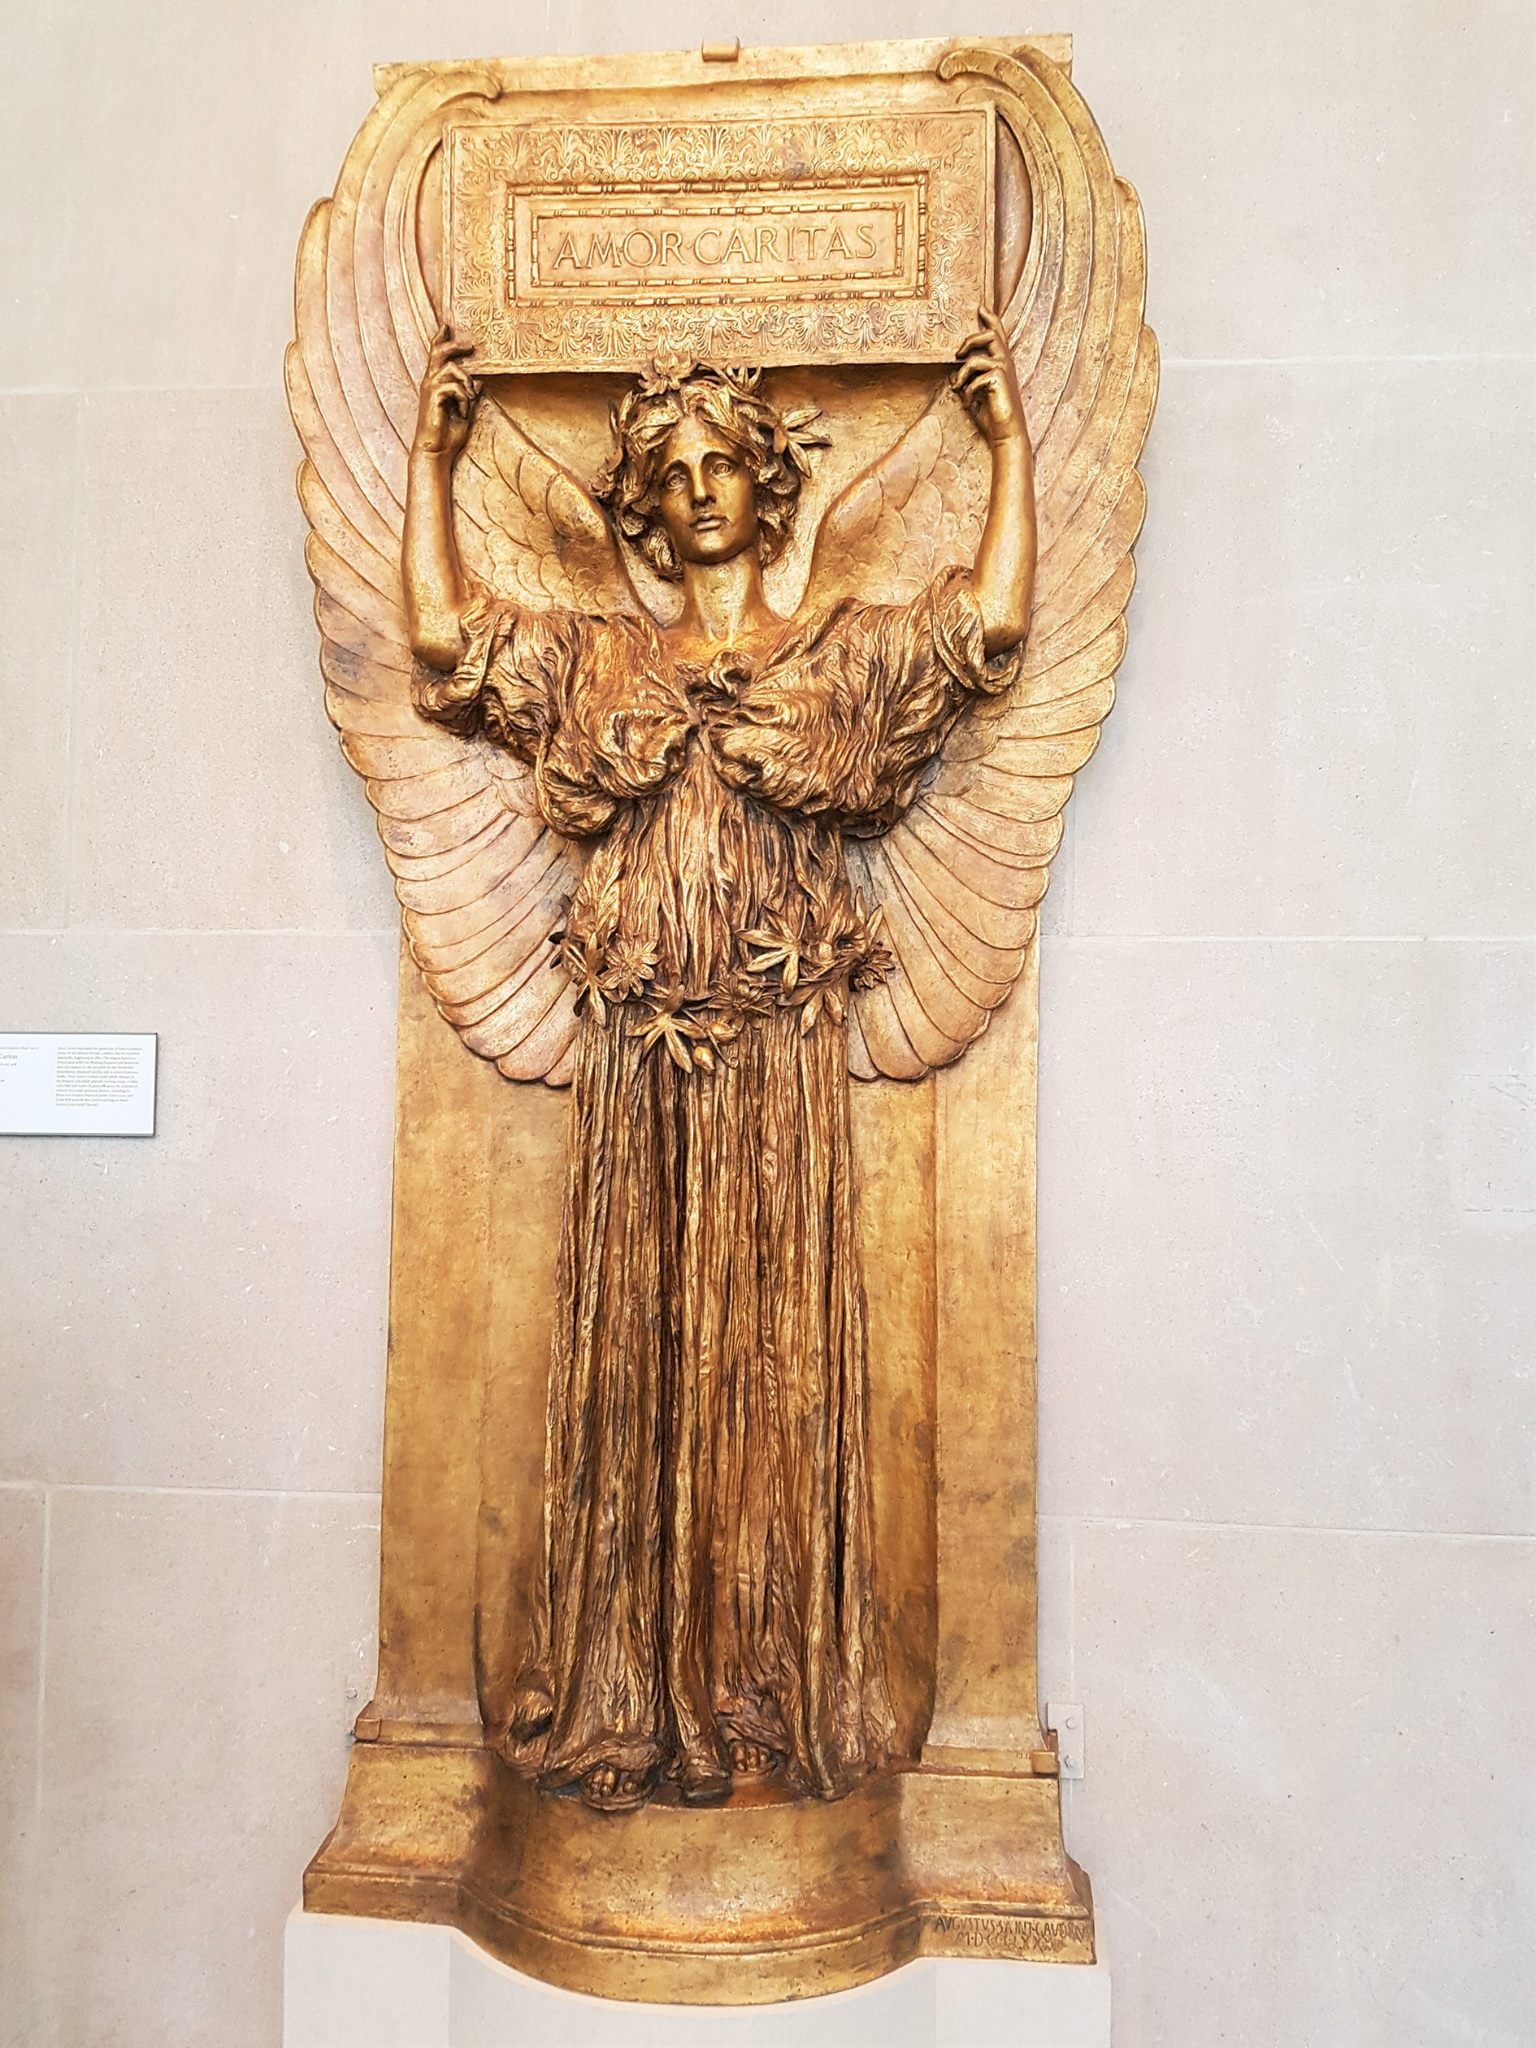
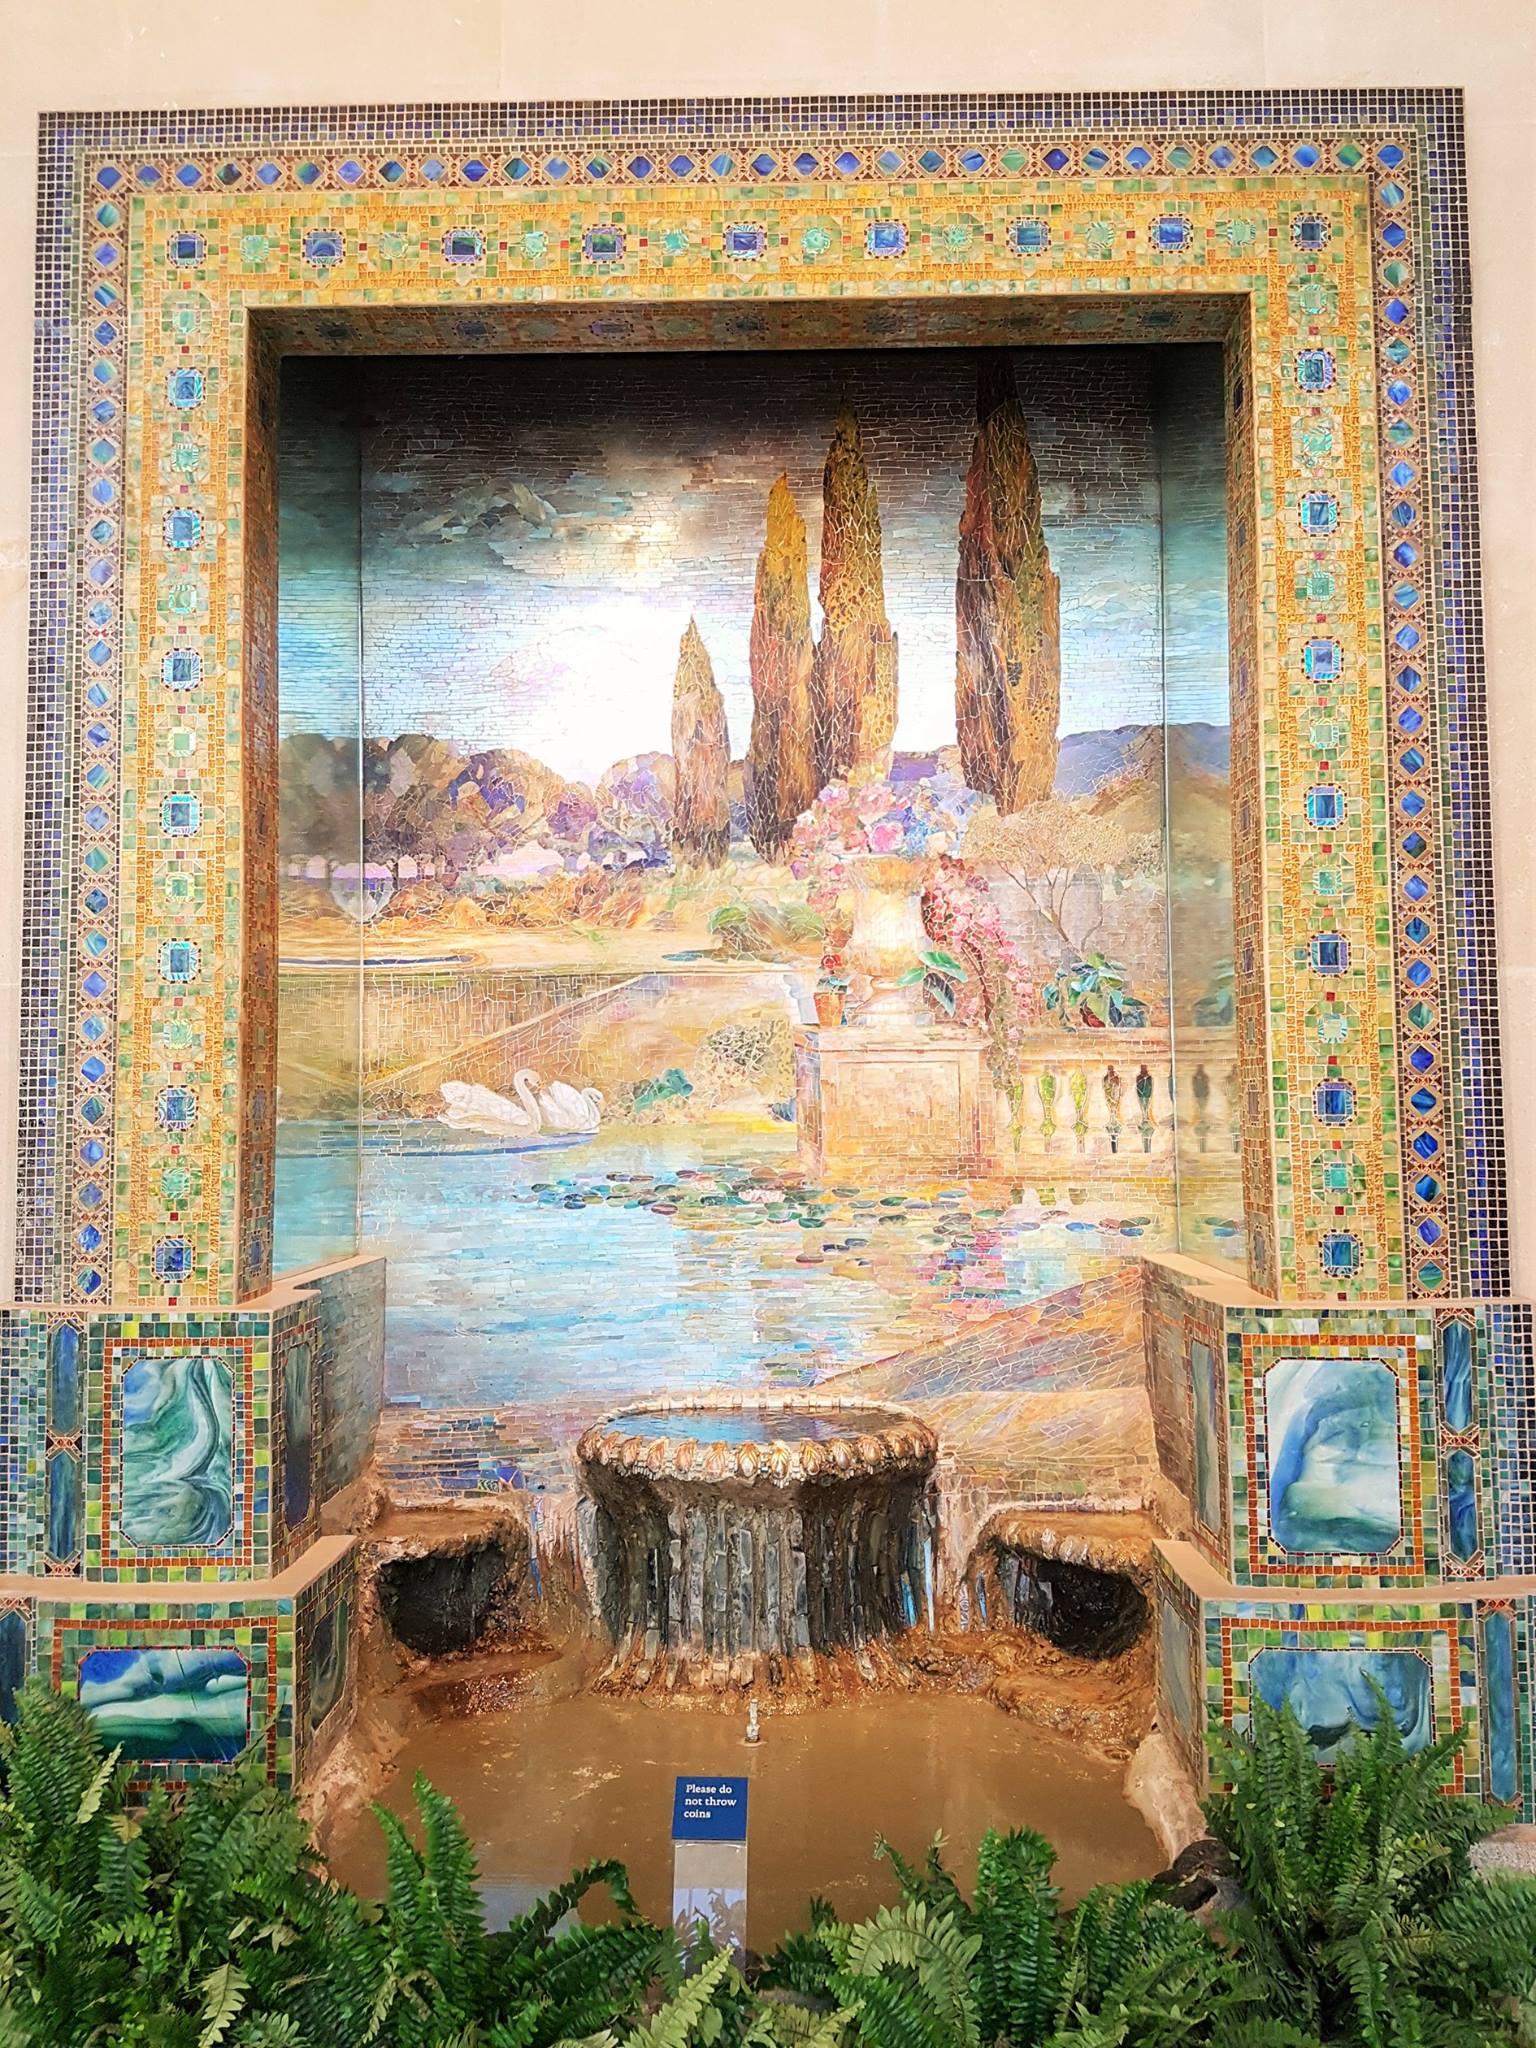
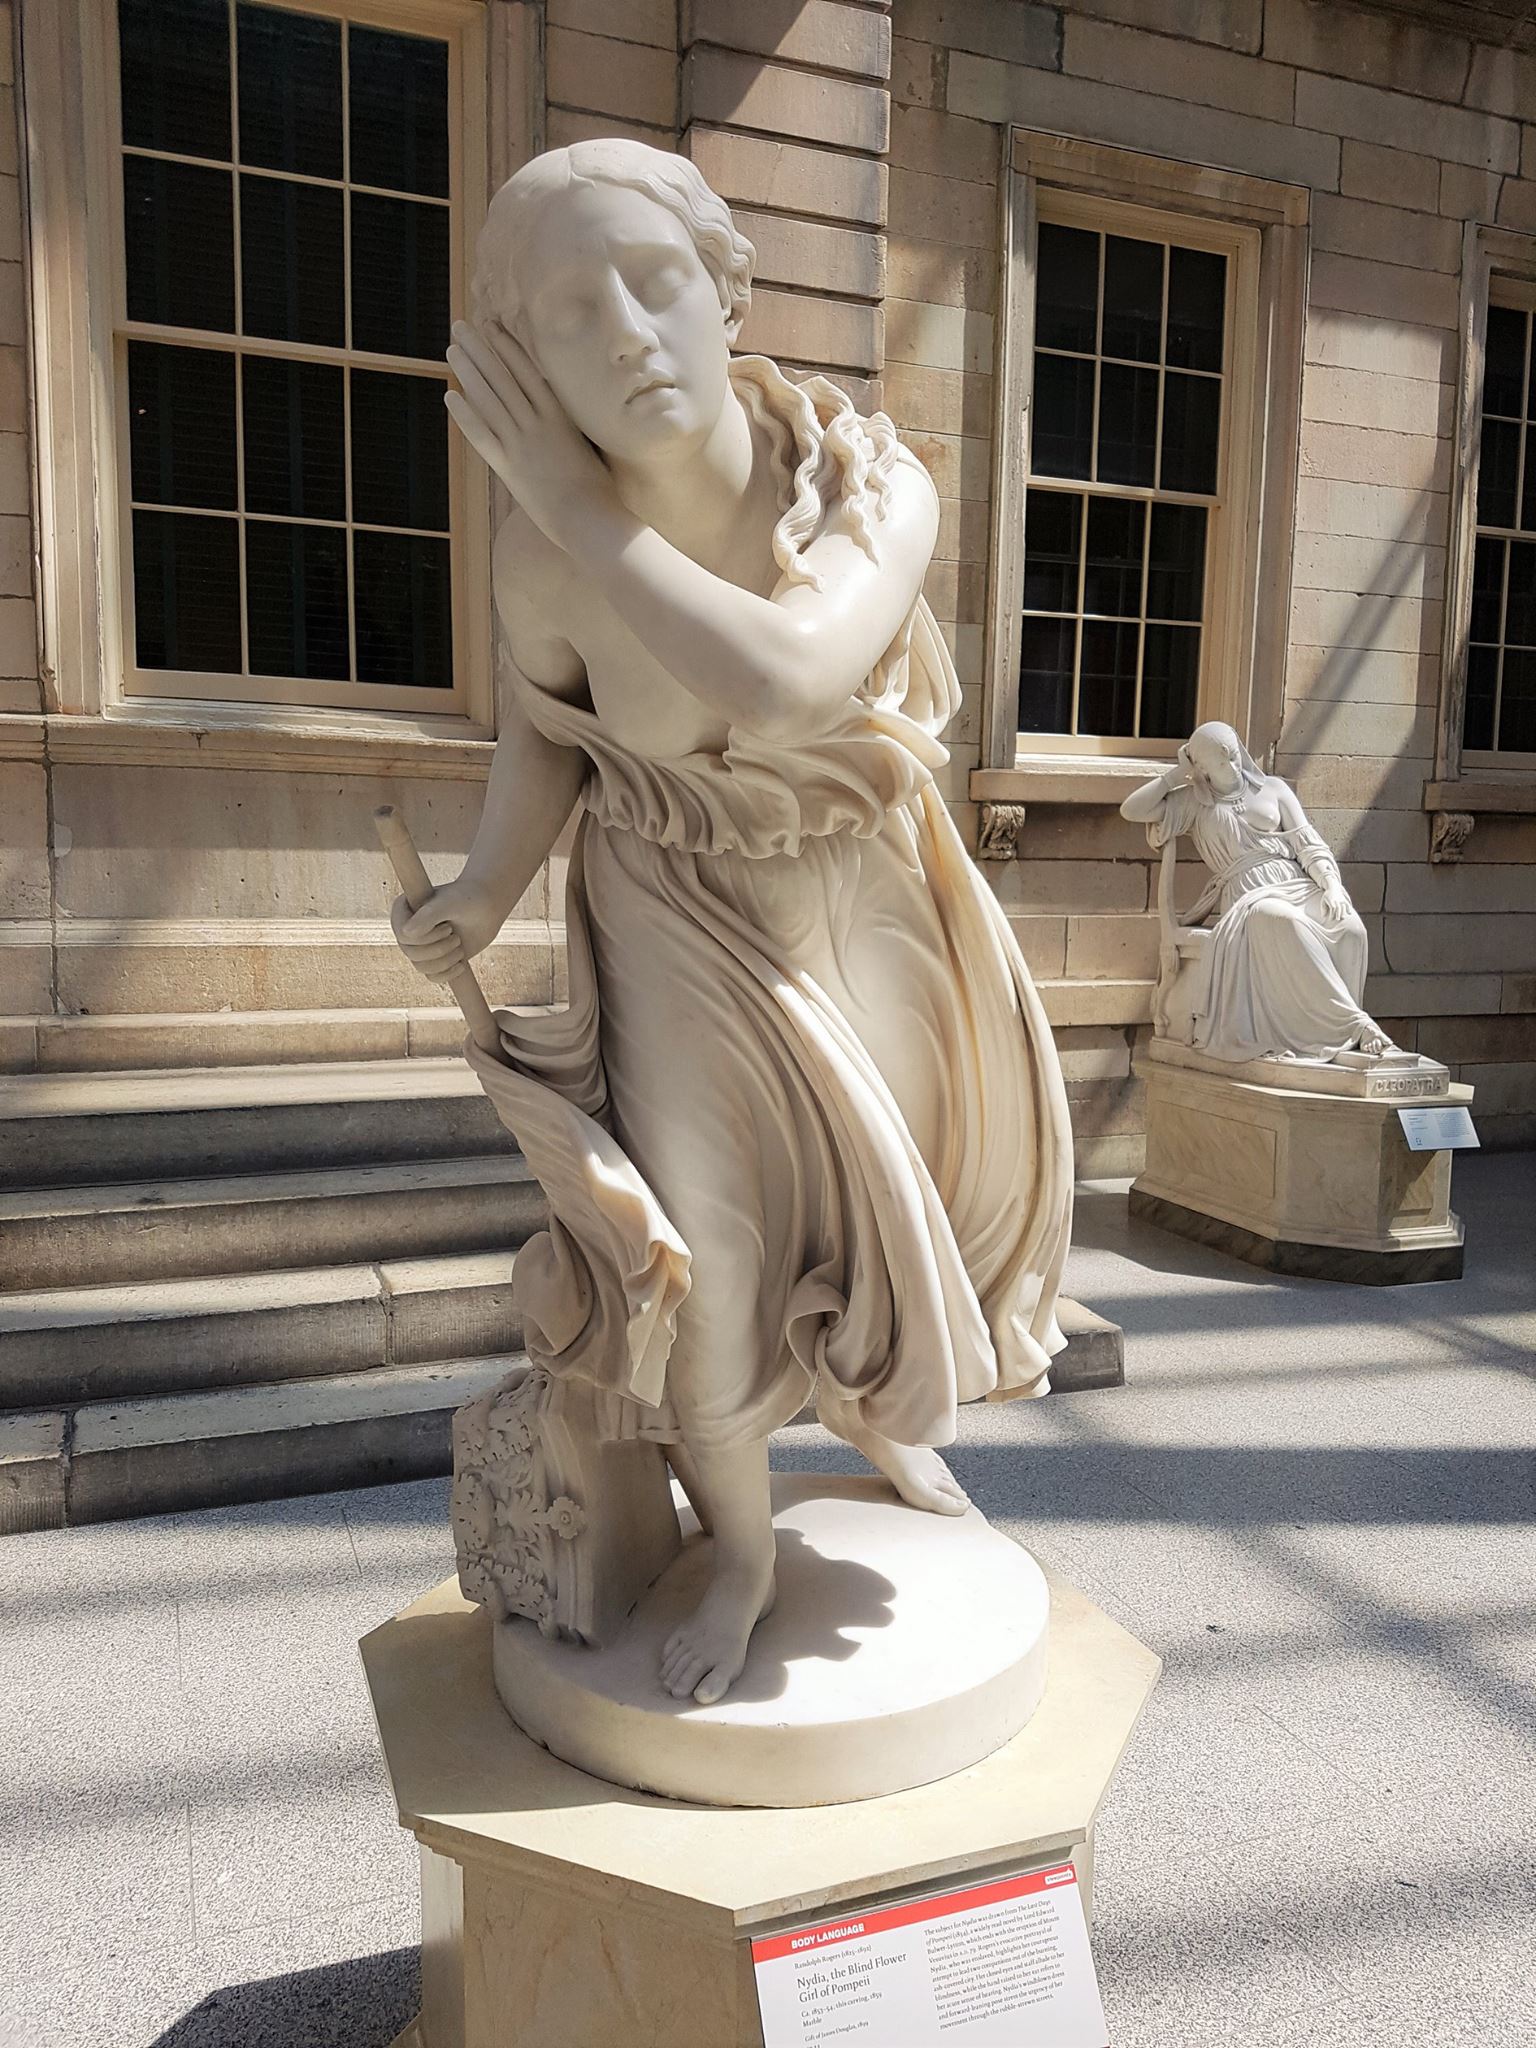
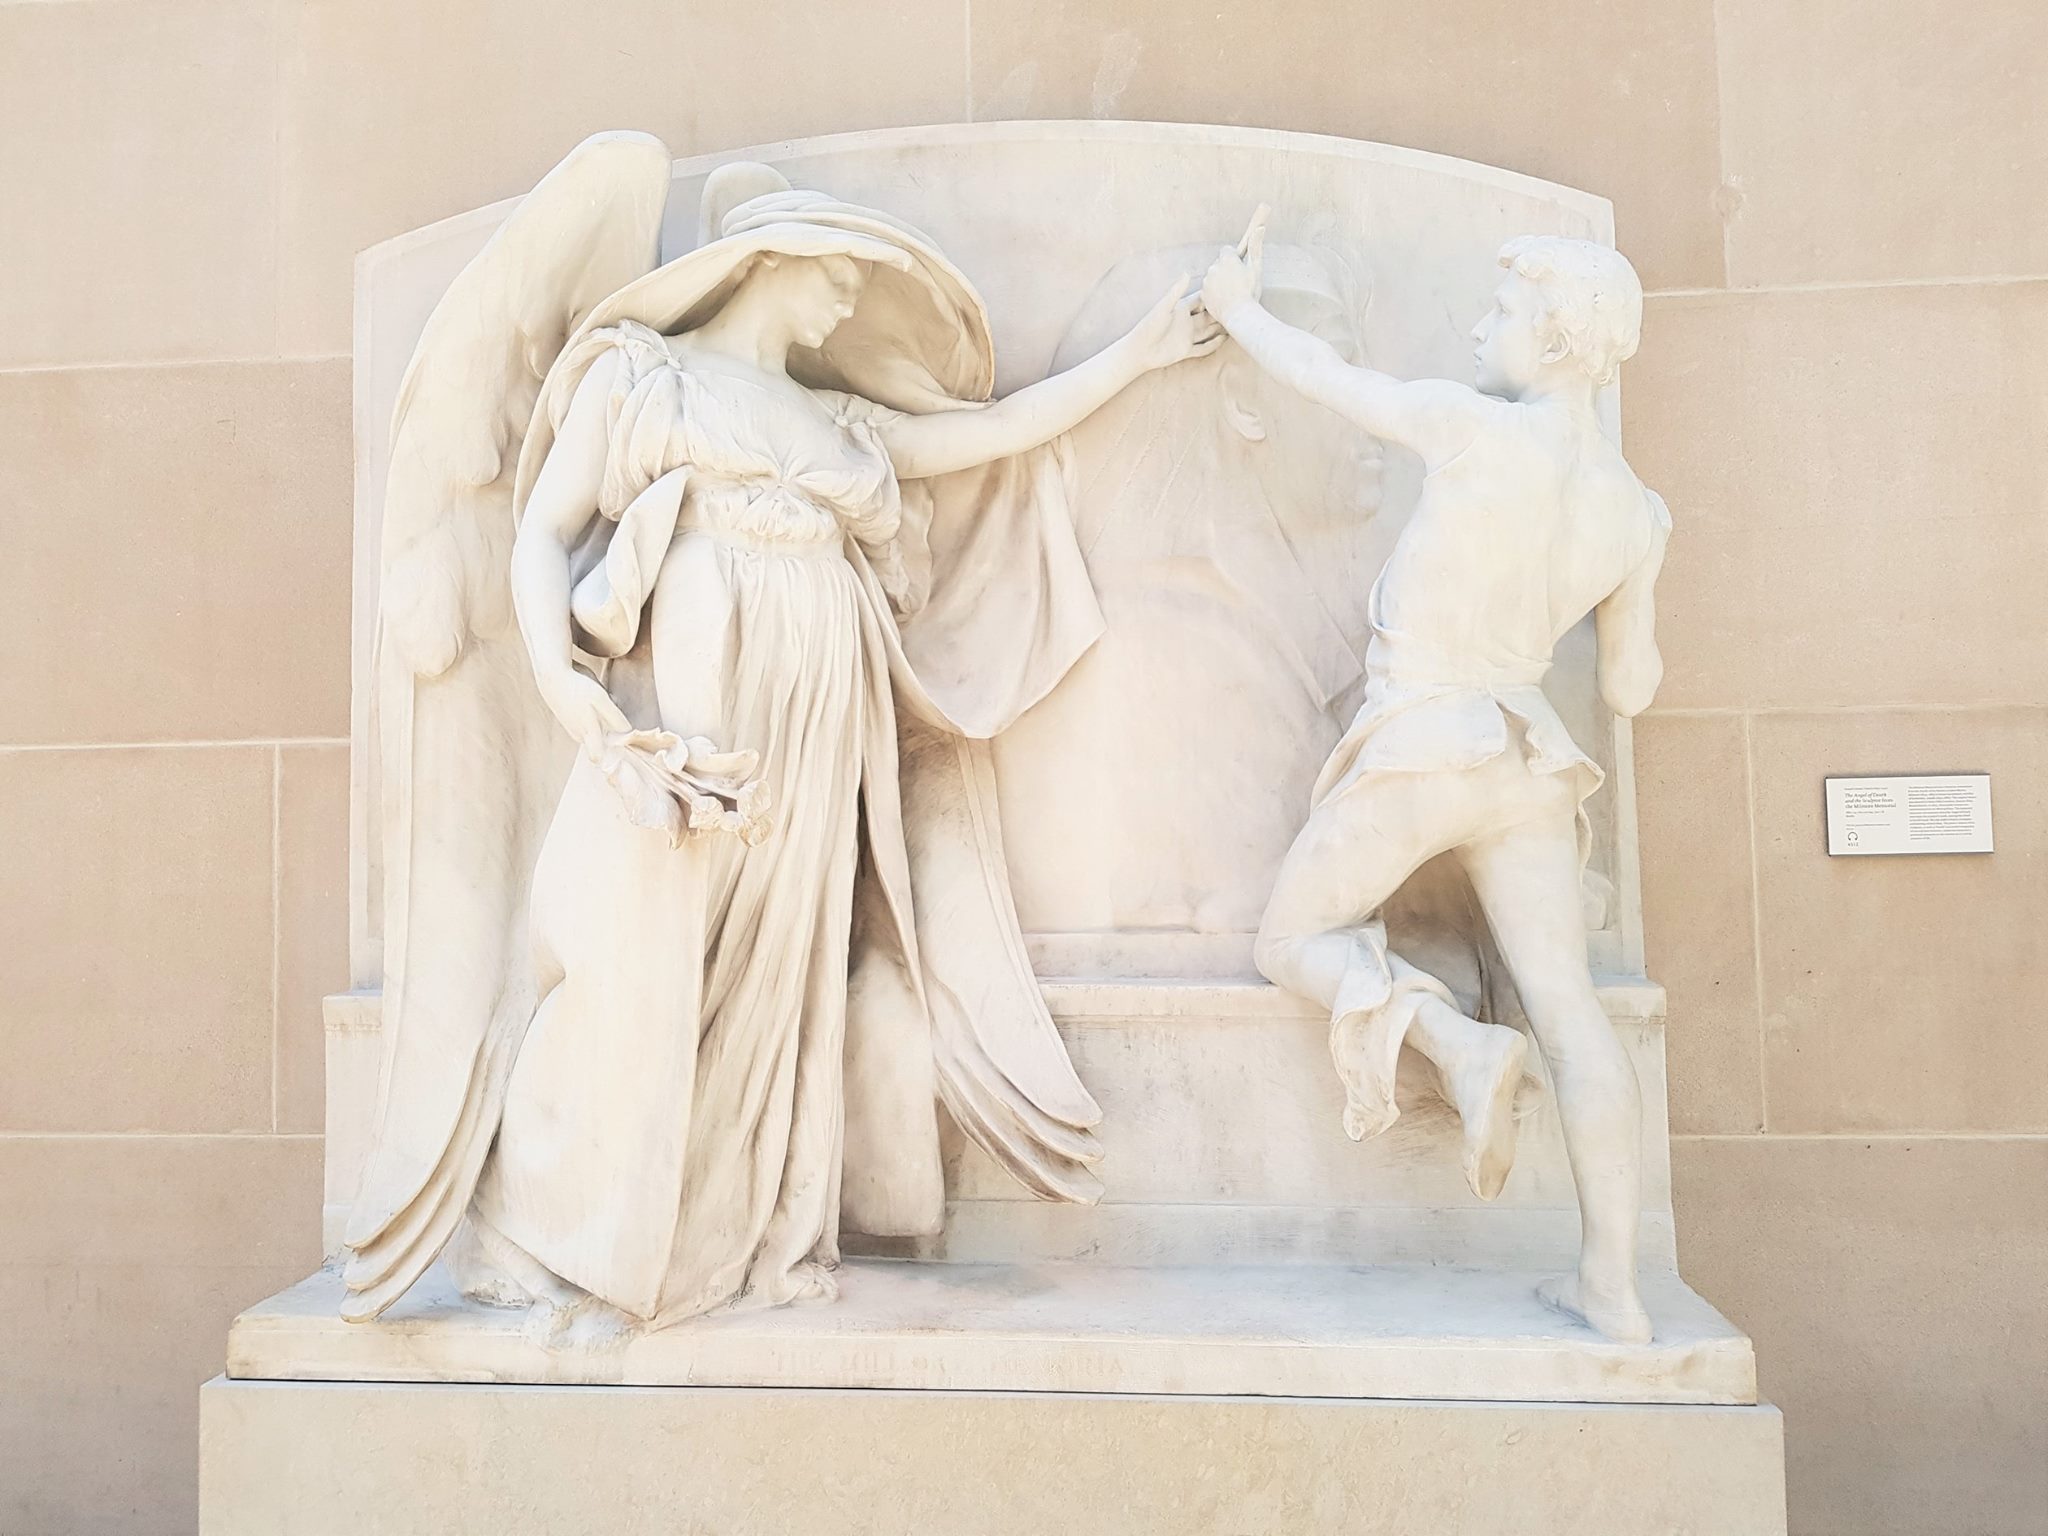
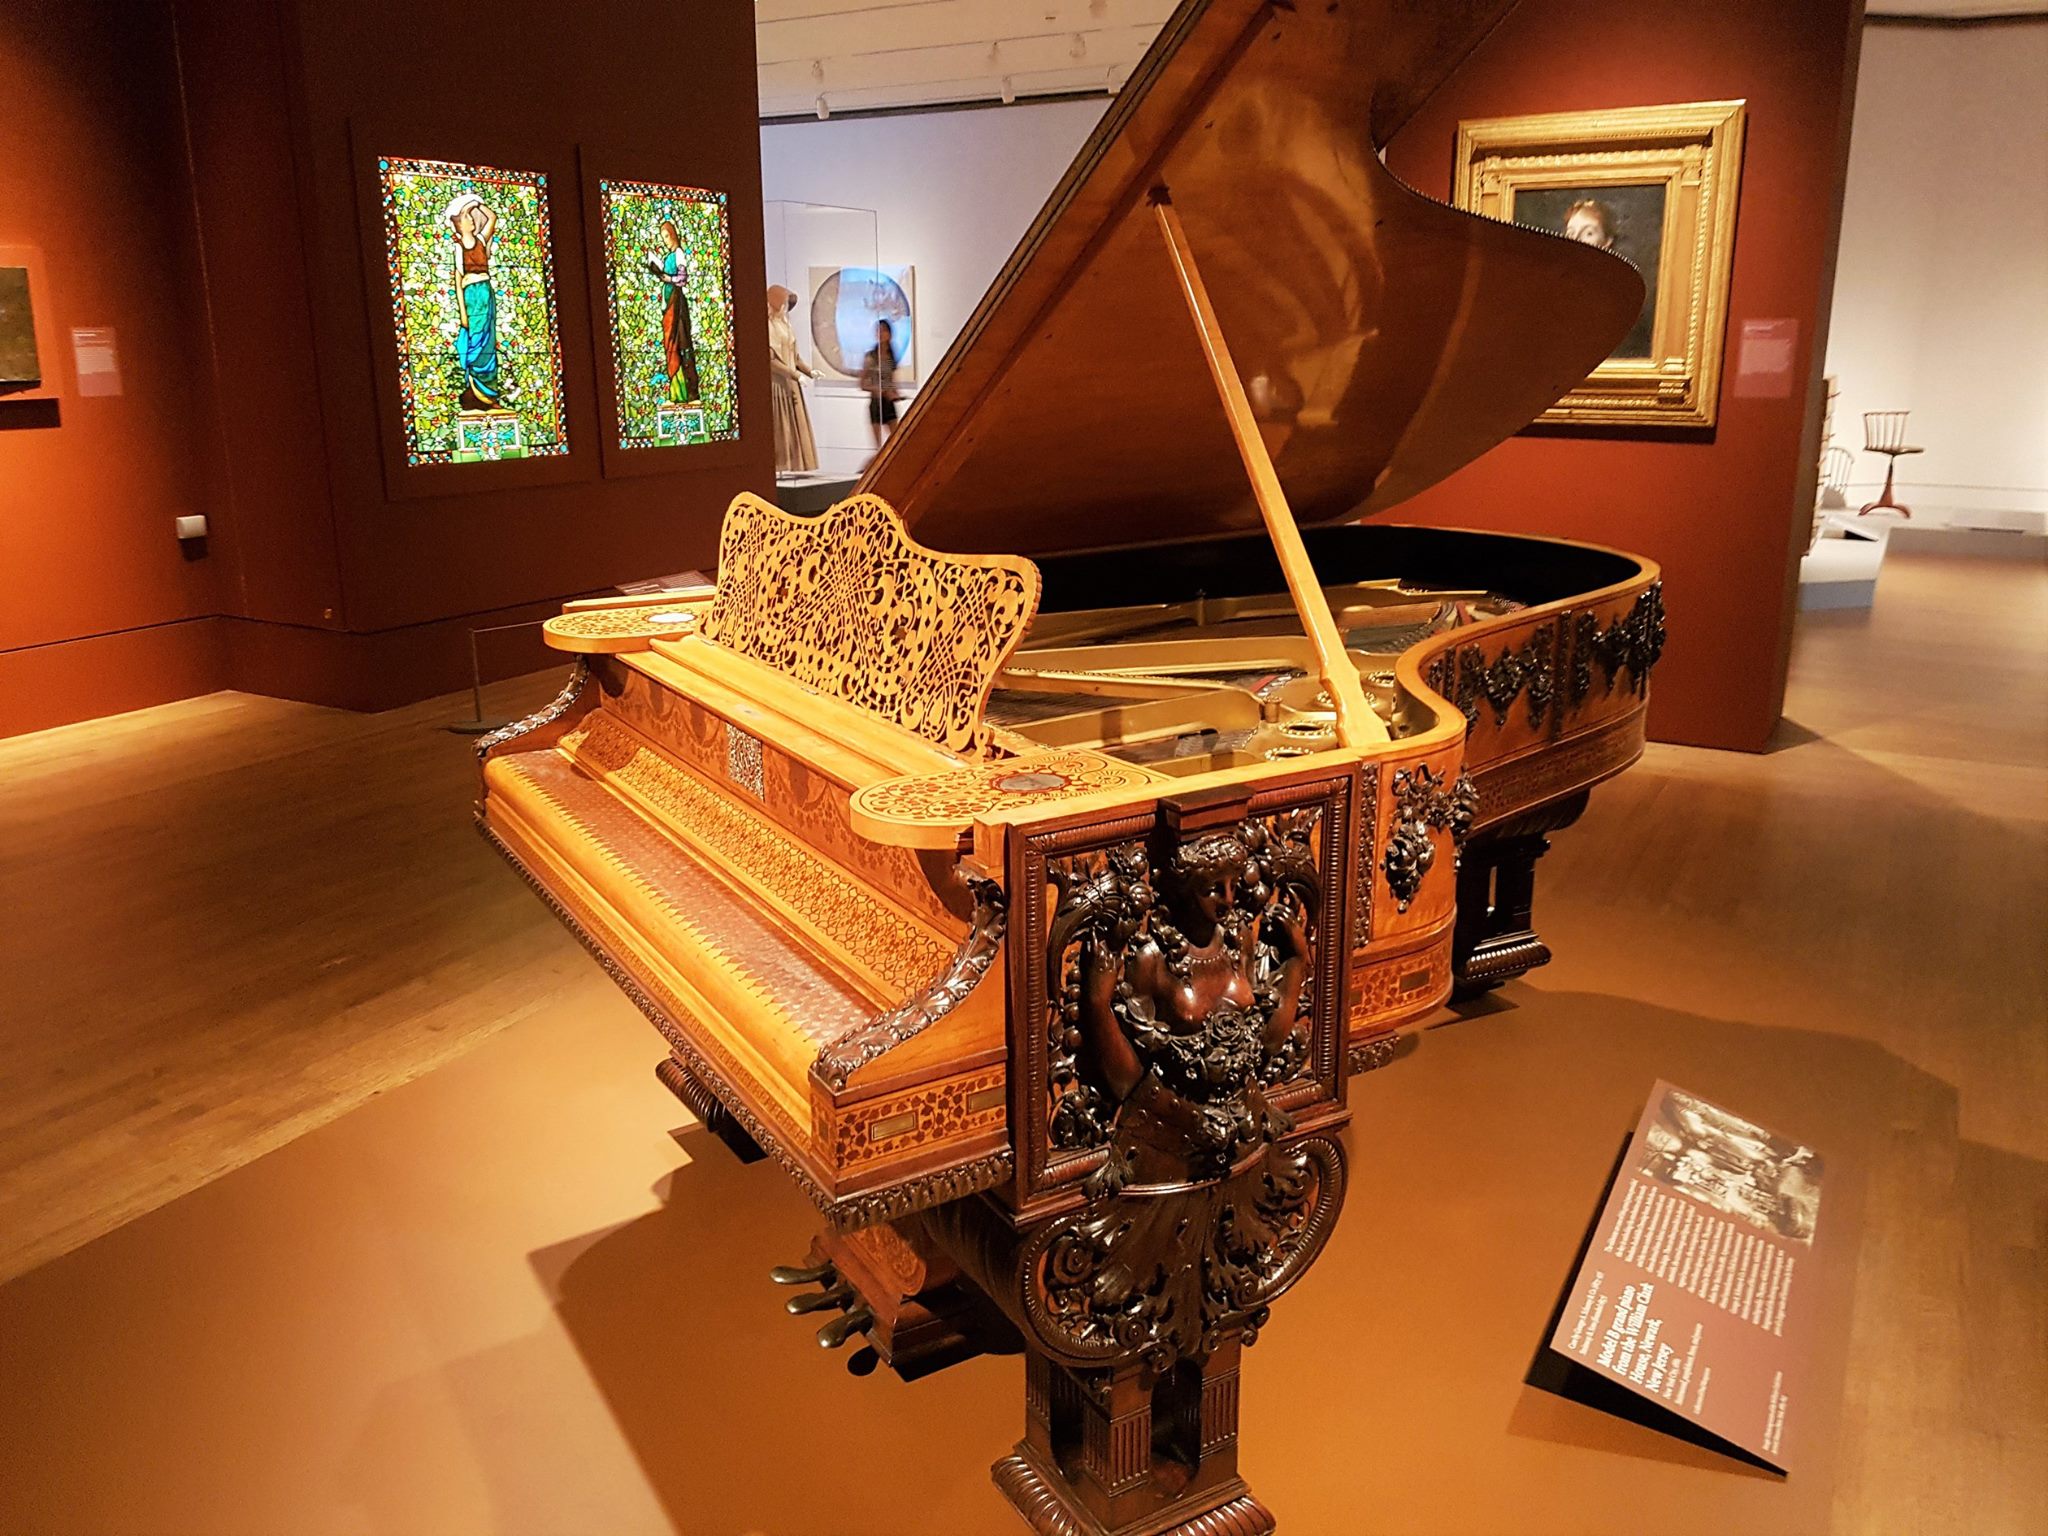
The American Wing covers art from the 18th to early 20th century. Within this wing, there is a bright and spacious courtyard which has various sculptures, stain glass and mosaic art. This was another one of my favourite place in the museum. I also enjoyed the various galleries of furnished room and painting artworks. This was my first time seeing American art, so I was quite blown away by the bright use of colour.
The Charles Engelhard Court
American Wing
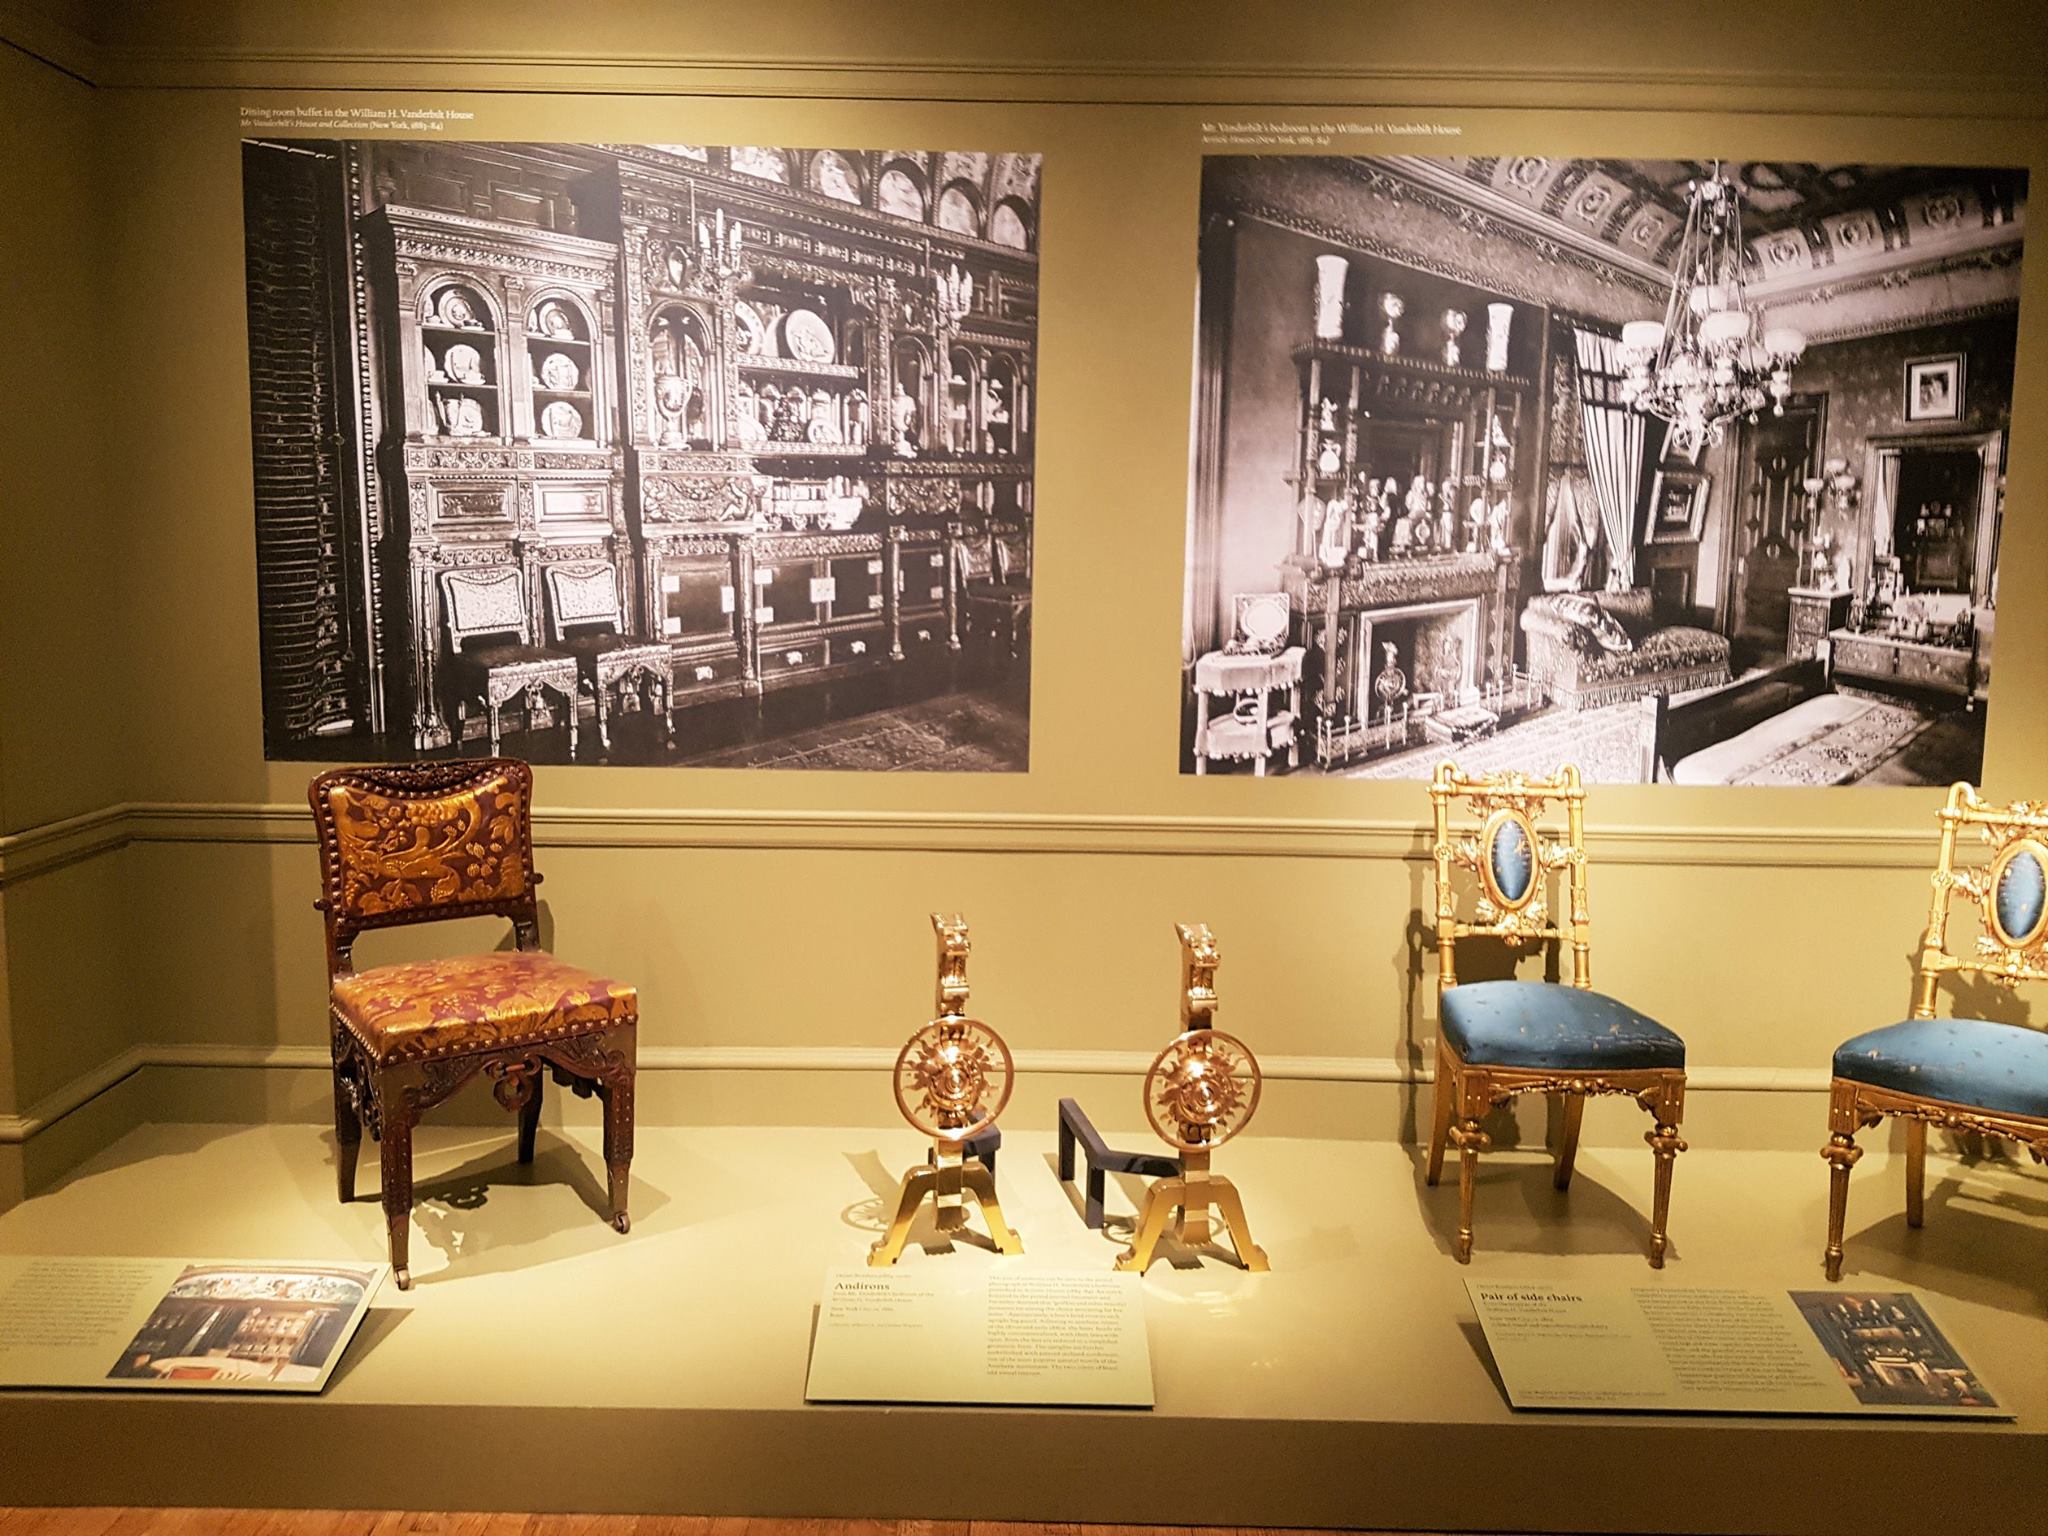
Medieval Art
The Medieval collection runs through the centre of the first floor. It includes art from the 4th to the early 16th century from Byzantine and Europe. I love Medieval art religious art, so I really enjoyed this area. My favourites are the oddly shaped busts.
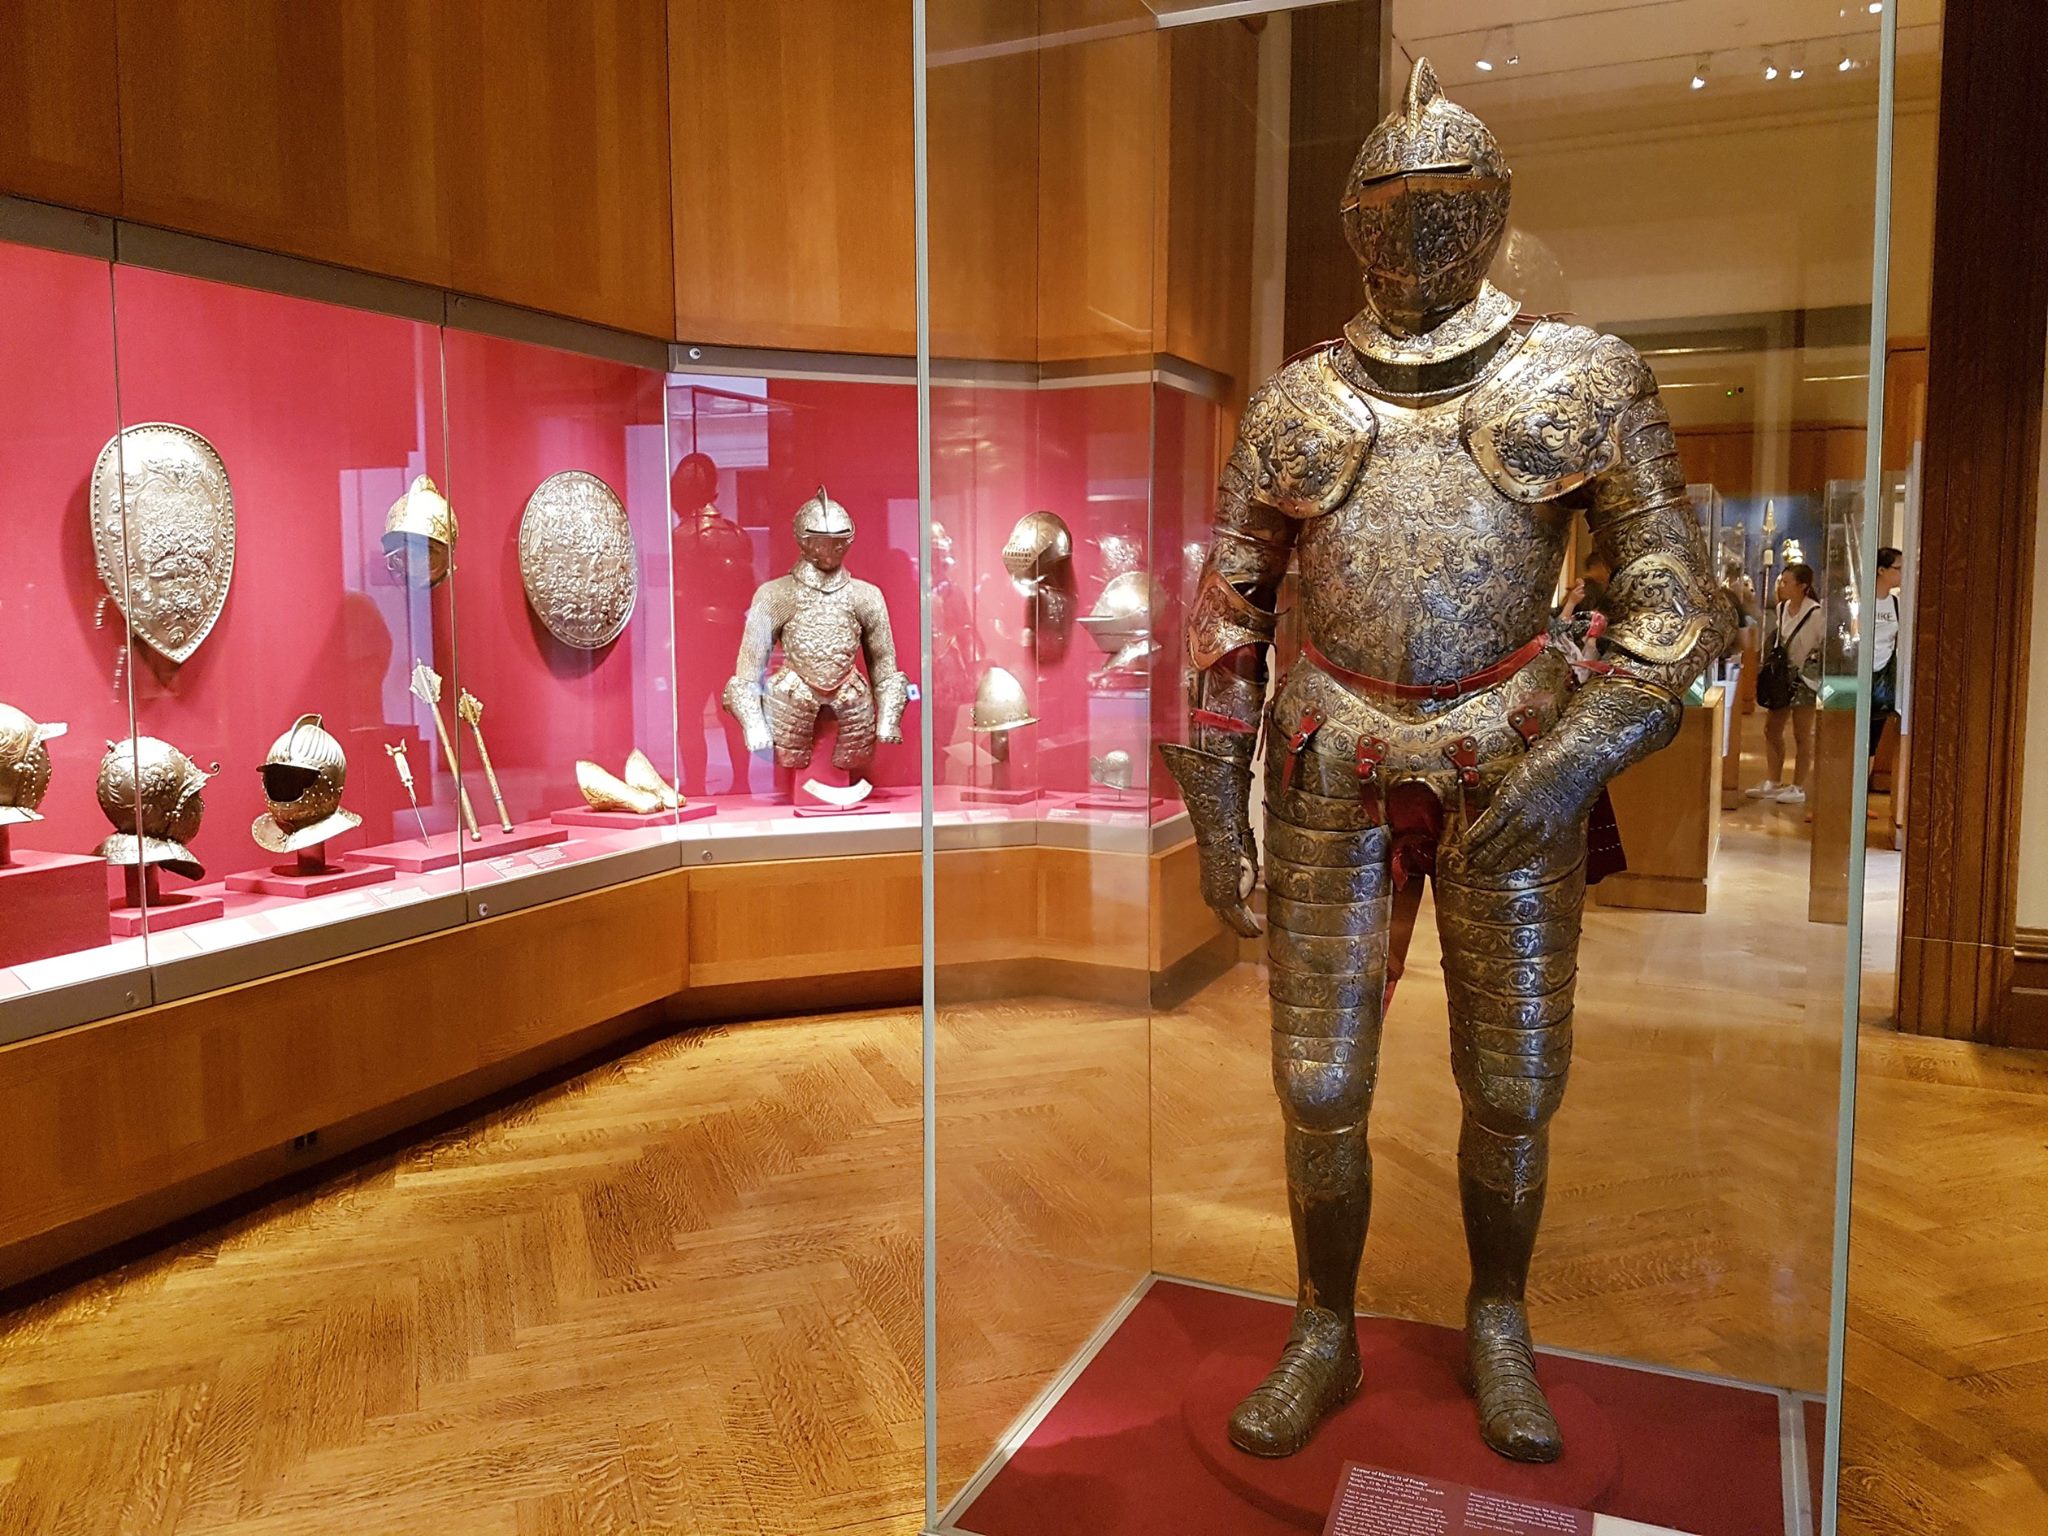
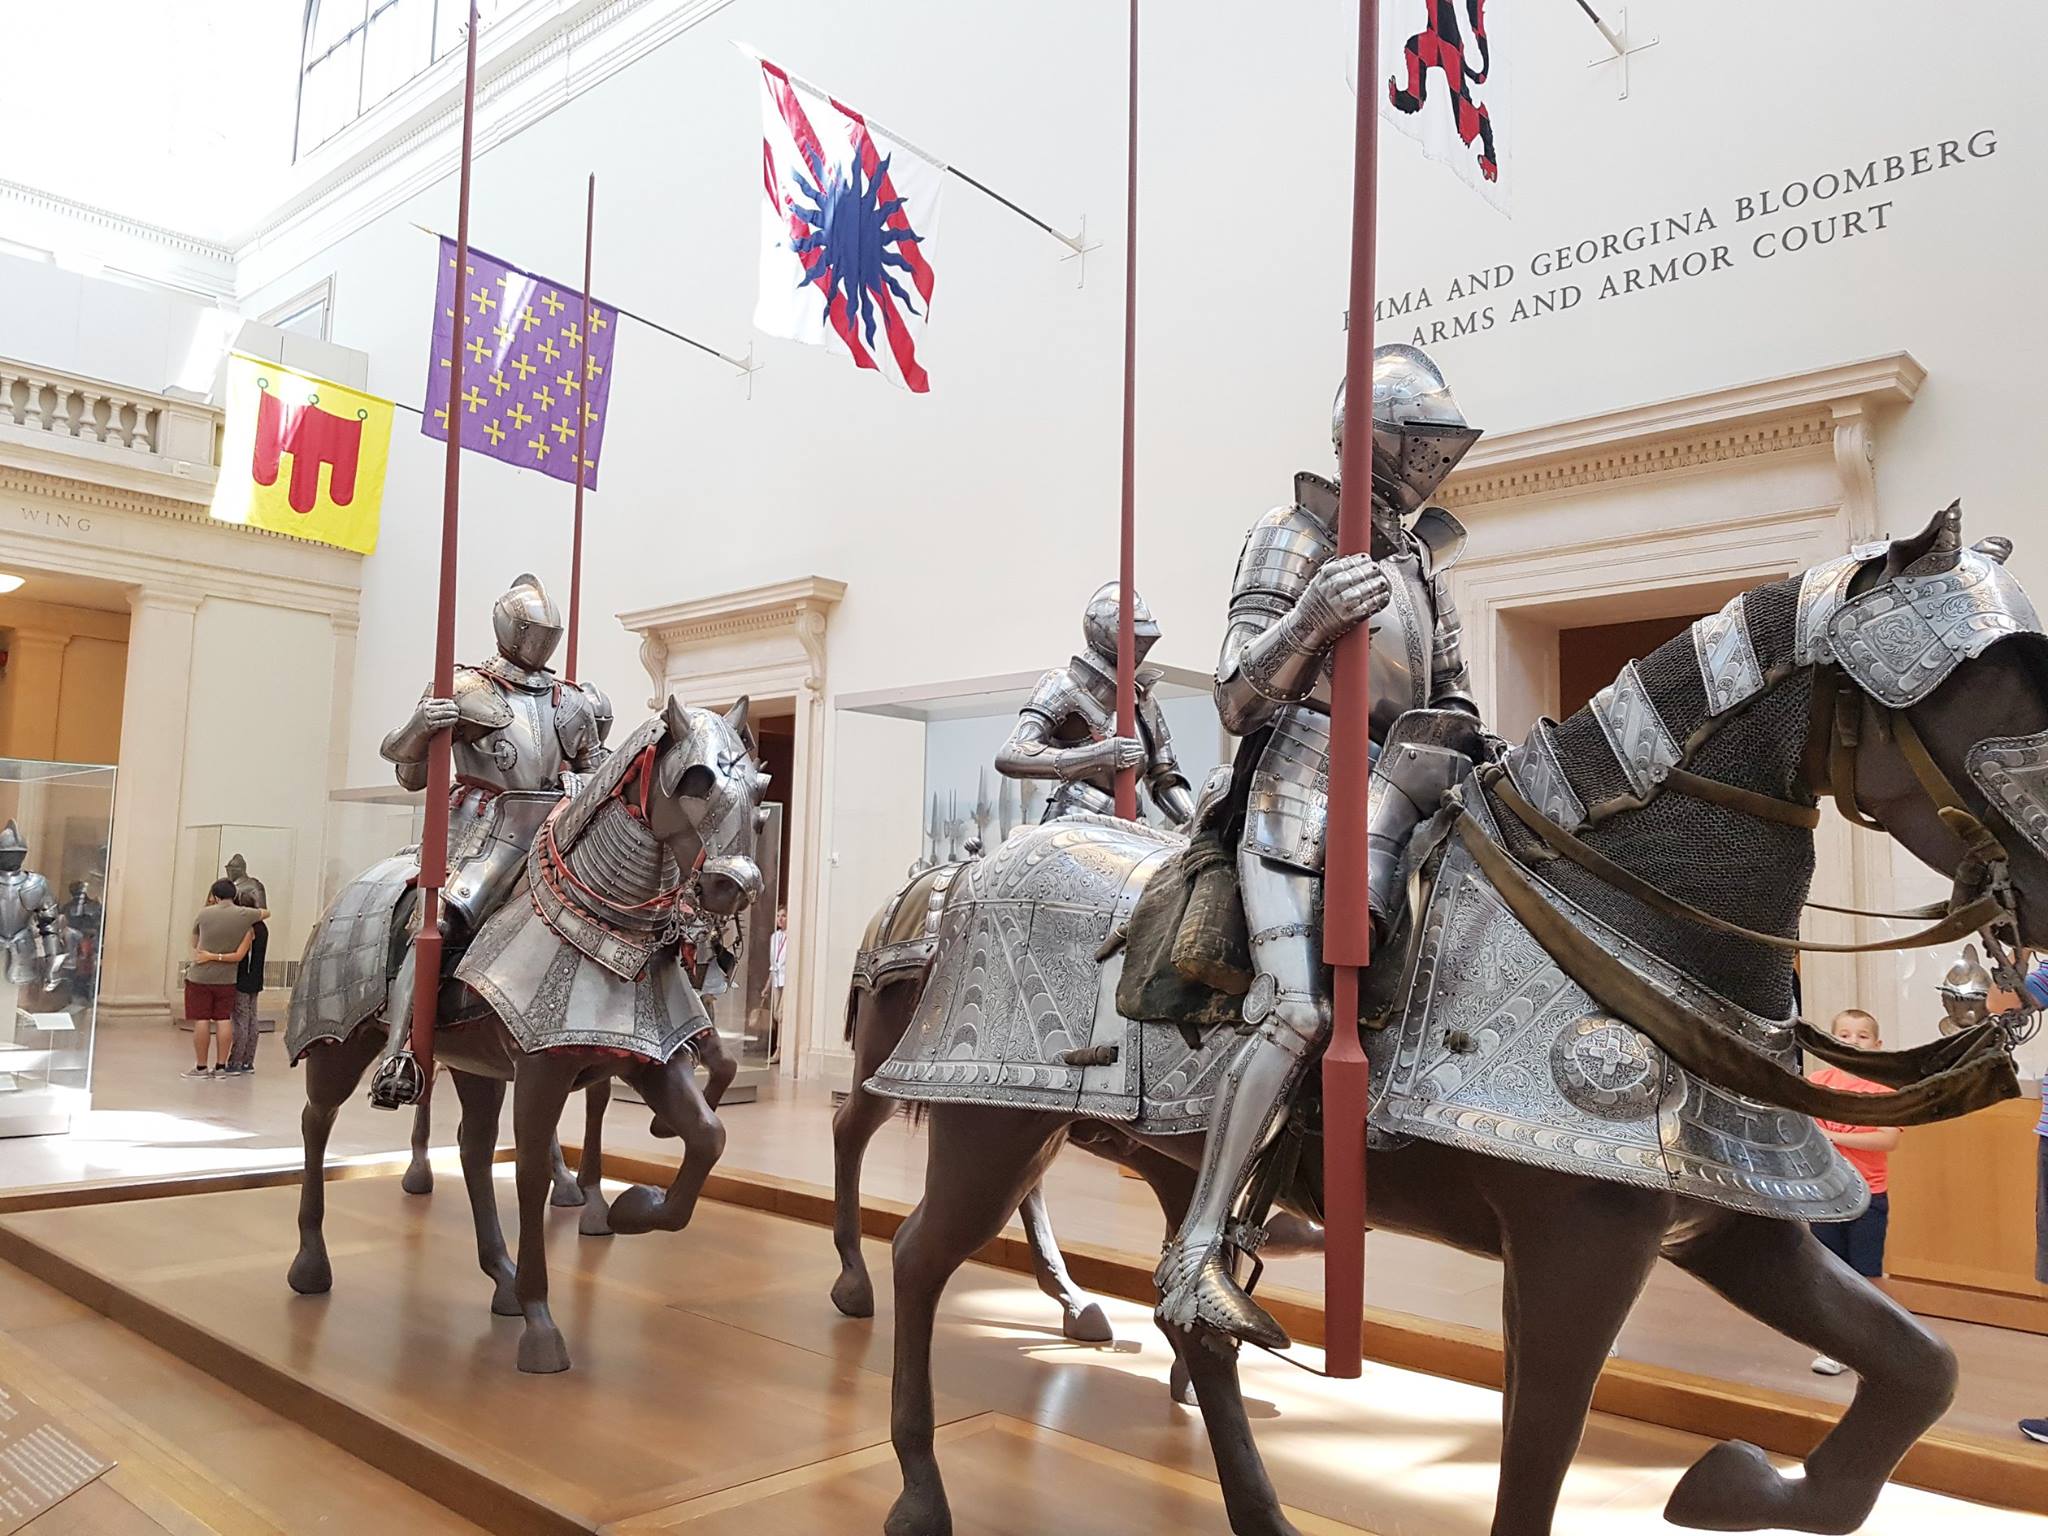
Arms and Armor
The Arms and Armor is a small gallery, off the Medieval wing. Apparently it one of the museums most popular collections, possibly because of the impressive ‘parade’ of armoured figures on horseback. This gallery includes weaponry and armour from a variety of geographical regions.
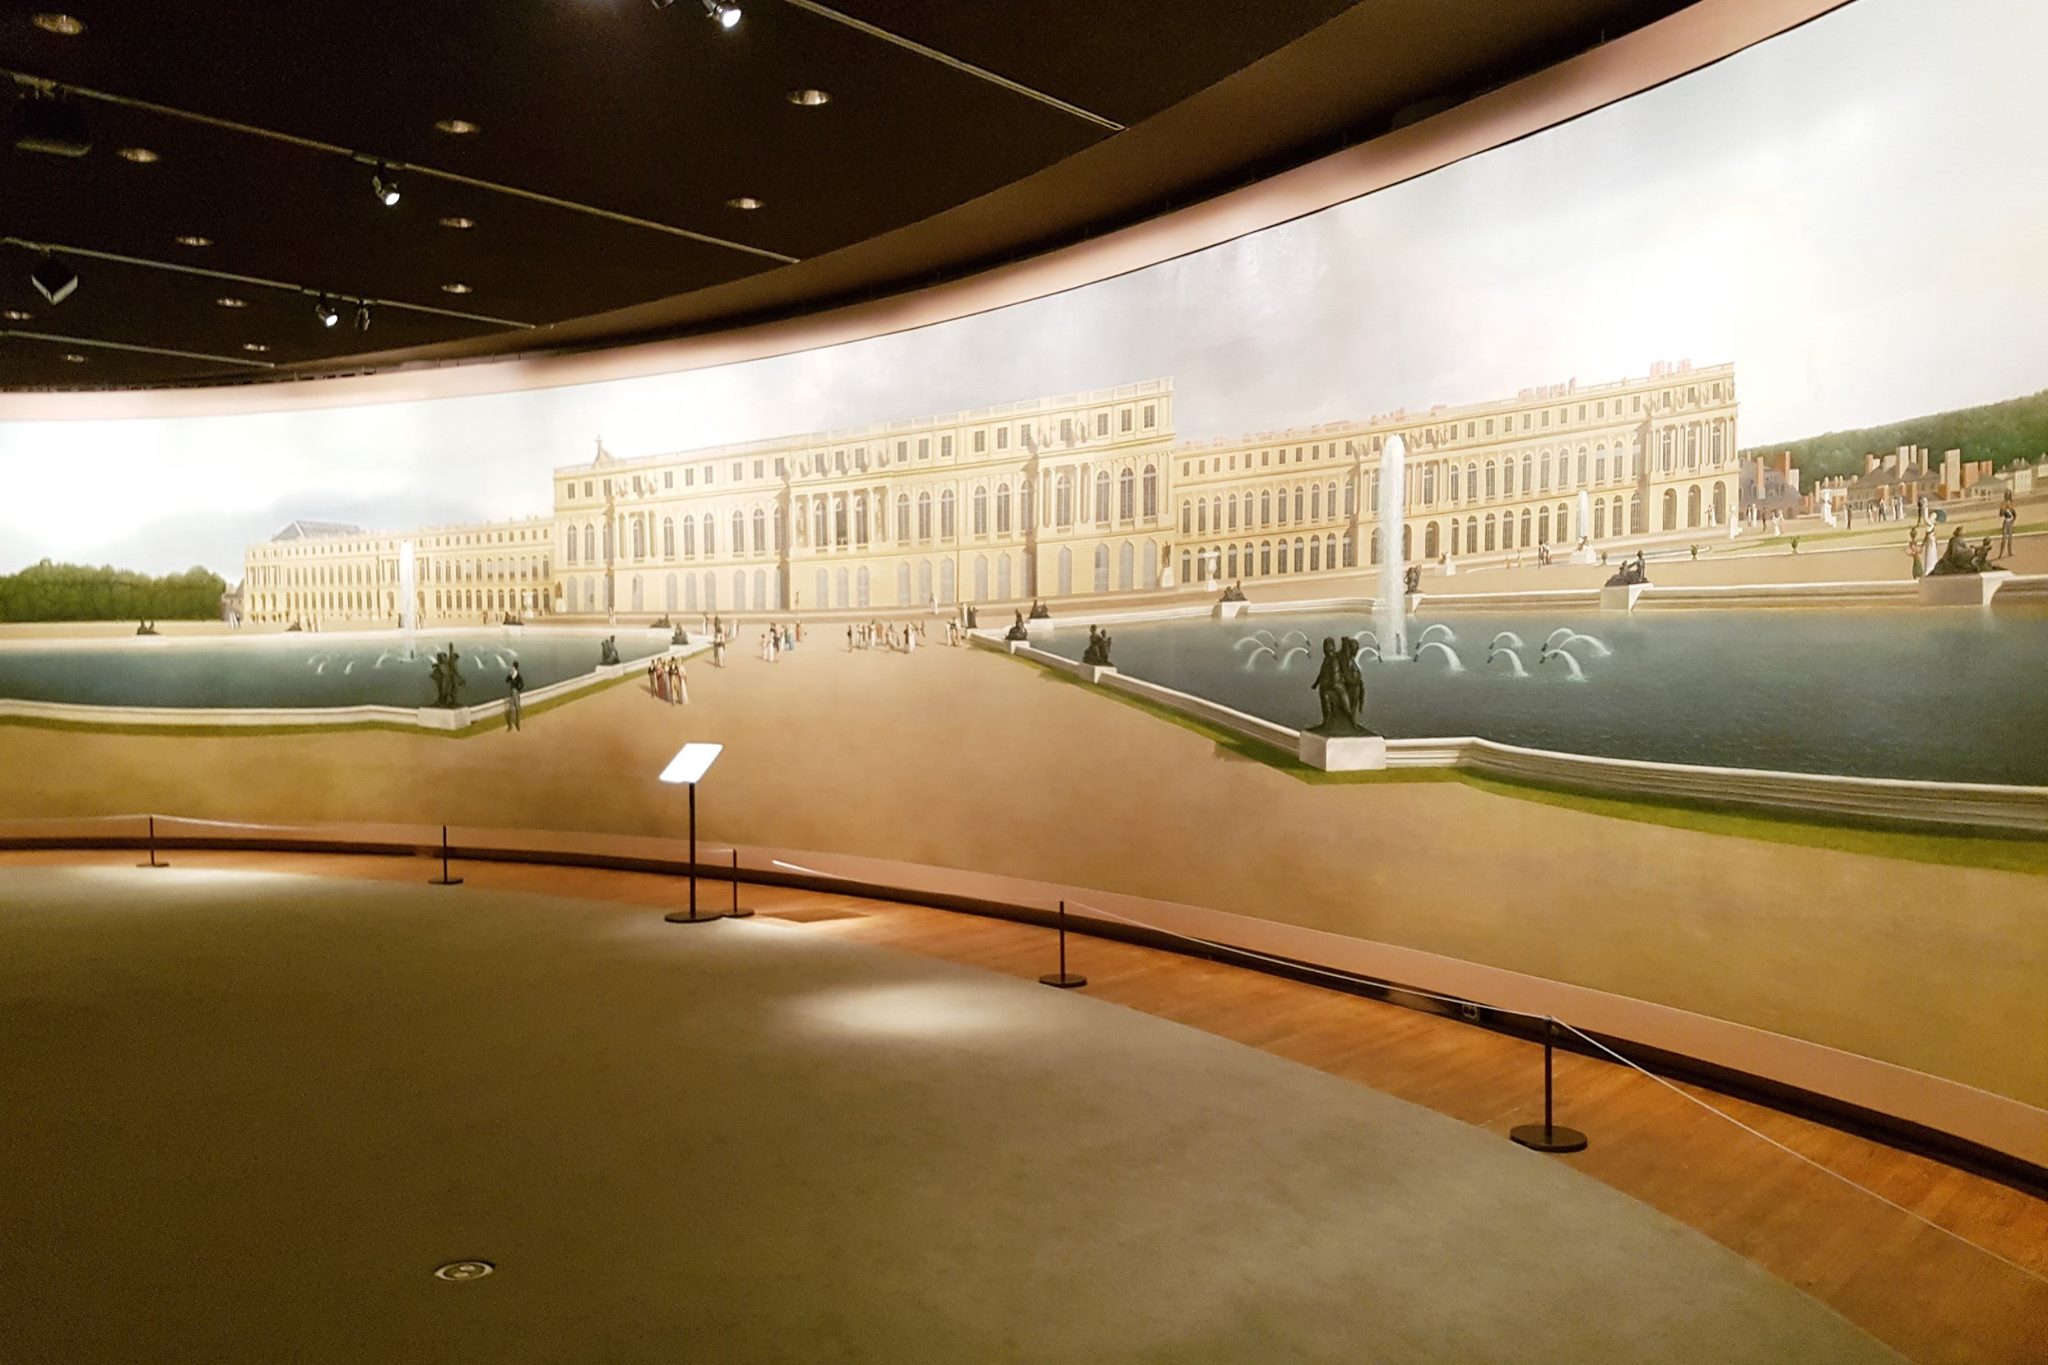
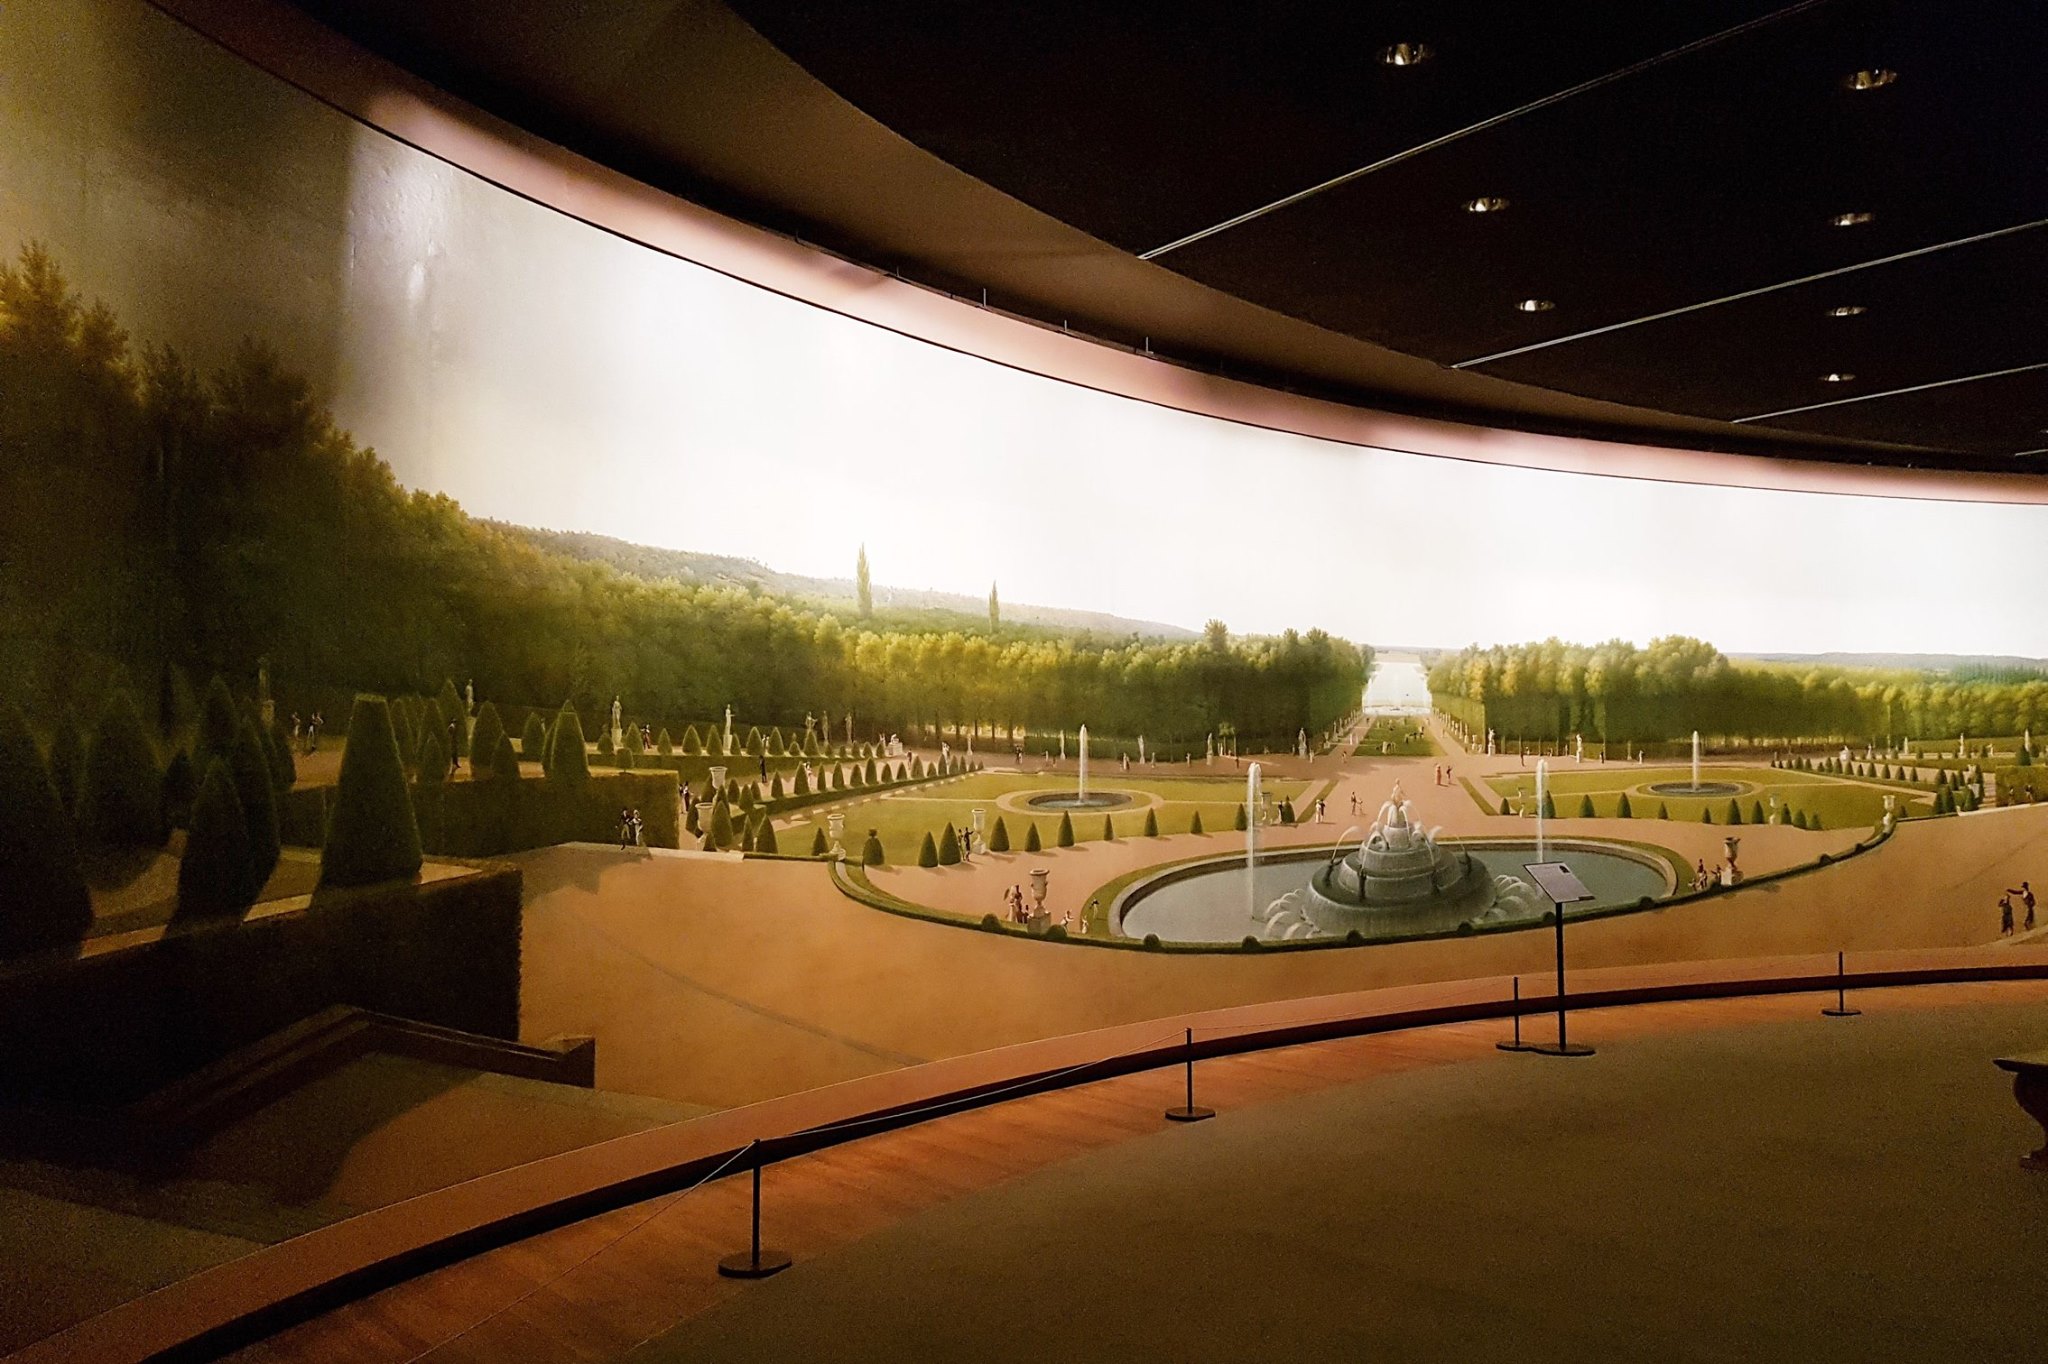
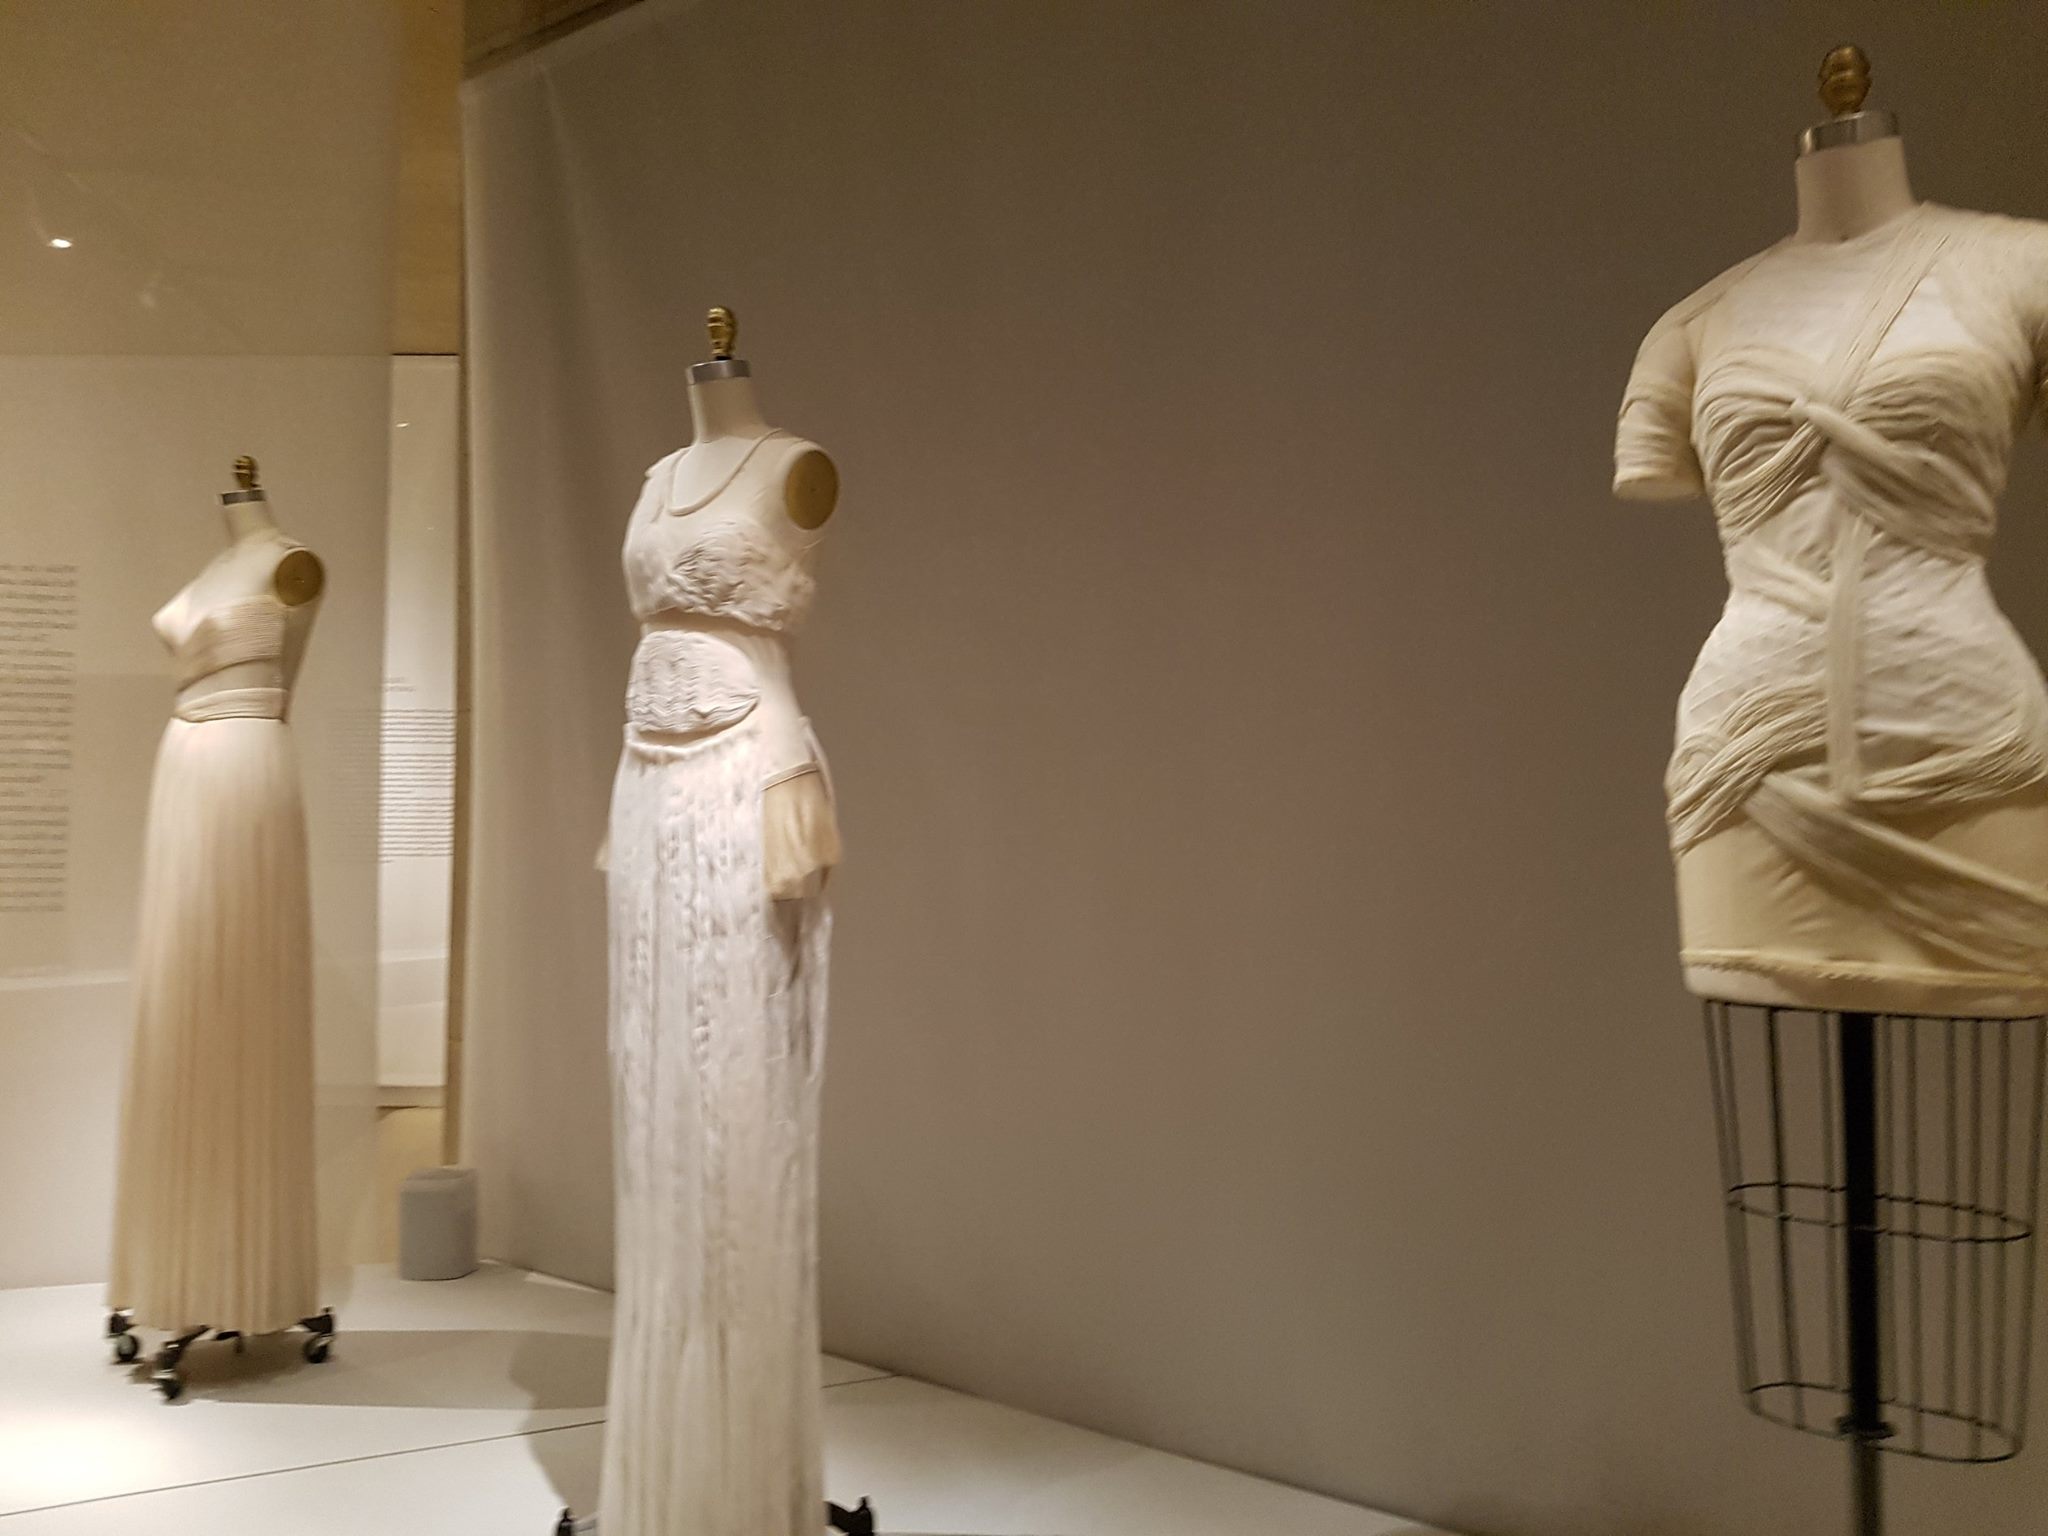
Manus x Machina: Fashion in an Age of Technology
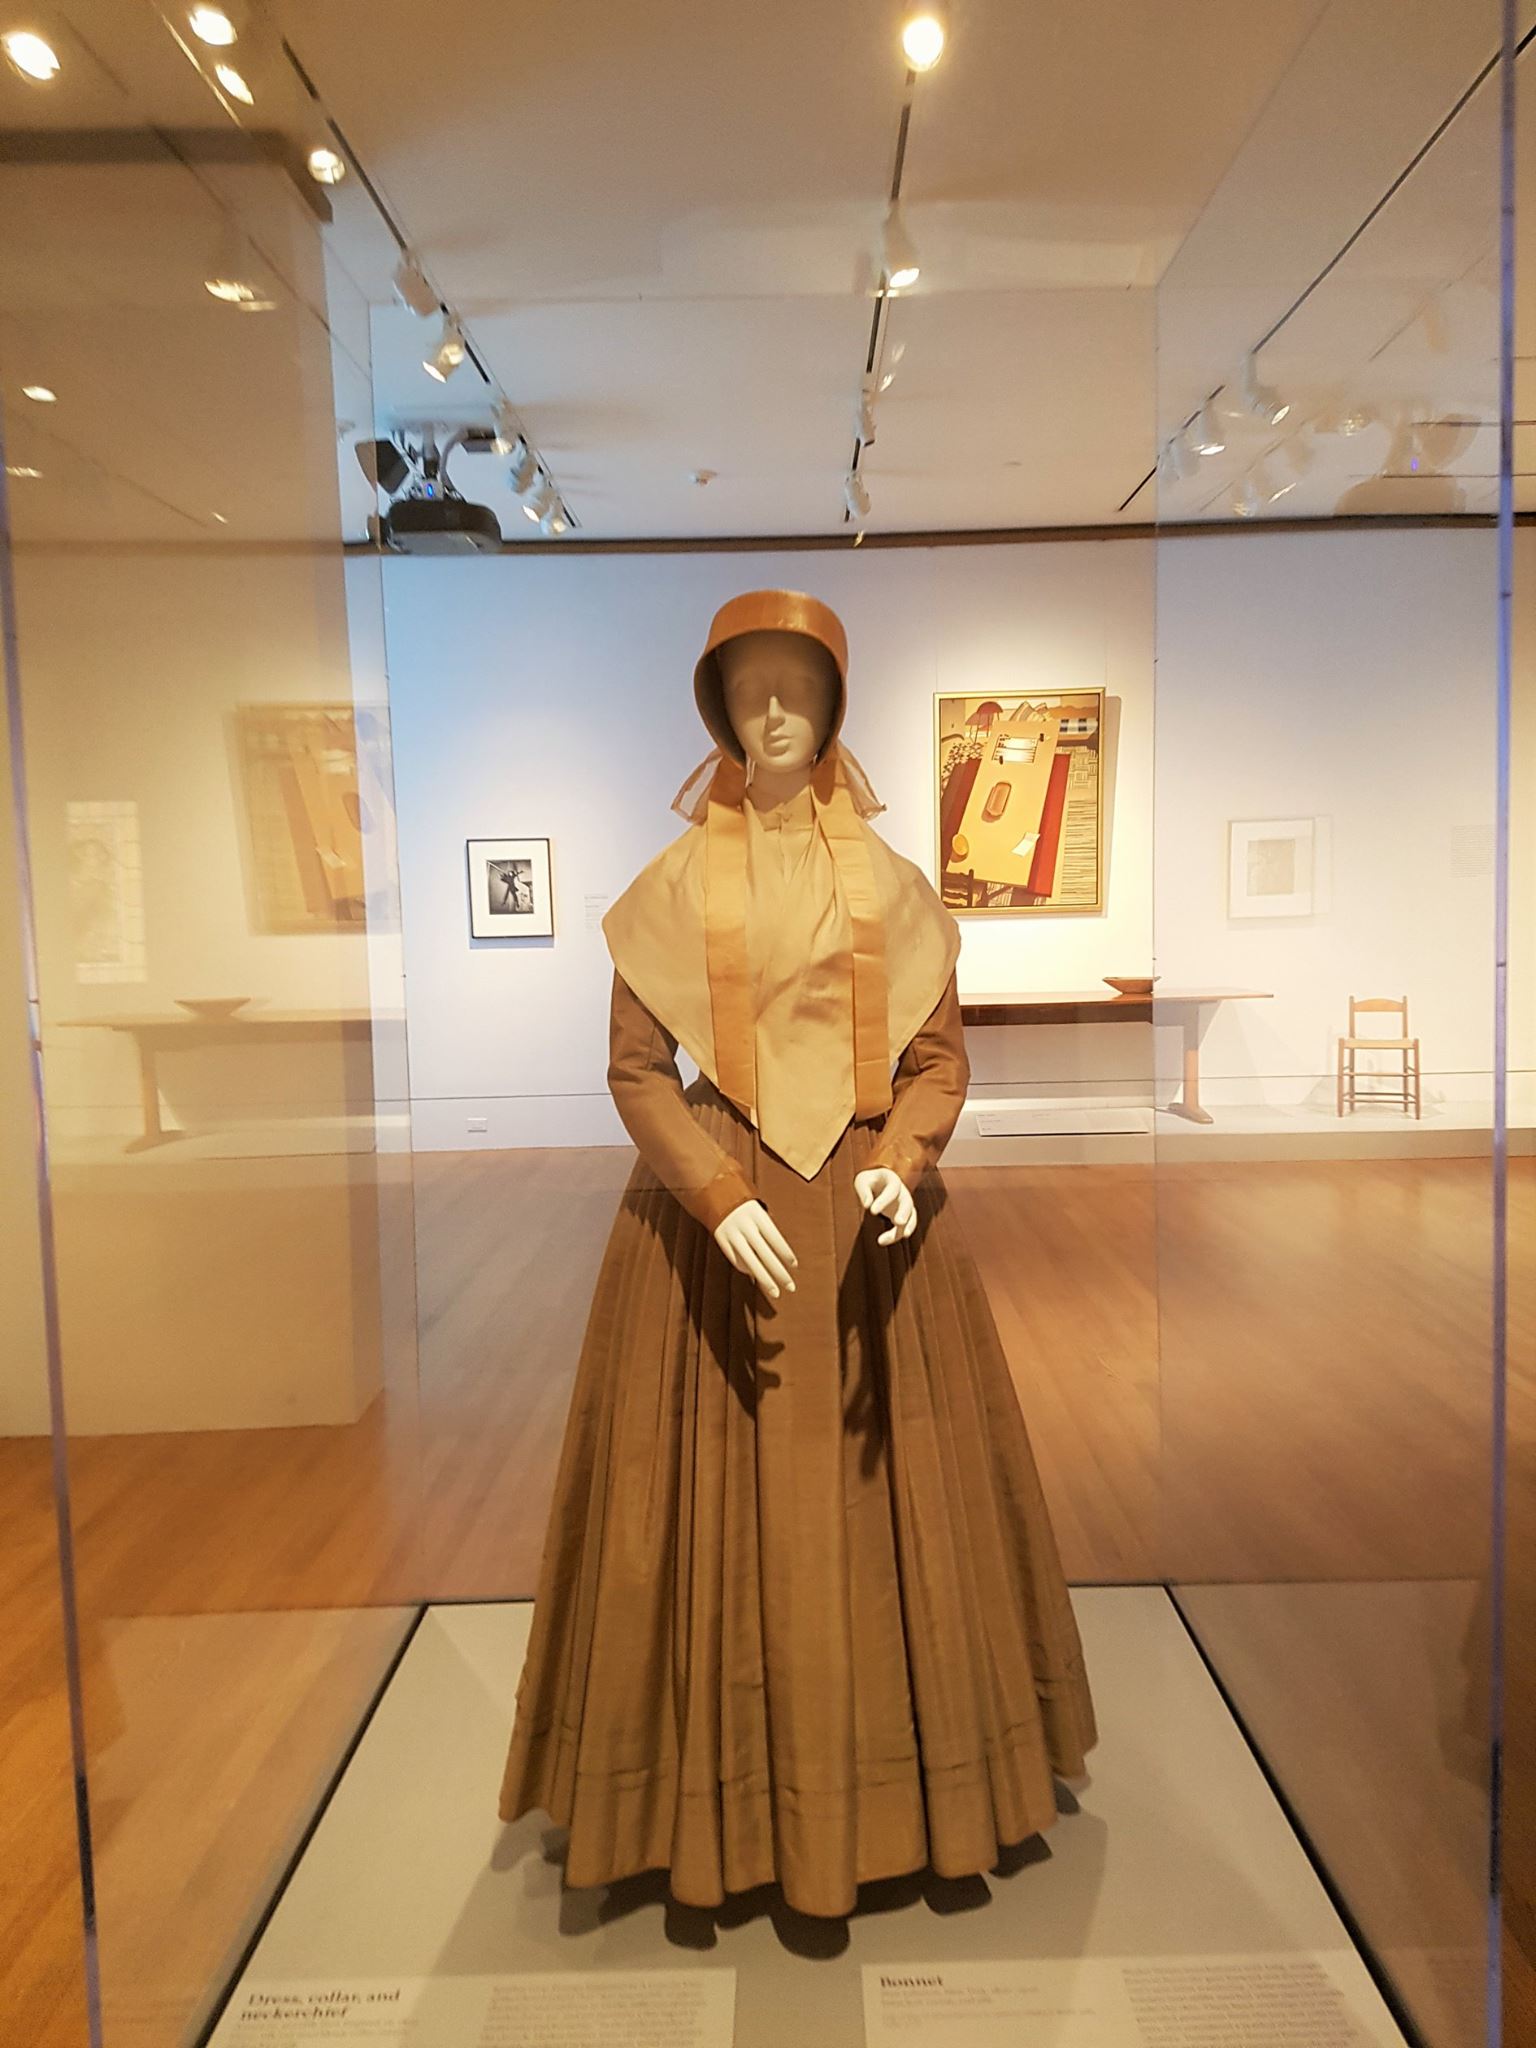
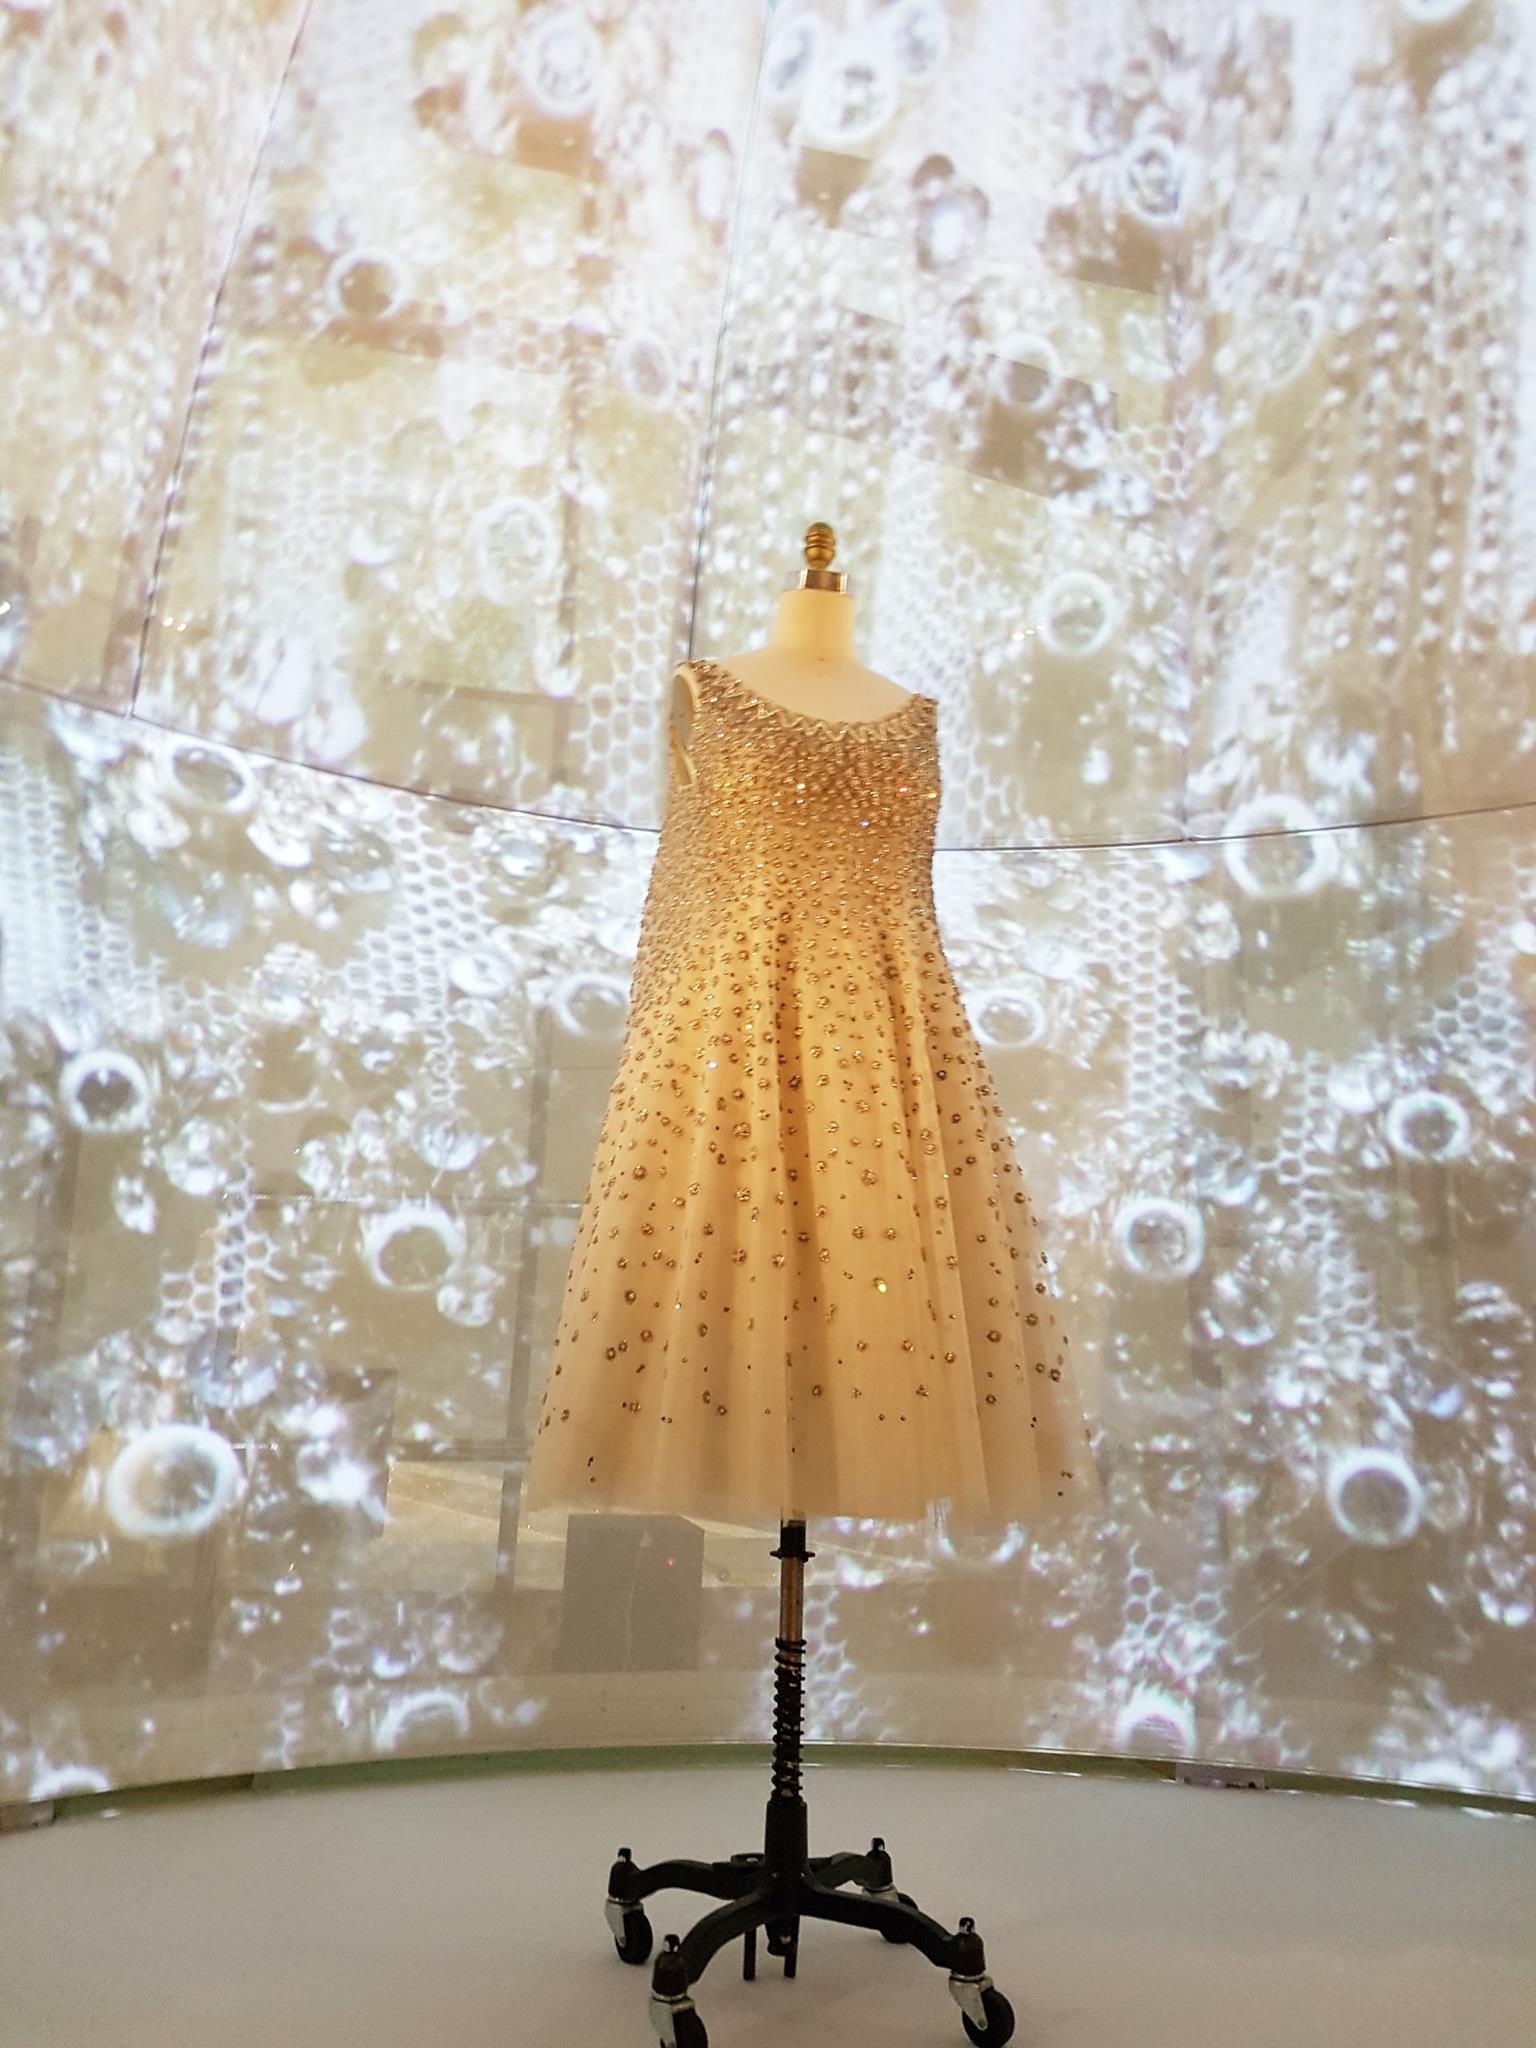
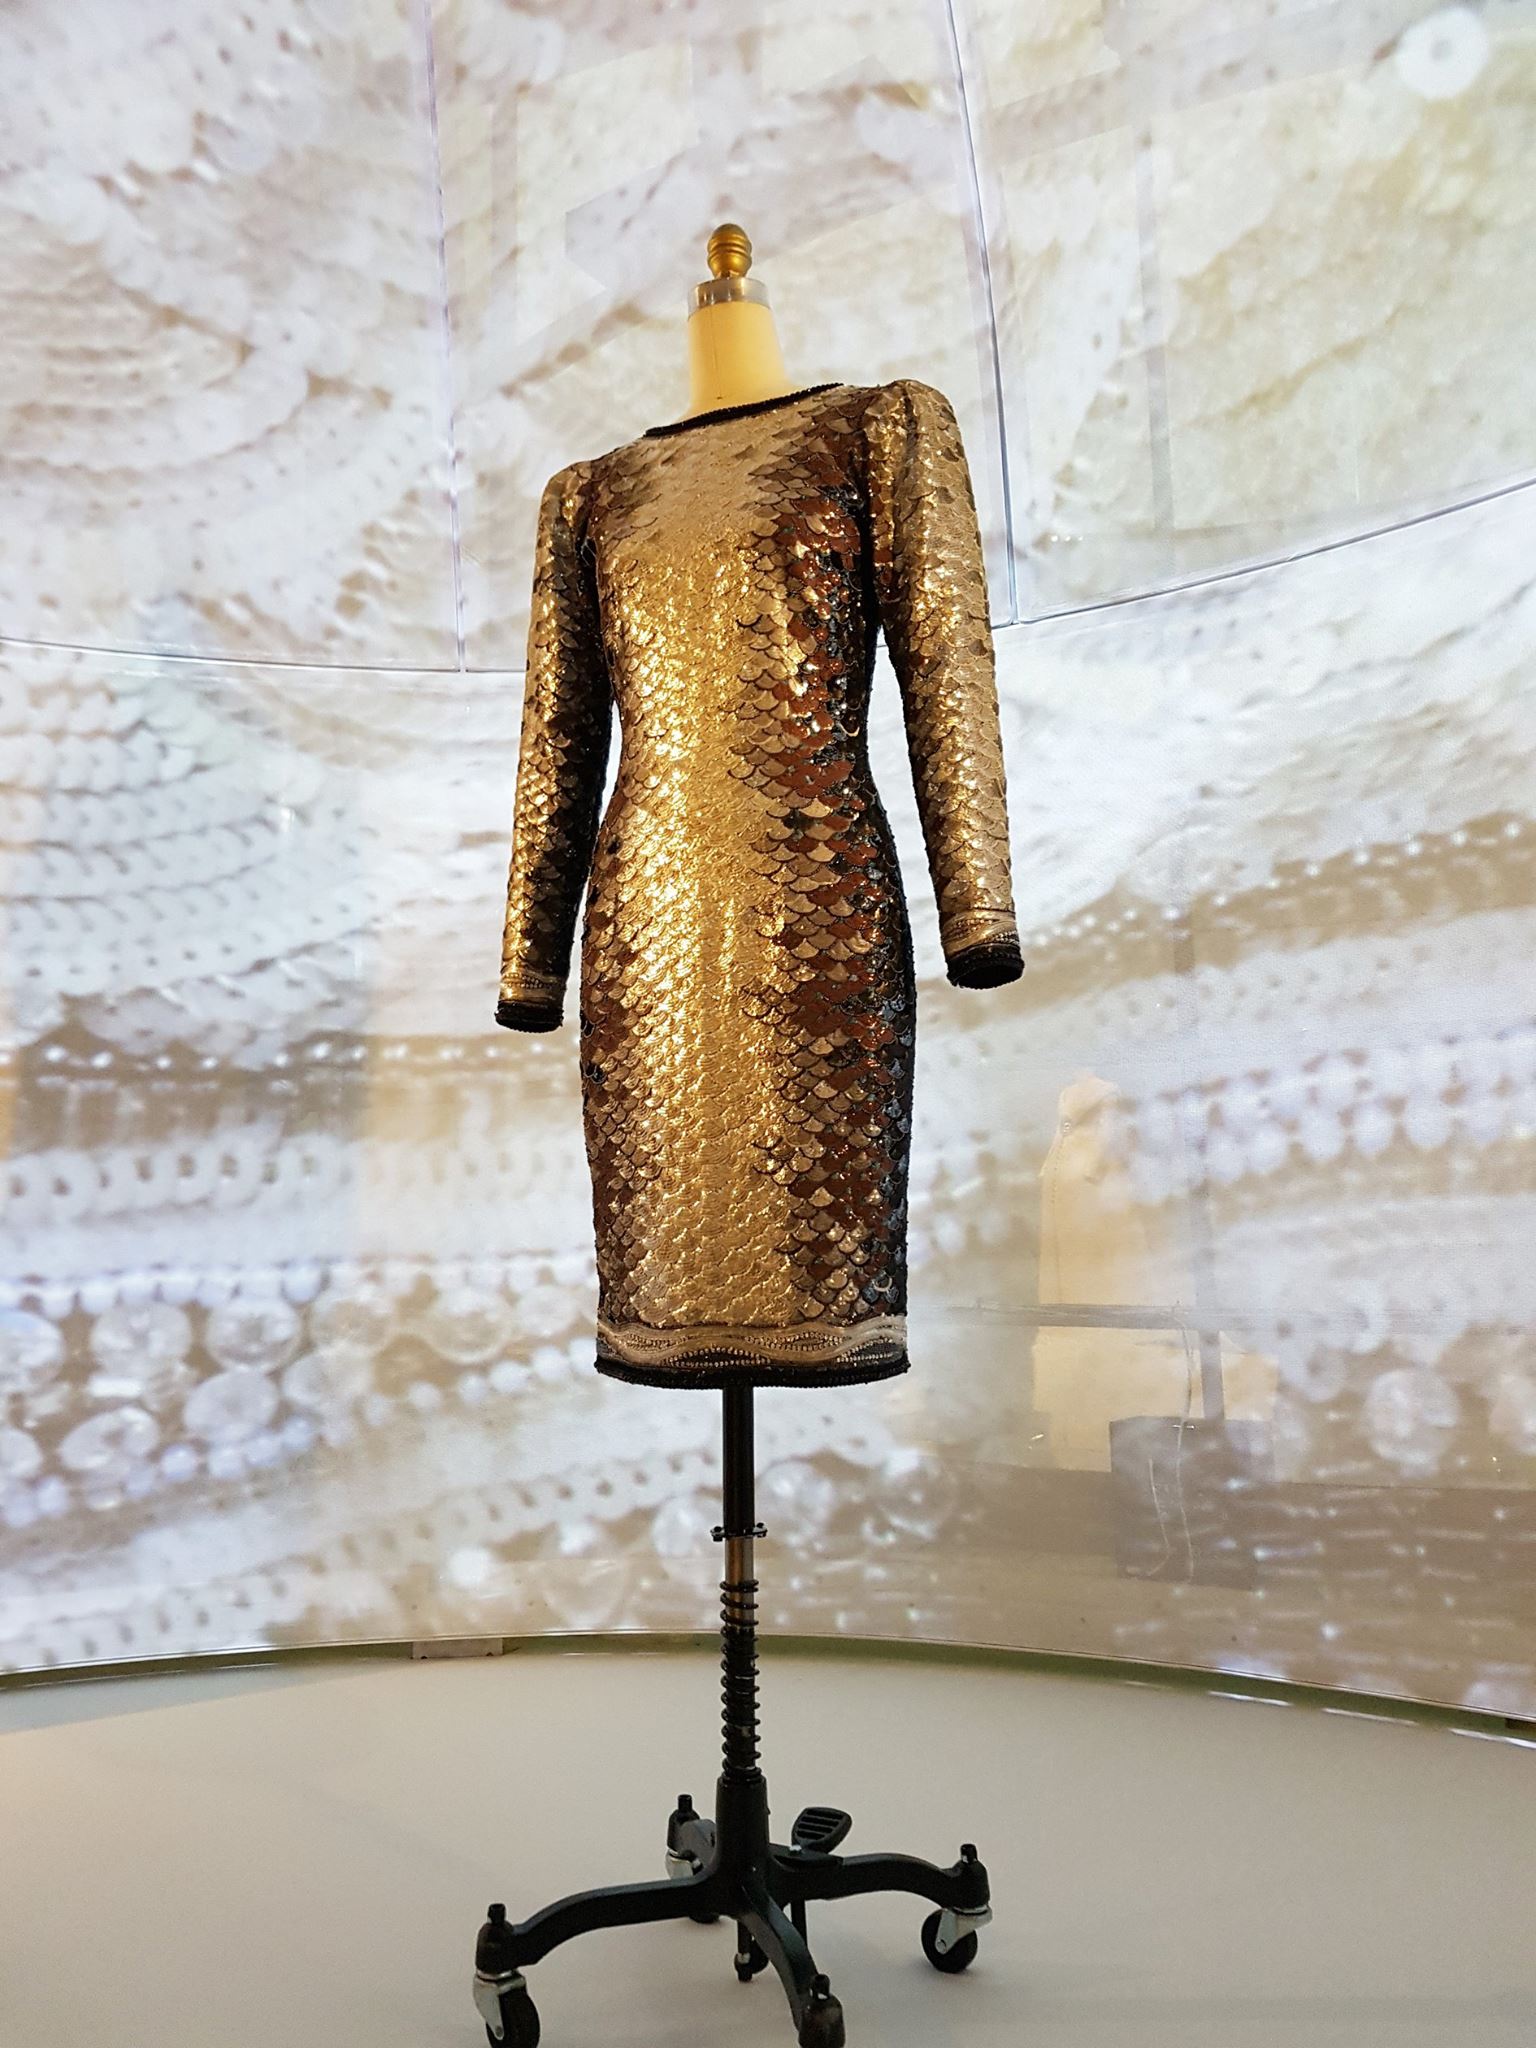
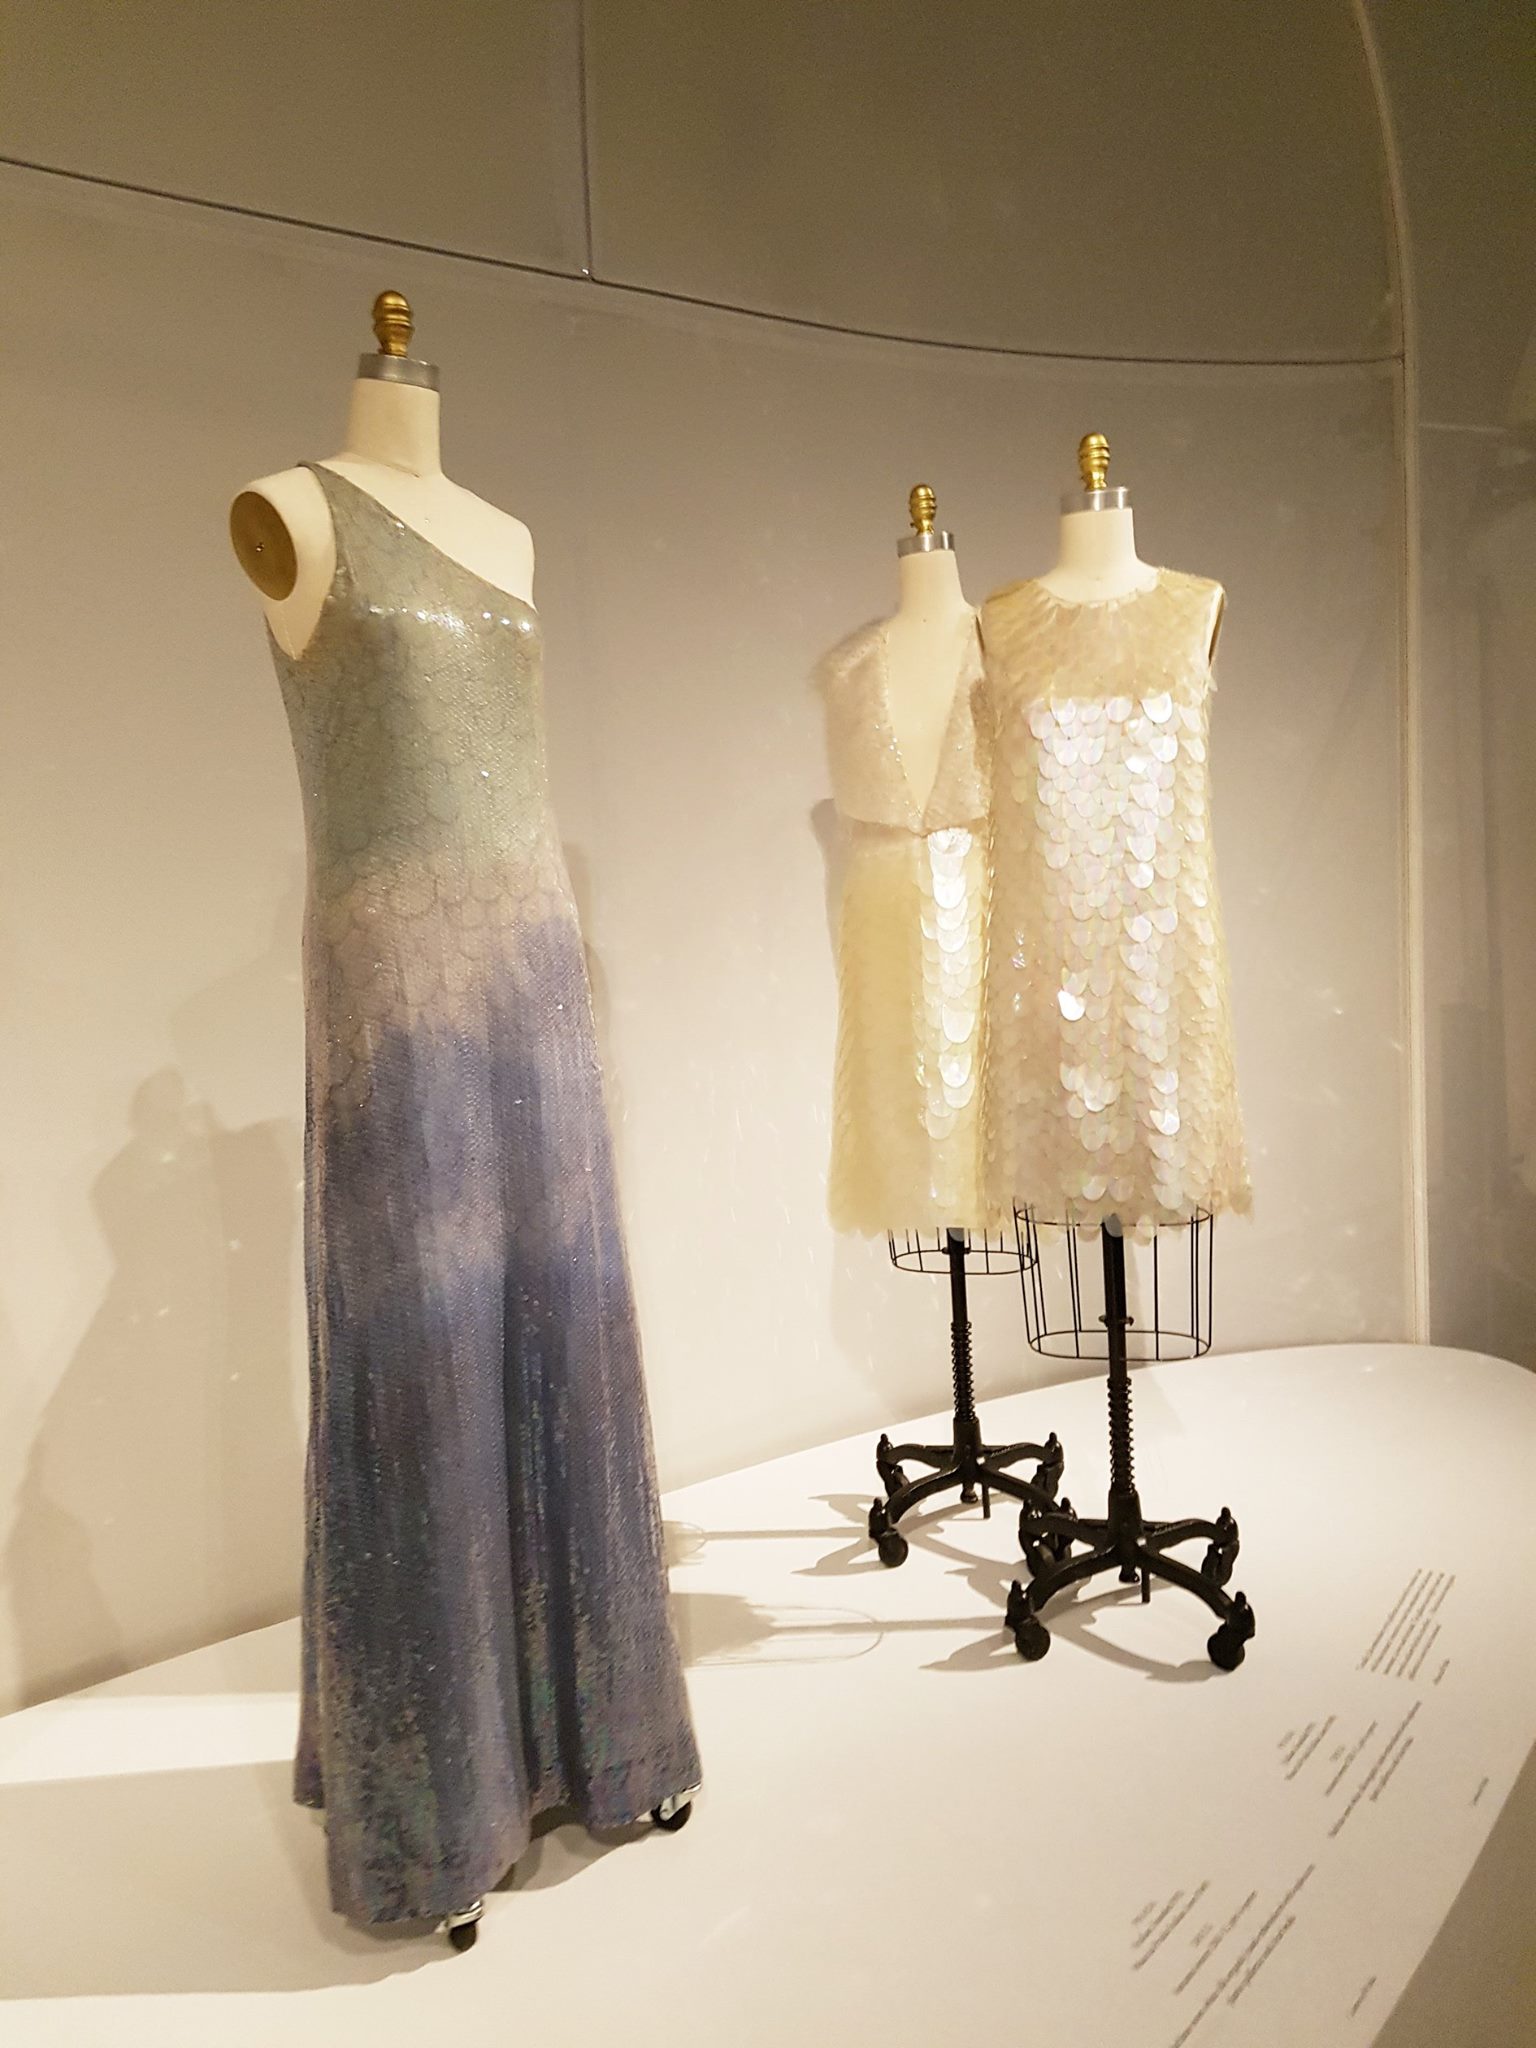
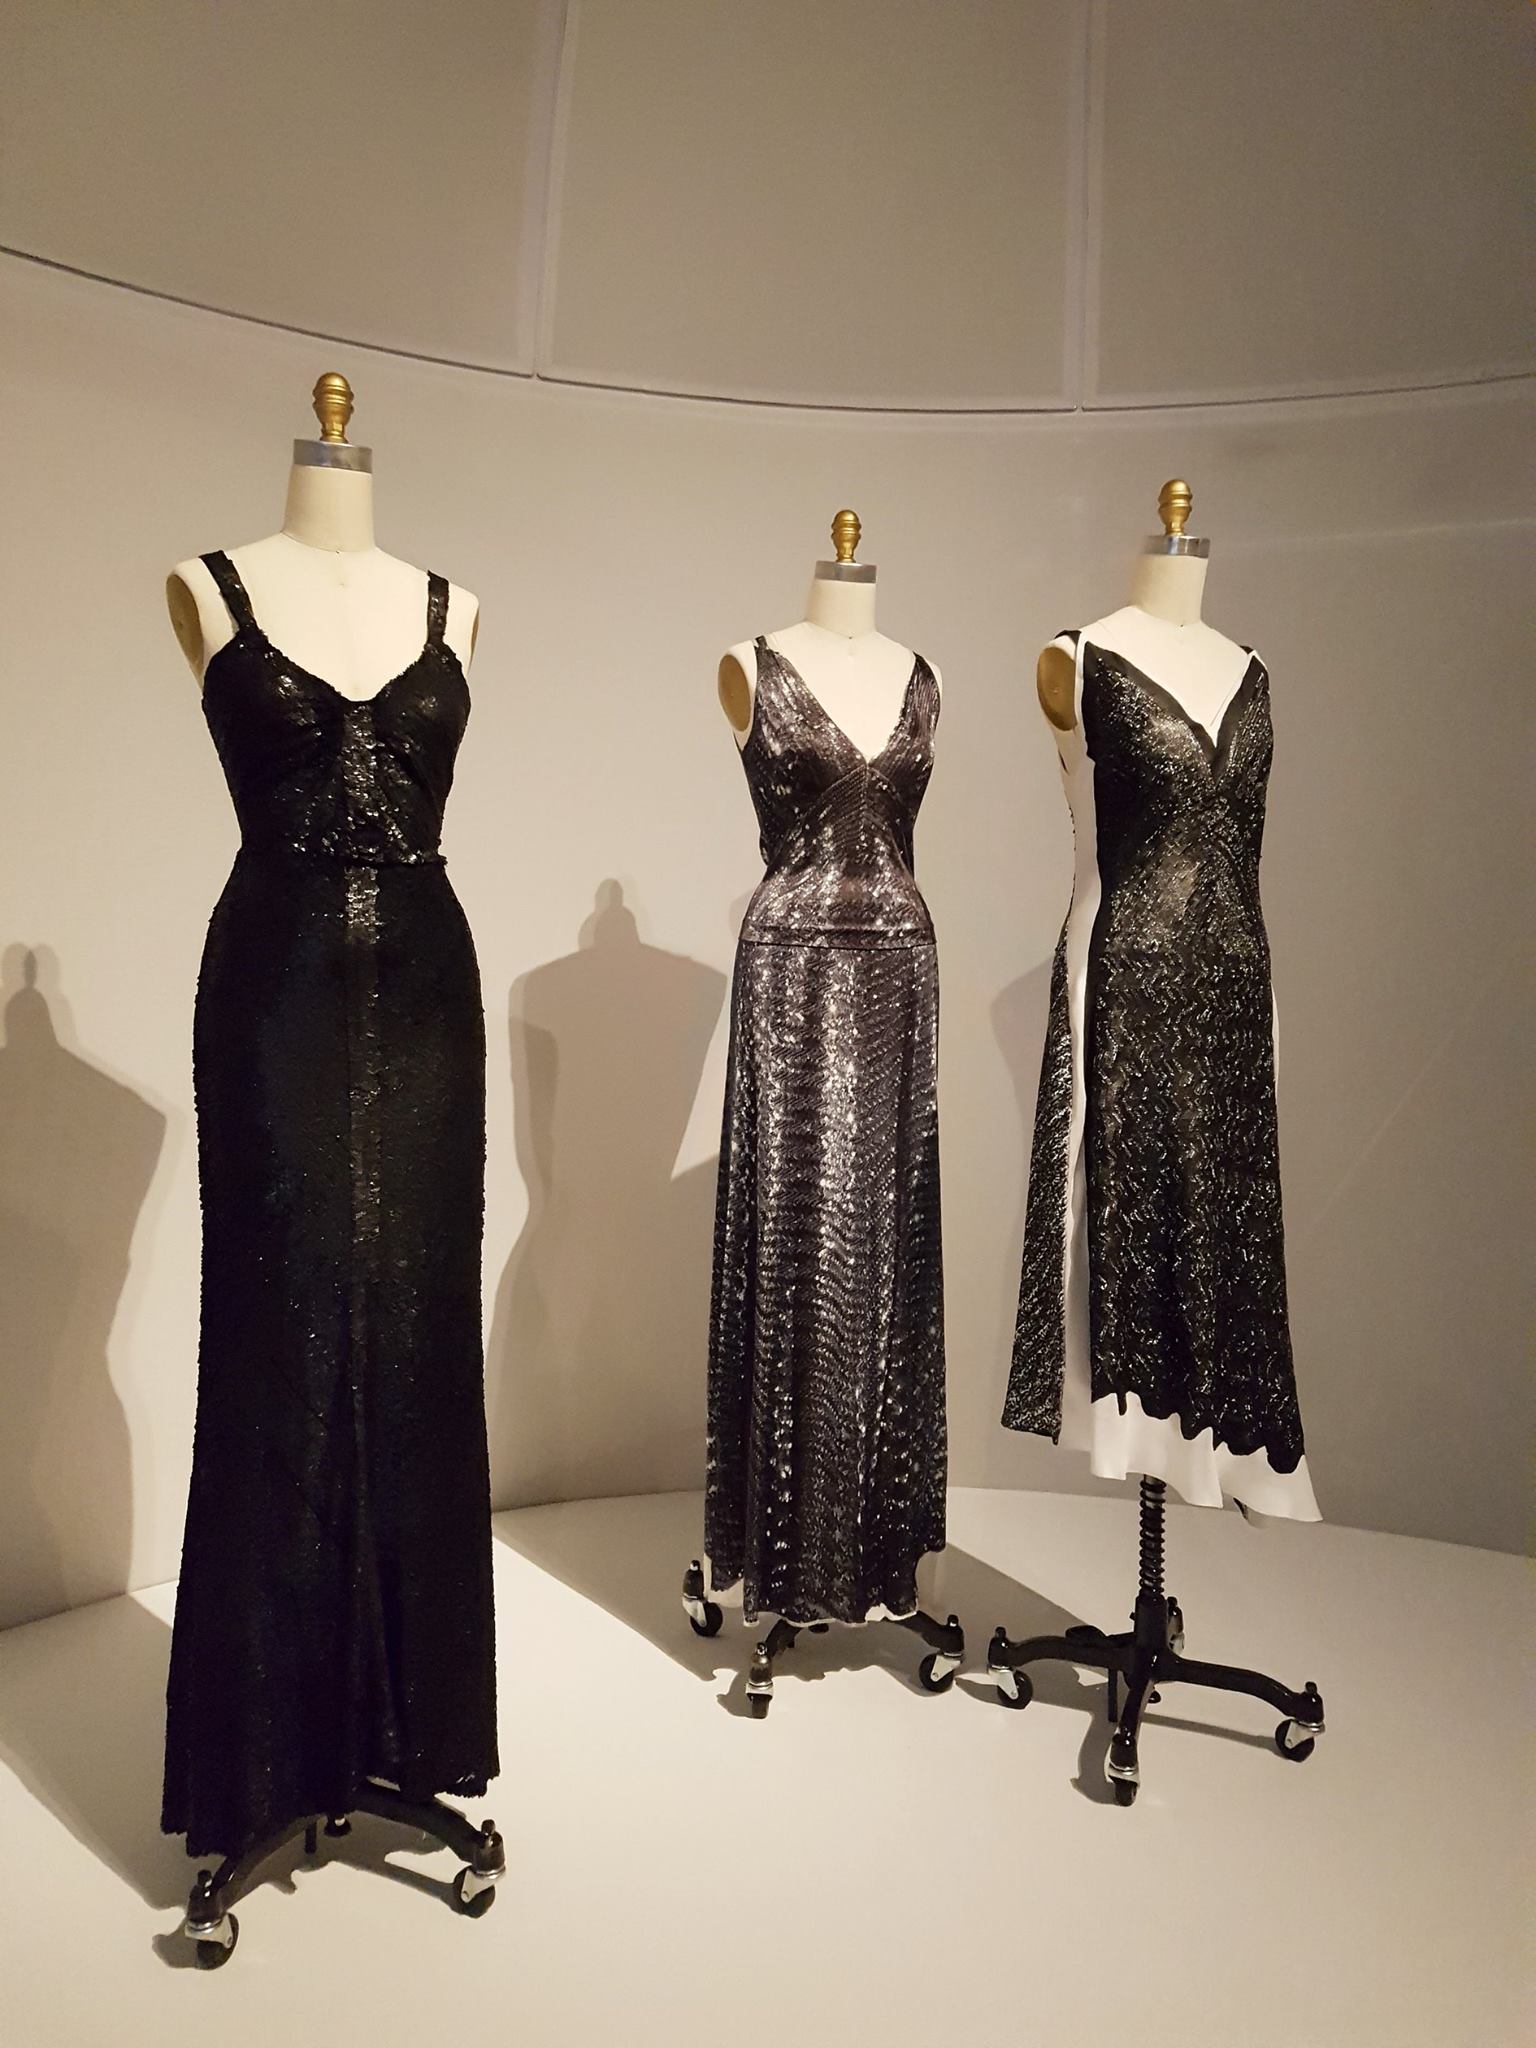
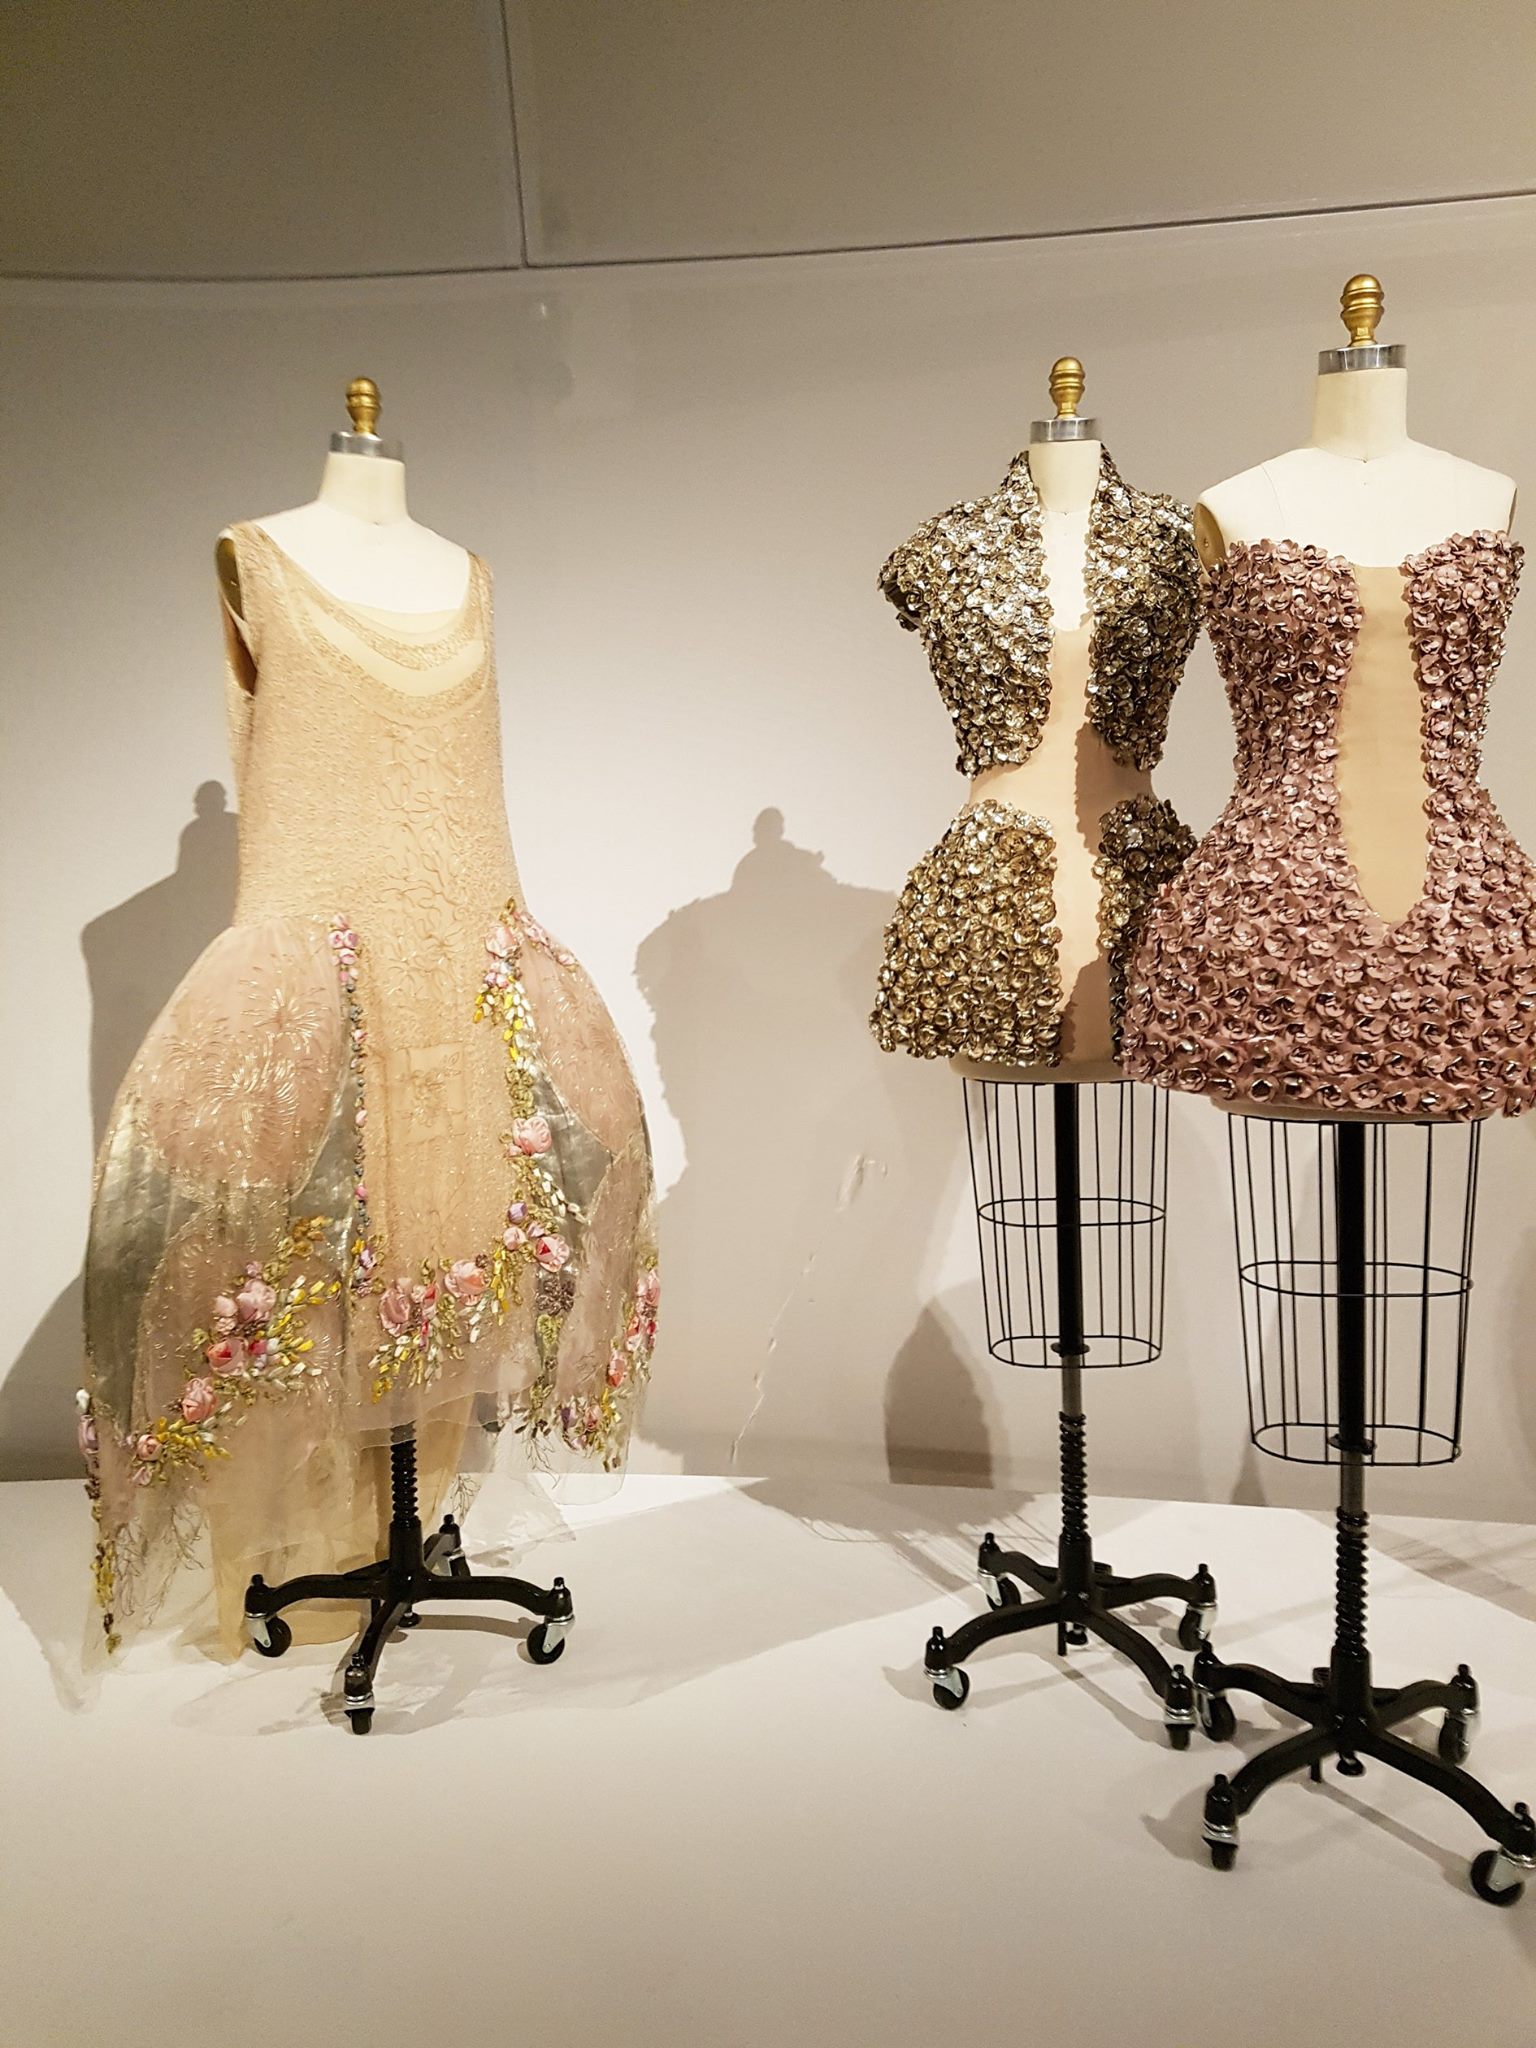
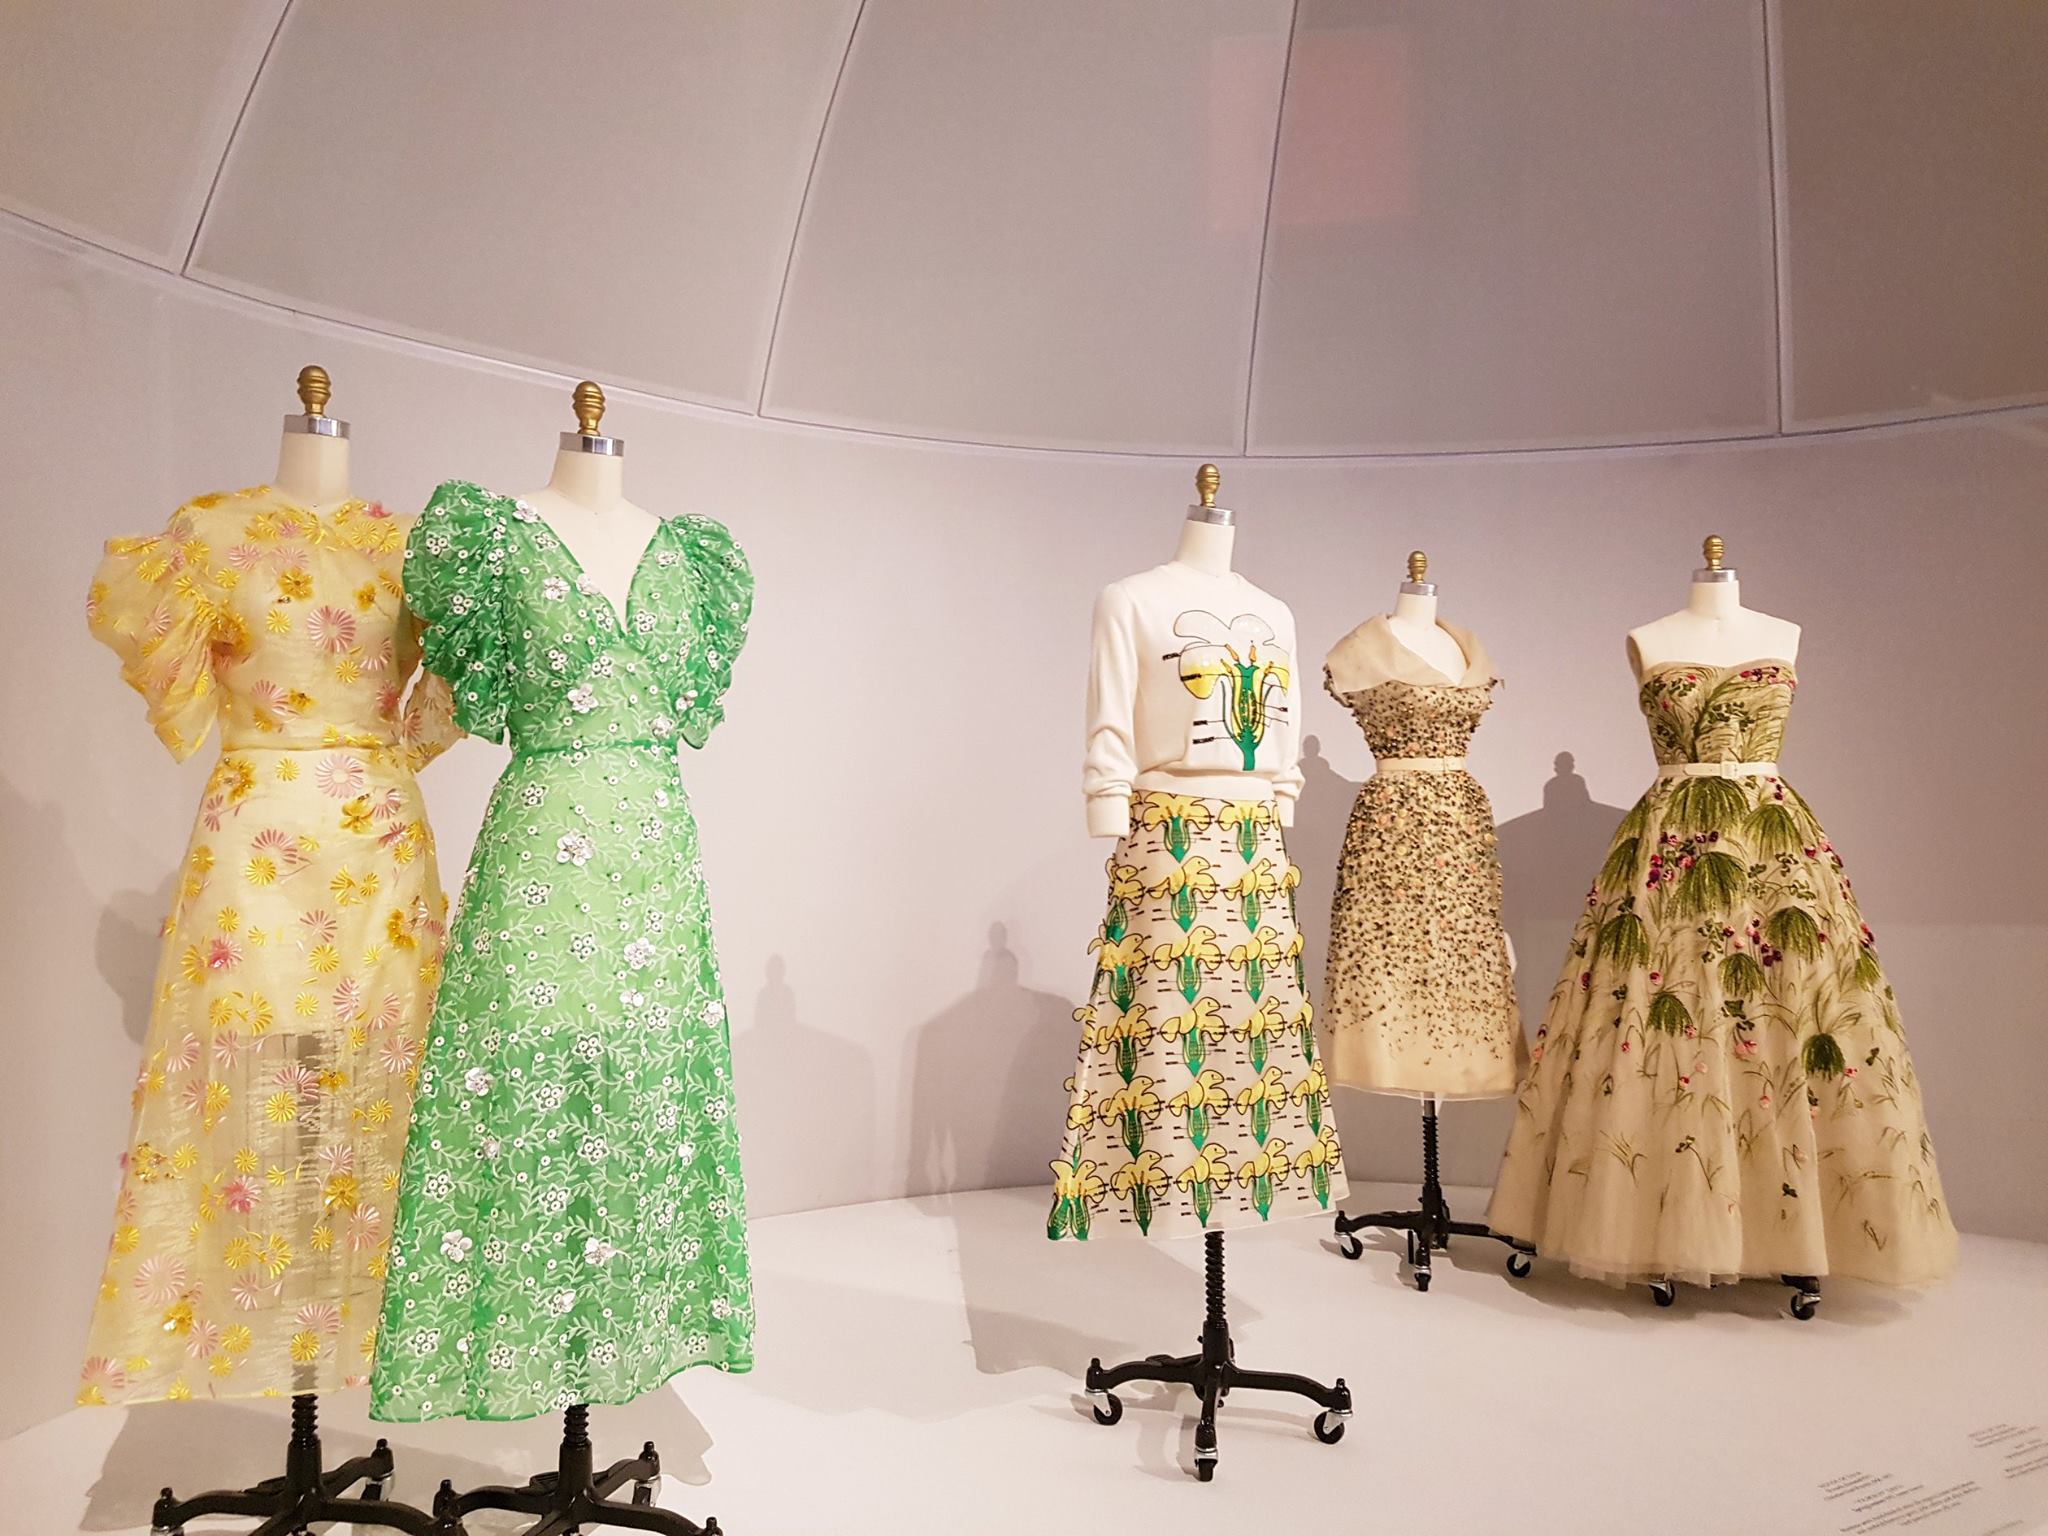
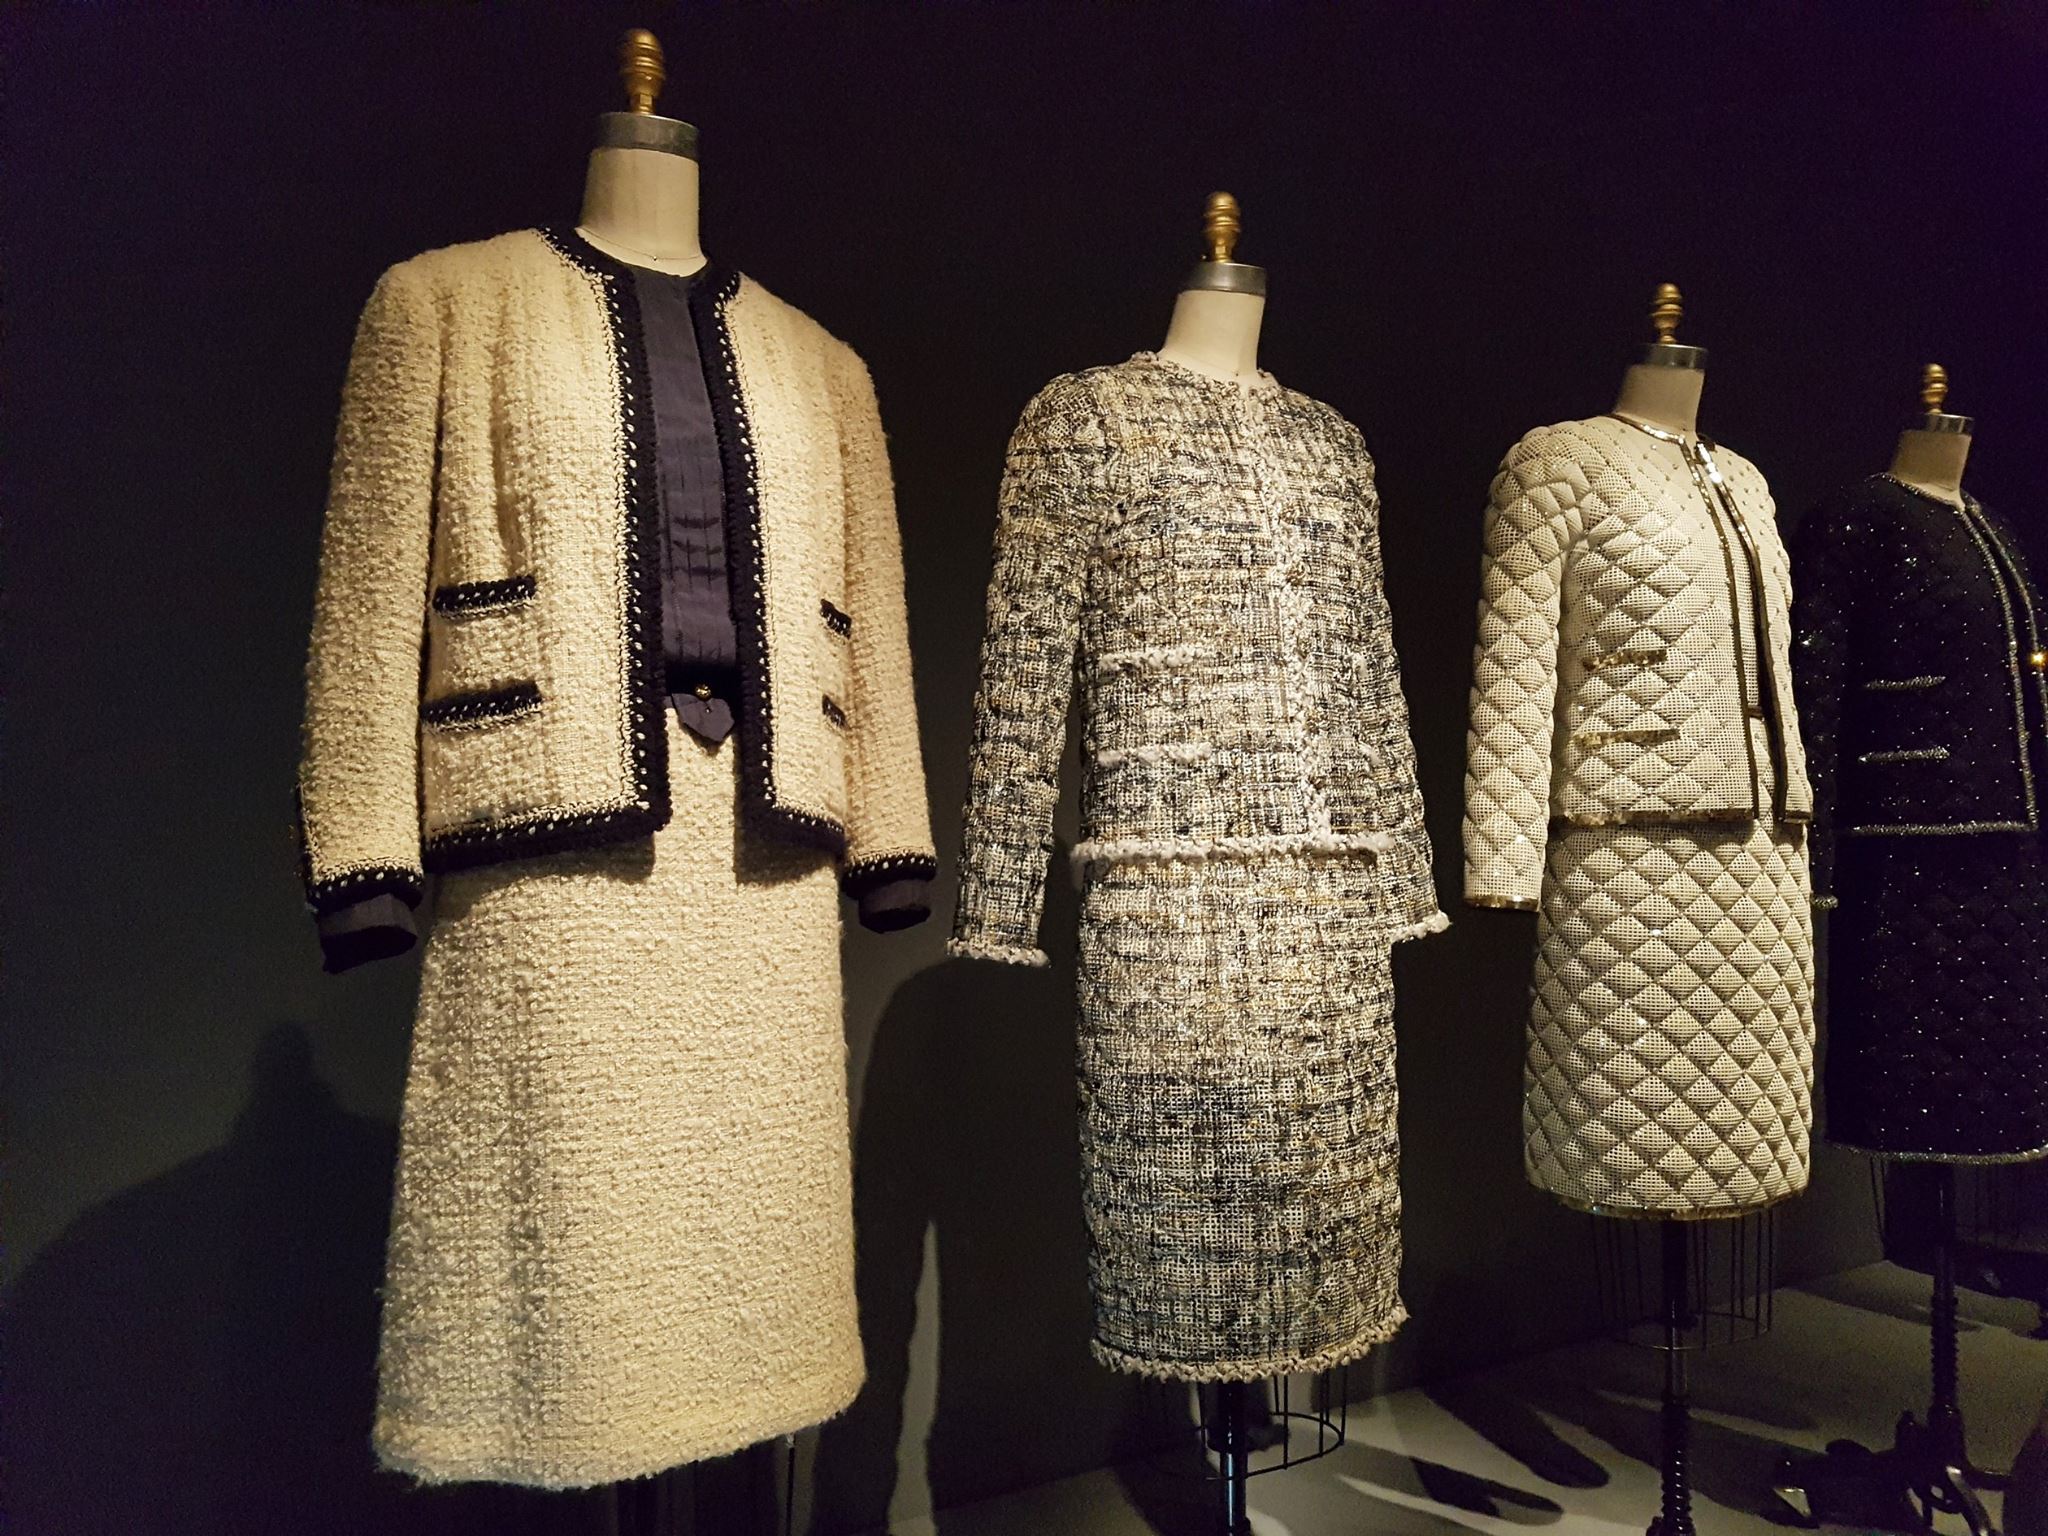
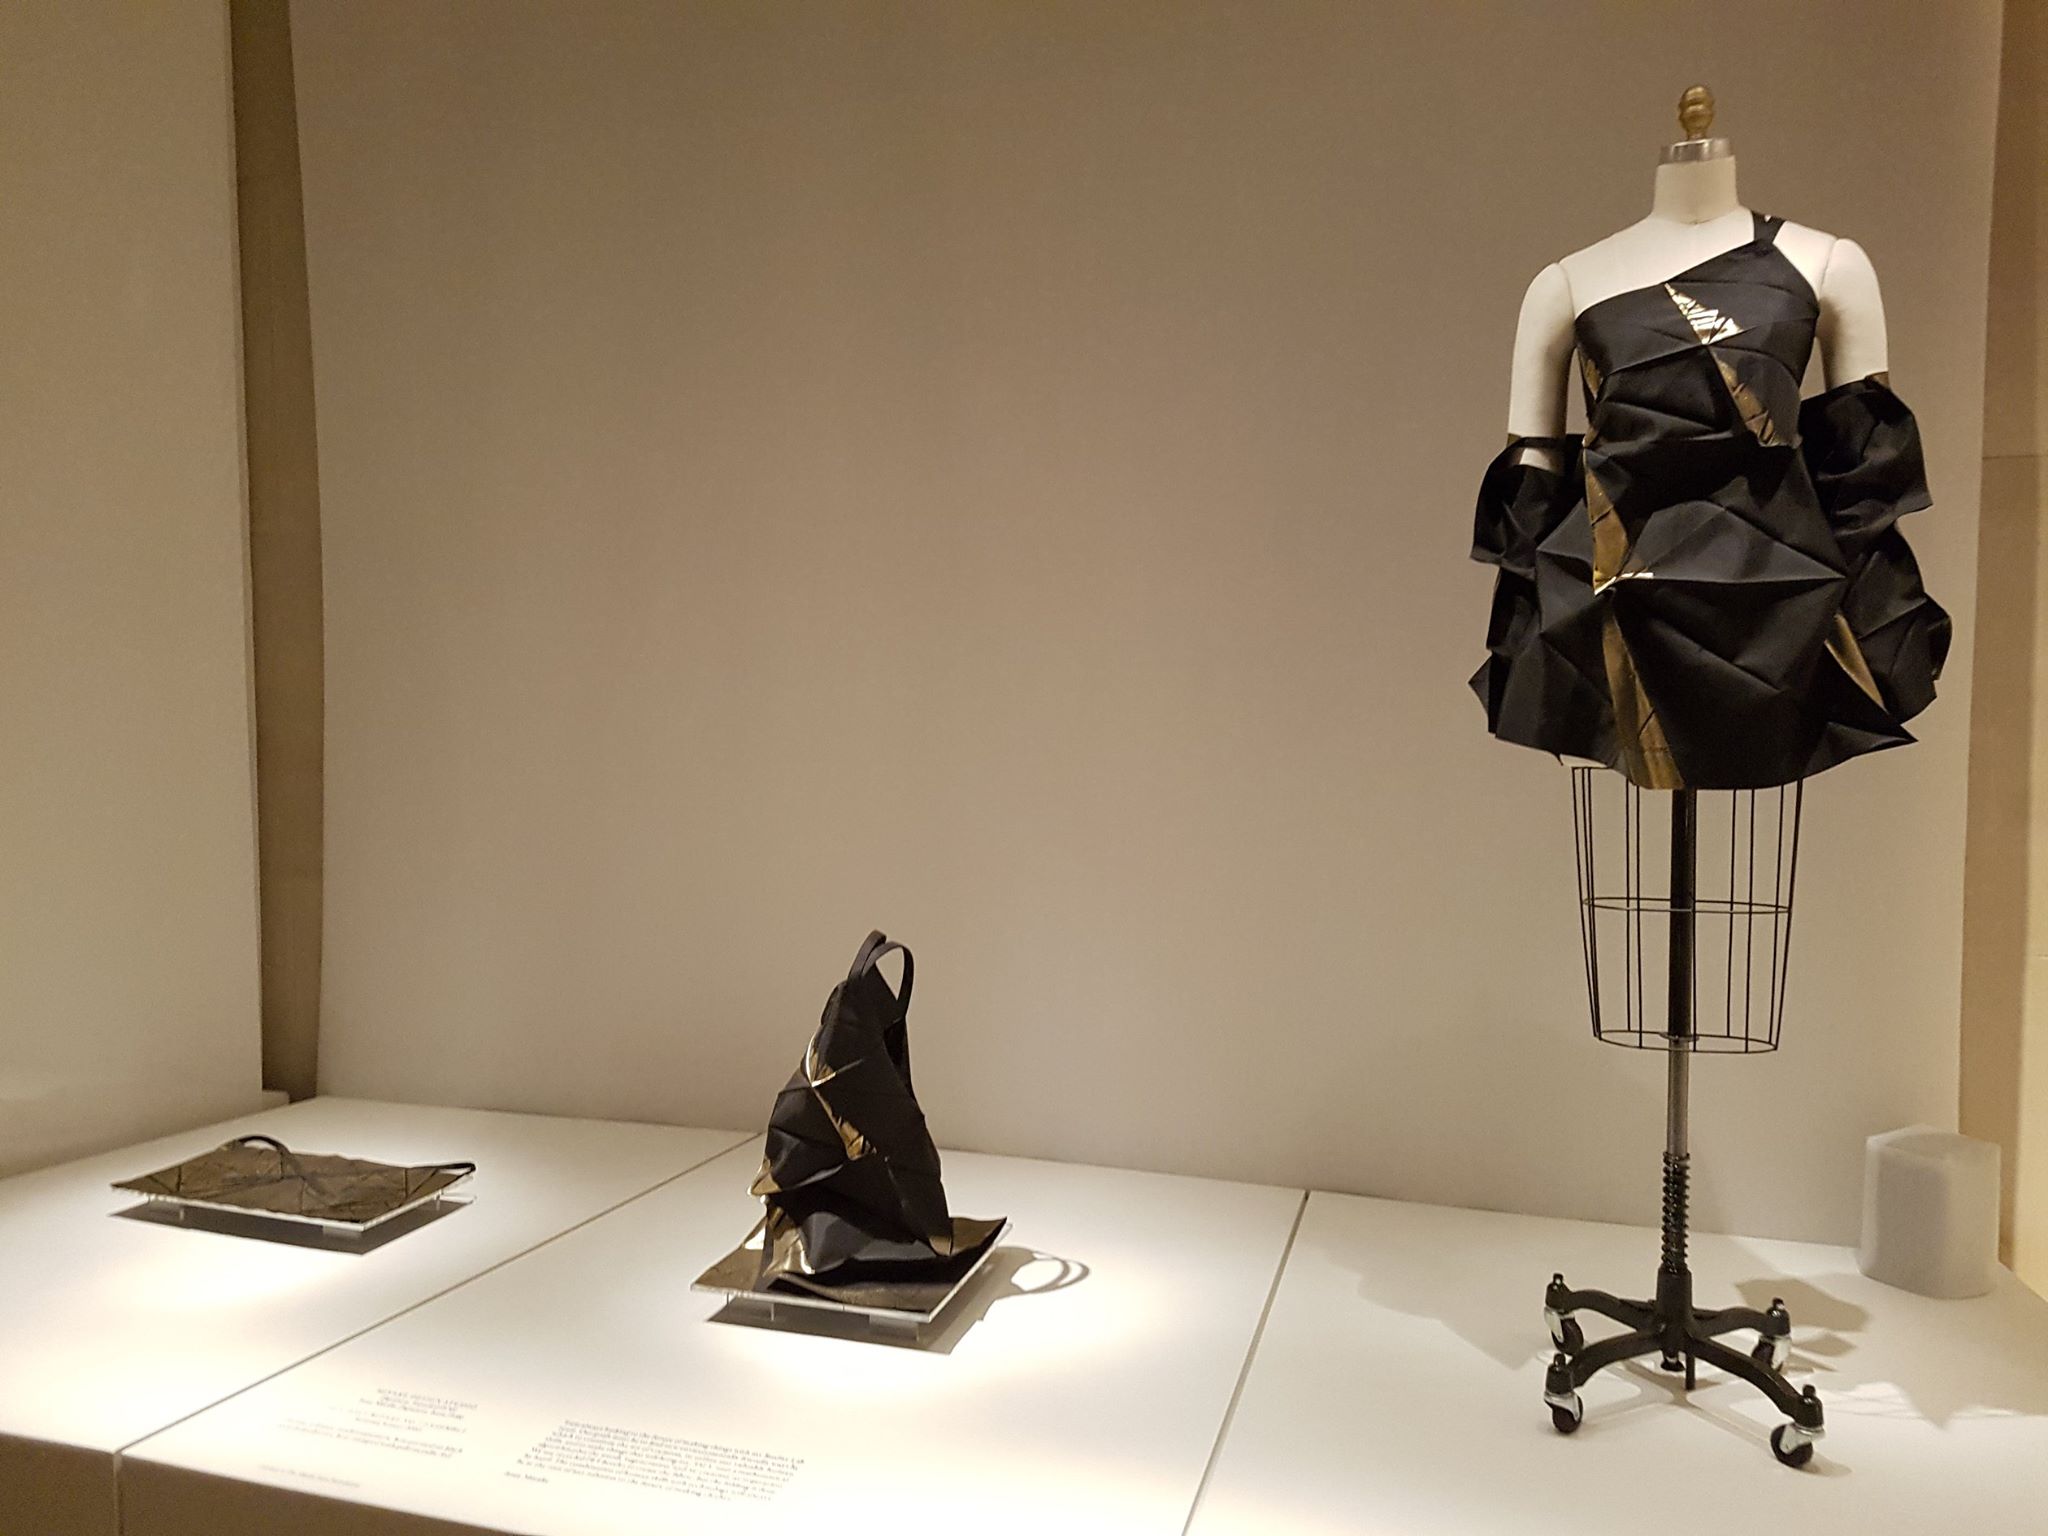
The last collection was from the 2016 exhibition Manus x Machina, by the Costume Institute. It was housed in the Robert Lehman Wing galleries. It explored designer handmade and the machine-made haute couture and avant-garde ready-to-wear fashion. There were about 170 garments, spanning from the early 20th century to the present. Each dress was a stunning work of art, due to their intricacy and uniqueness. I didn’t expect to enjoy this exhibition as much as I did. I also appreciated that the garments were not behind glass, so I was able to get a good look and great photos without glare.
This is my last post for my trip to New York. Next I will be taking you to Washington D.C, where I saw plenty more museums, iconic sites and ate plenty of delicious meals.
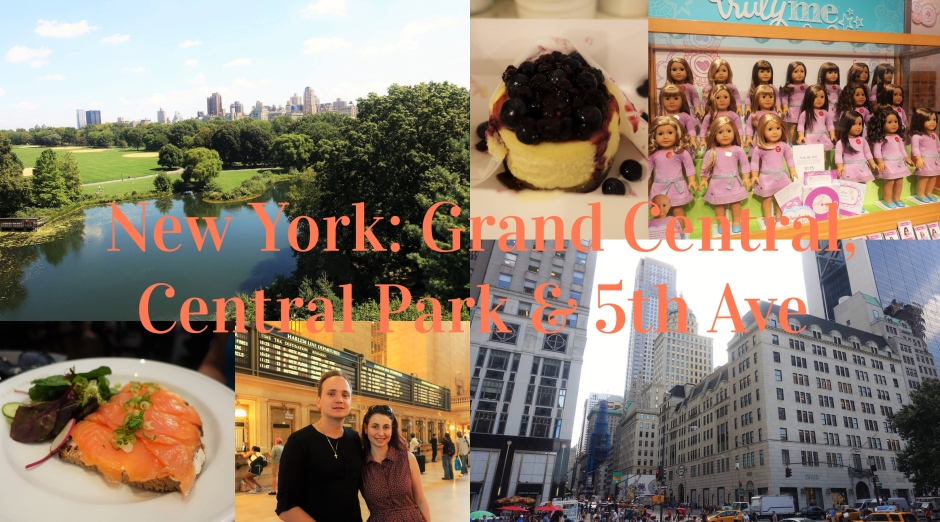
Hi all! While I’m away on my babymoon to Tasmania, I thought I would continue sharing a couple of posts from my trip to America. These are from our last day in New York on day 7. There is just so much to see in New York, as you have seen from what we did. There is so much more I would like to do when I return one day. I am sure there will be many new attractions and delicious foods to try as well. On the last day we covered Grand Central Terminal, the MET, Central Park and made quite a few stops on 5th Avenue. We also dinned in a old-world Viennese cafe on the Upper East side and New York’s largest dinner.
So on my last day, Octavia and I began the day at the Piccolo Cafe, who are known for there authentic Italian fare and espresso. They have three locations, but I visited the little cafe is in Midtown on 238 Madison Ave. This location is quite tiny but was very popular in the early morning with locals. Their menu offers quite a range of pastries and panini with various fillings, pasta, gourmet eggs and salads. I ordered this delicious Salmon and Egg Sandwich, which was perfect to start the day.
Our first tourist stop for the day was the Grand Central Terminal, also commonly known as Grand Central Station. This iconic station is just stunning and a must-do if you visit New York. It was opened in 1913 and it’s retains its old-world nostalgia, due to its stunning Beaux-Arts architecture. Besides being a transport hub connecting Manhattan, it also offers shopping, dining, tours and other events.
After this, I visited The MET alone. Yes just right, I was by myself. I was not disturbed or rushed through my visit and I took photos of everything. I will do a separate post for this visit to show you all the amazing artwork that I saw.
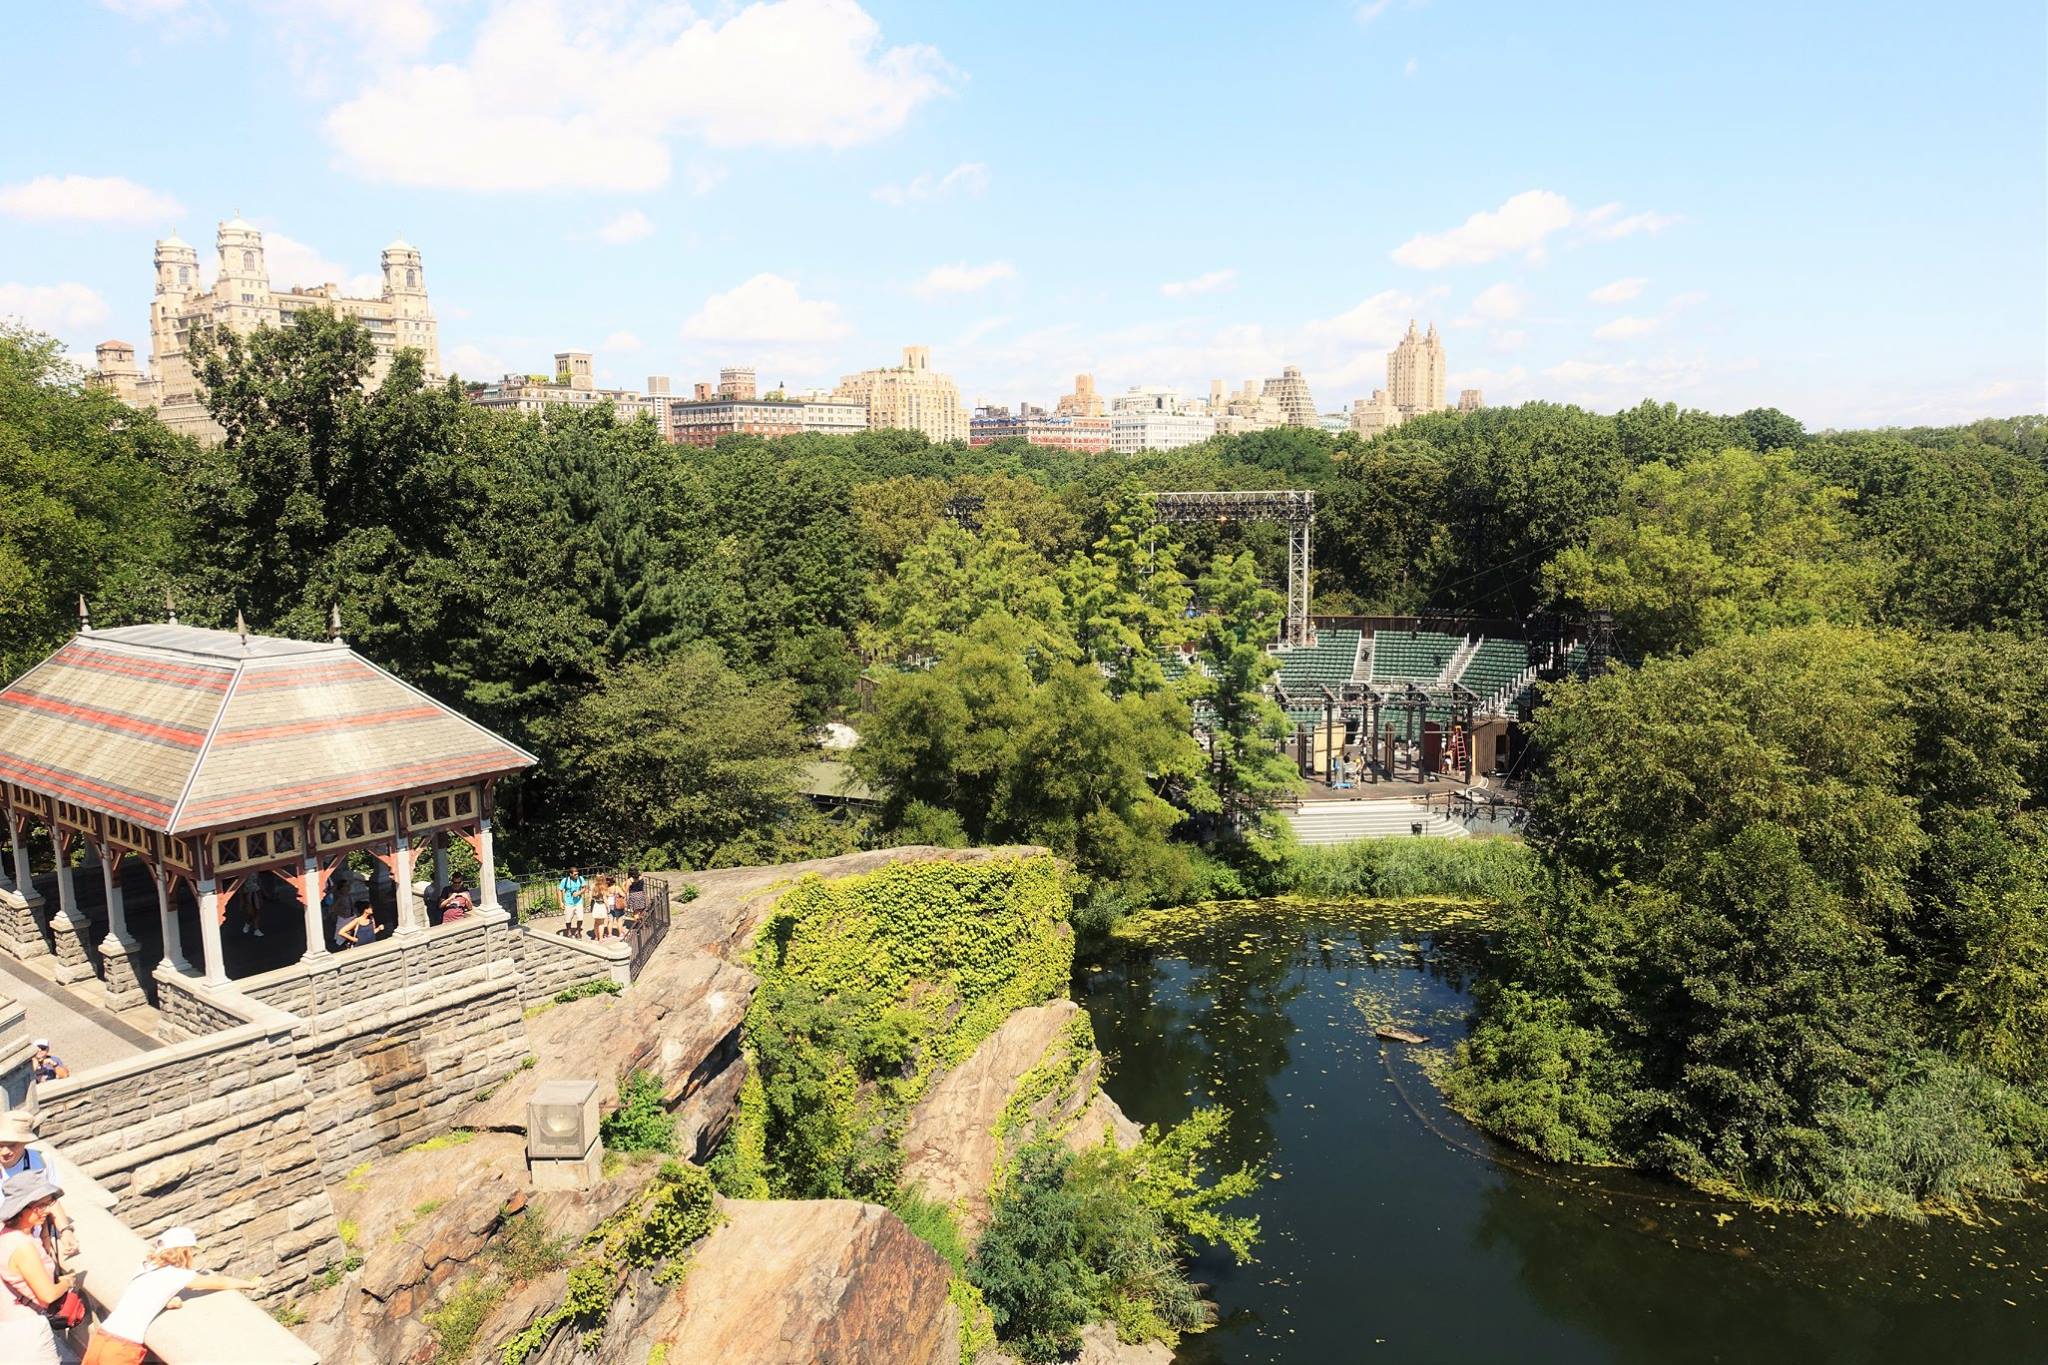
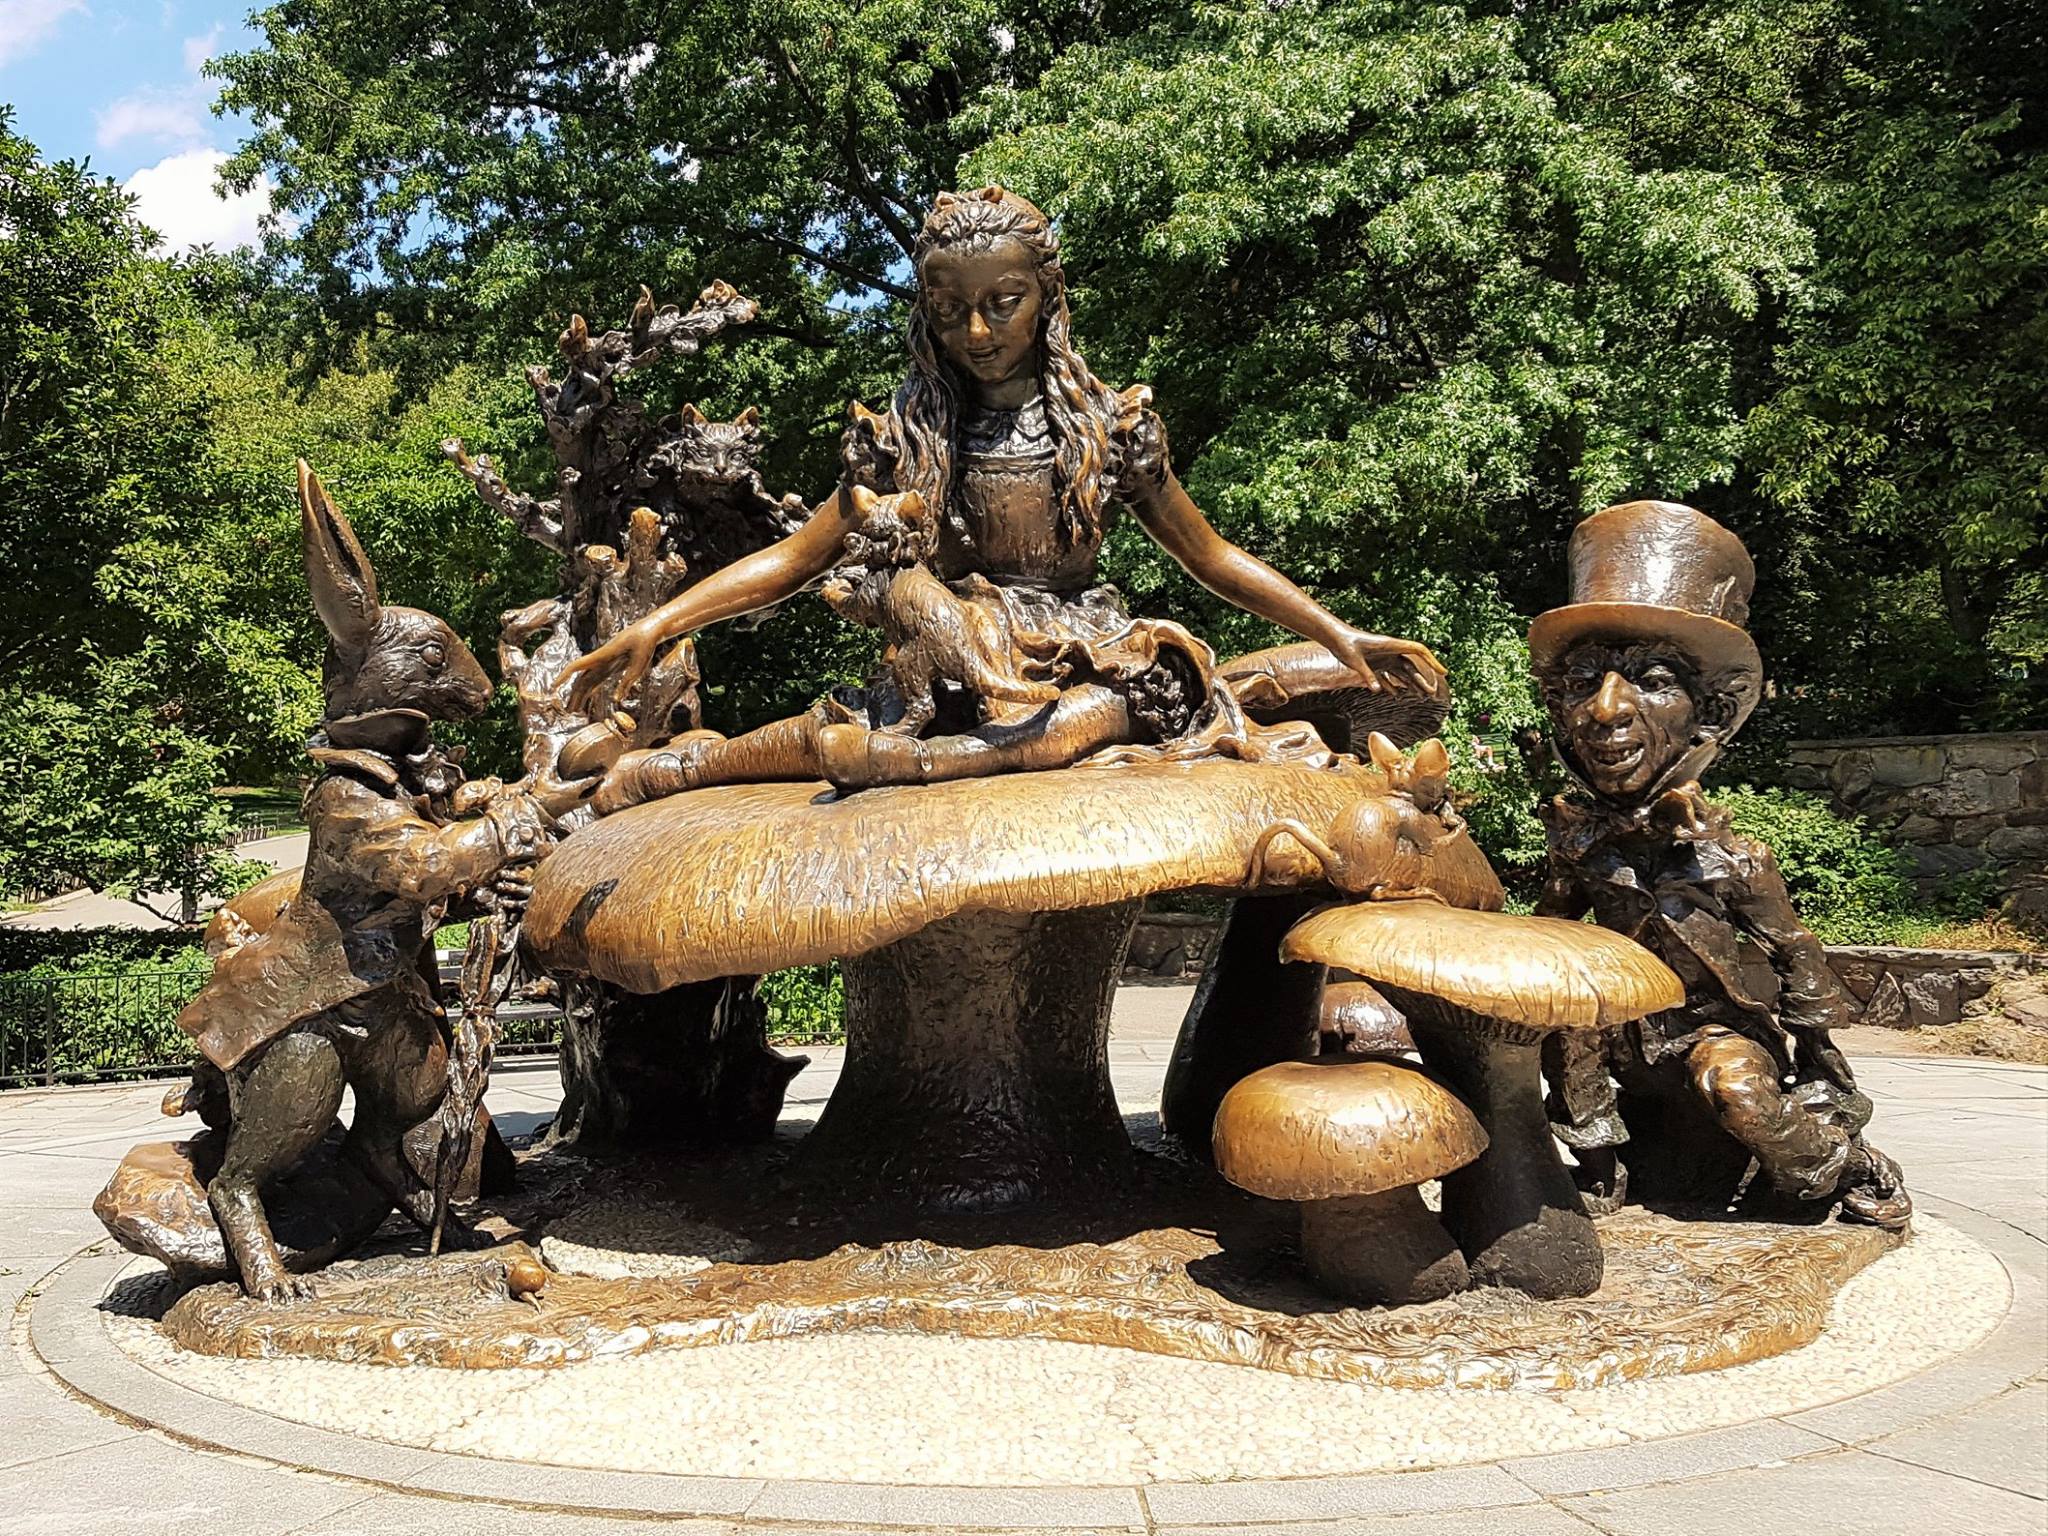
Meanwhile, Marco, O and his mum visited Central Park. They took their time walking around and enjoying the gardens. I didn’t meet them until later and only got to see a fraction of what they saw. It was so hot this day and everyone wanted to leave. If we had more time I would have loved to do a tour of the gardens. This is probably not the best activity to do in the middle of summer.
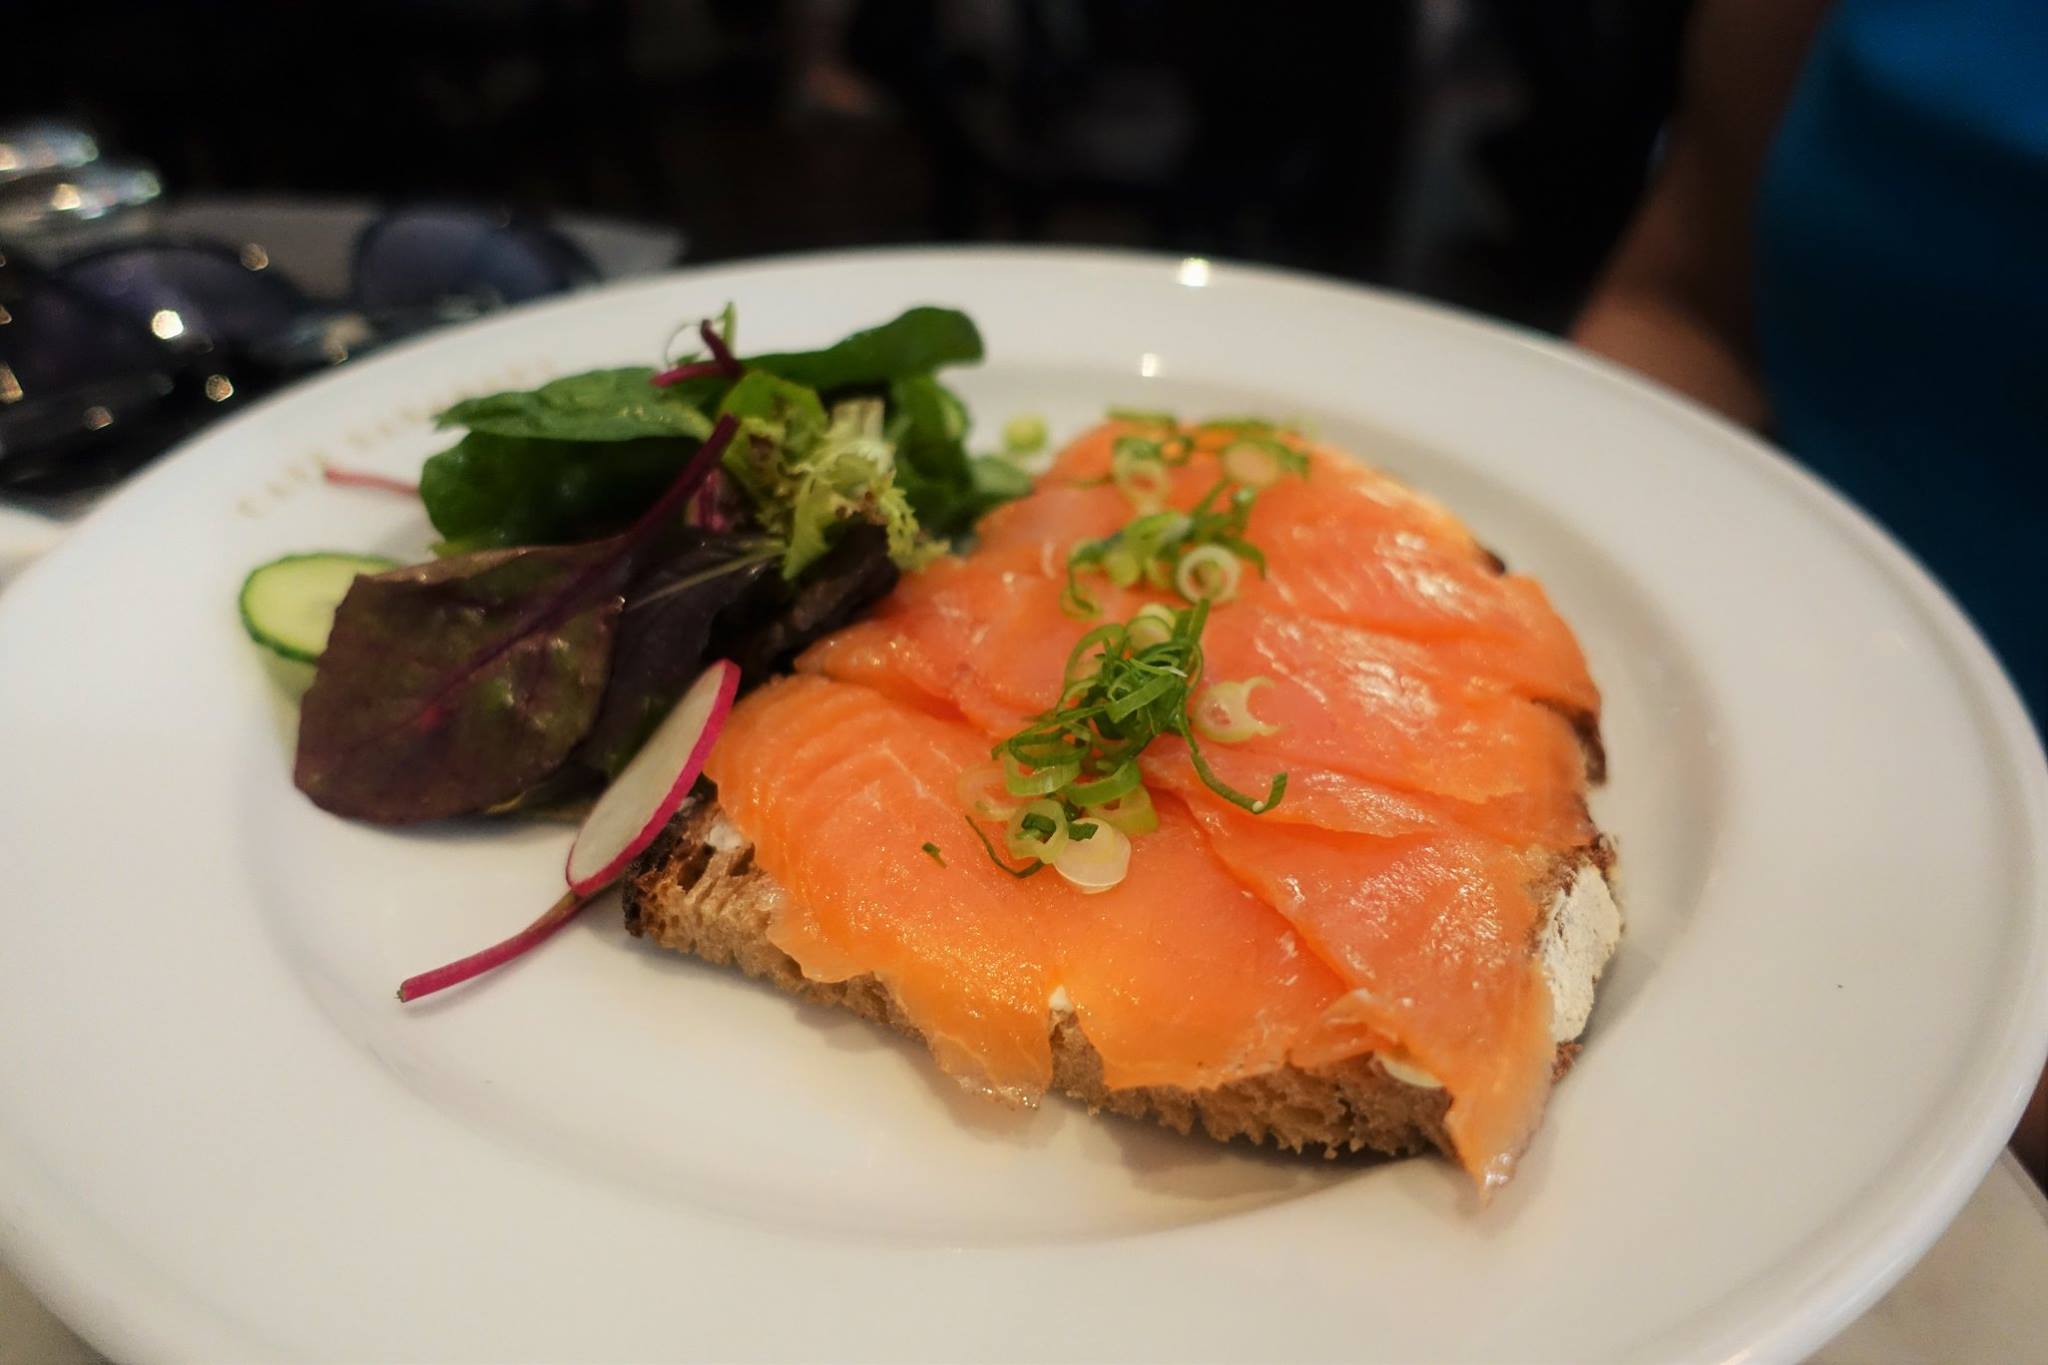
For lunch, we stopped into a restaurant nearby on 5th avenue, within in the Neue Gallery. Café Sabarsky is an Austrian cafe, which was inspired by the turn-of-the-century Viennese cafes, which served as a hub for intellectual and artists. It’s headed by Michelin-star chef Kurt Gutenbrunner, who presents a menu with a modern take on Viennese traditional dishes. The dining room is relatively small but the interior is just stunning. The walls are flanked with dark wood, which is adorned with carved embellishments and there is a classic old-style bar. We each ordered a dish from the menu, including Smoked Salmon with Cream Cheese, Bavarian Sausage with warm Pretzel & Sweet Mustard and Roasted Bratwurst with Riesling Sauerkraut, Roasted Potatoes & Dijon. The dishes were presently lovely and tasted very nice as well. They were rather small serves, but then for such a fancy place we probably should have ordered a bit more. Especially since I had to split my meal with my toddler.
After that, we took a walk from on 5th Avenue from the Upper Eastside to Midtown. This is a great walk to take in all the amazing architecture and high-end shopping scene. We made a few stops along the way. First, we stopped at the iconic Apple Fifth Avenue. To get to the store we had to go into a cube and down a spiral staircase. It was very crowded down there, just like every Apple store I suppose.
Next, we visited Trump Tower. Now, this was before the election, so I wasn’t so accustomed with the Trump name as we all are now. The interior is very grand, but also a little outdated. For me it’s reminiscent of the the grandeur of New York in the 1980s and 1990s. At the time we visited there weren’t any stores open. Since I had the pram, I had to take a lift to the first floor to get a view of the foyer. There was a doorman inside, who would only allow one customer or couple at a time. It was kind of nice to privately ascend up. While we were there we did get some ice cream from the Trump Ice Cream Parlor. It offers about 16 classic flavours. I believe I tried the Vanilla Honey Baklava, which I hadn’t come across before and it was pretty nice.
Next, we stopped at St. Patrick’s Cathedral. This is the grand church we saw while in New York. This church is 140 years old and is the seat of the archbishop of the Roman Catholic Archdiocese of New York. The architectural style is largely Neo-Gothic and is truly stunning both inside and out. It is massive in size and can hold 3000 parishes at once.
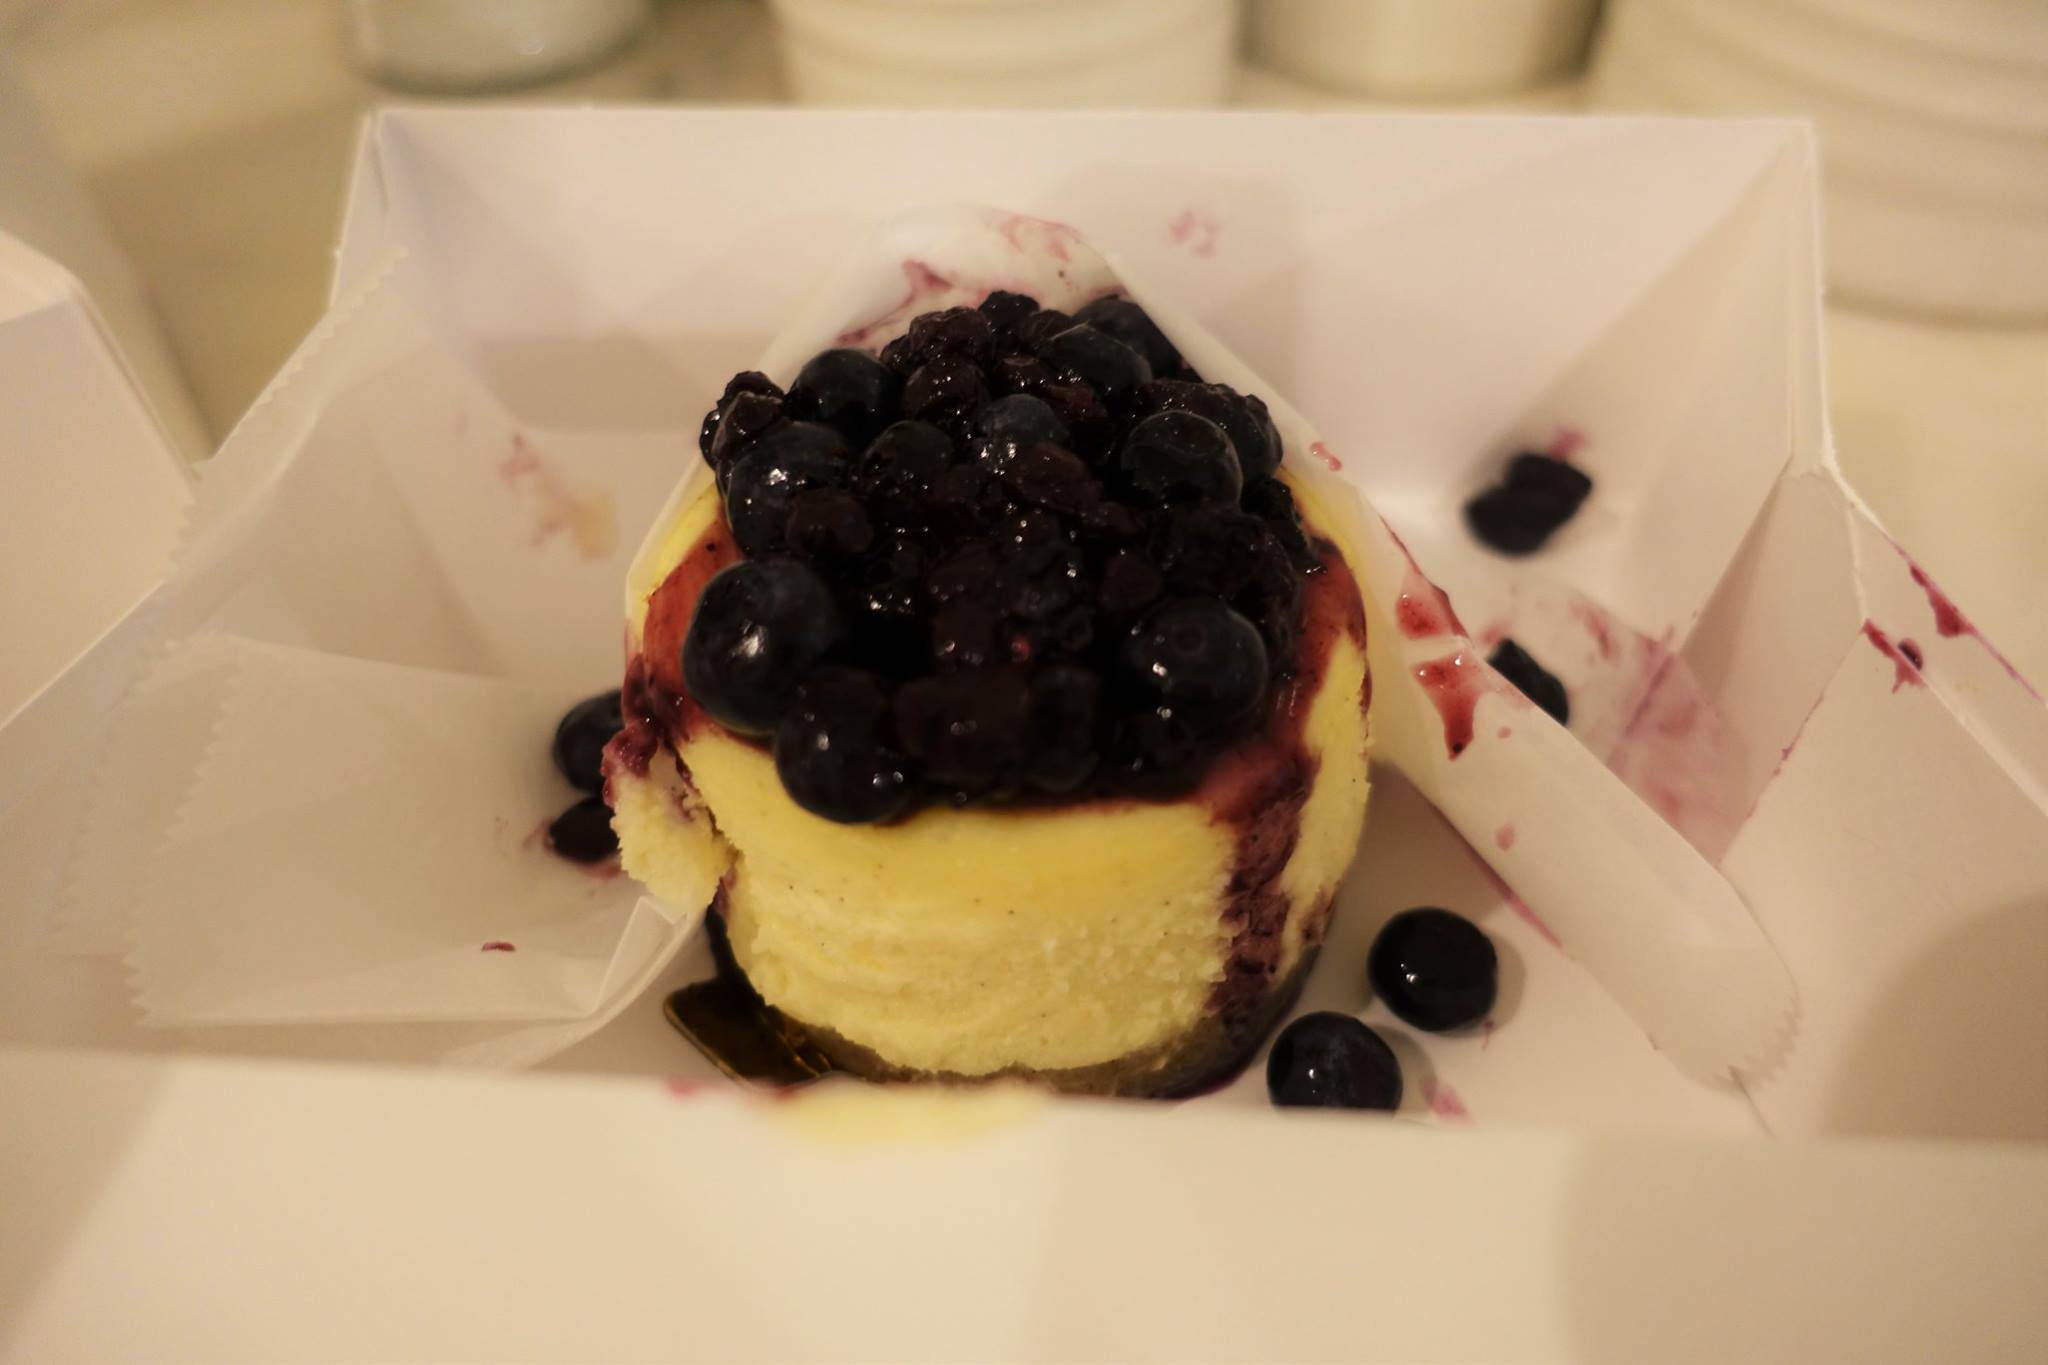
Not far from 5th Avenue in Midtown, we also made a stop at the famous Magnolia Bakery at the Rockefeller Centre. This New York bakery is various locations within the city across the US, as well as in Asia and the Middle East. The brand was made famous by the ‘Sex and the City’ series and for its cupcakes. Their menu offer a range of cupcakes as well as speciality weekly cupcake flavours. Additional they offer pies, cakes, mini cheesecakes, brownies, bars, cookies and sweet breakfast muffins, scones and loaves. This particular location is rather small and doesn’t offer seating, so we had to grab and go. For me the cheesecakes looked the most amazing, so we got the Blueberry and Caramel Pecan Cheesecake. Oh my goodness they were amazing. They were so soft, creamy and perfectly flavoured and sweetened. I was in cheesecake heaven. I also hadn’t eaten cheesecake in 6 years, but I promise you they are great.
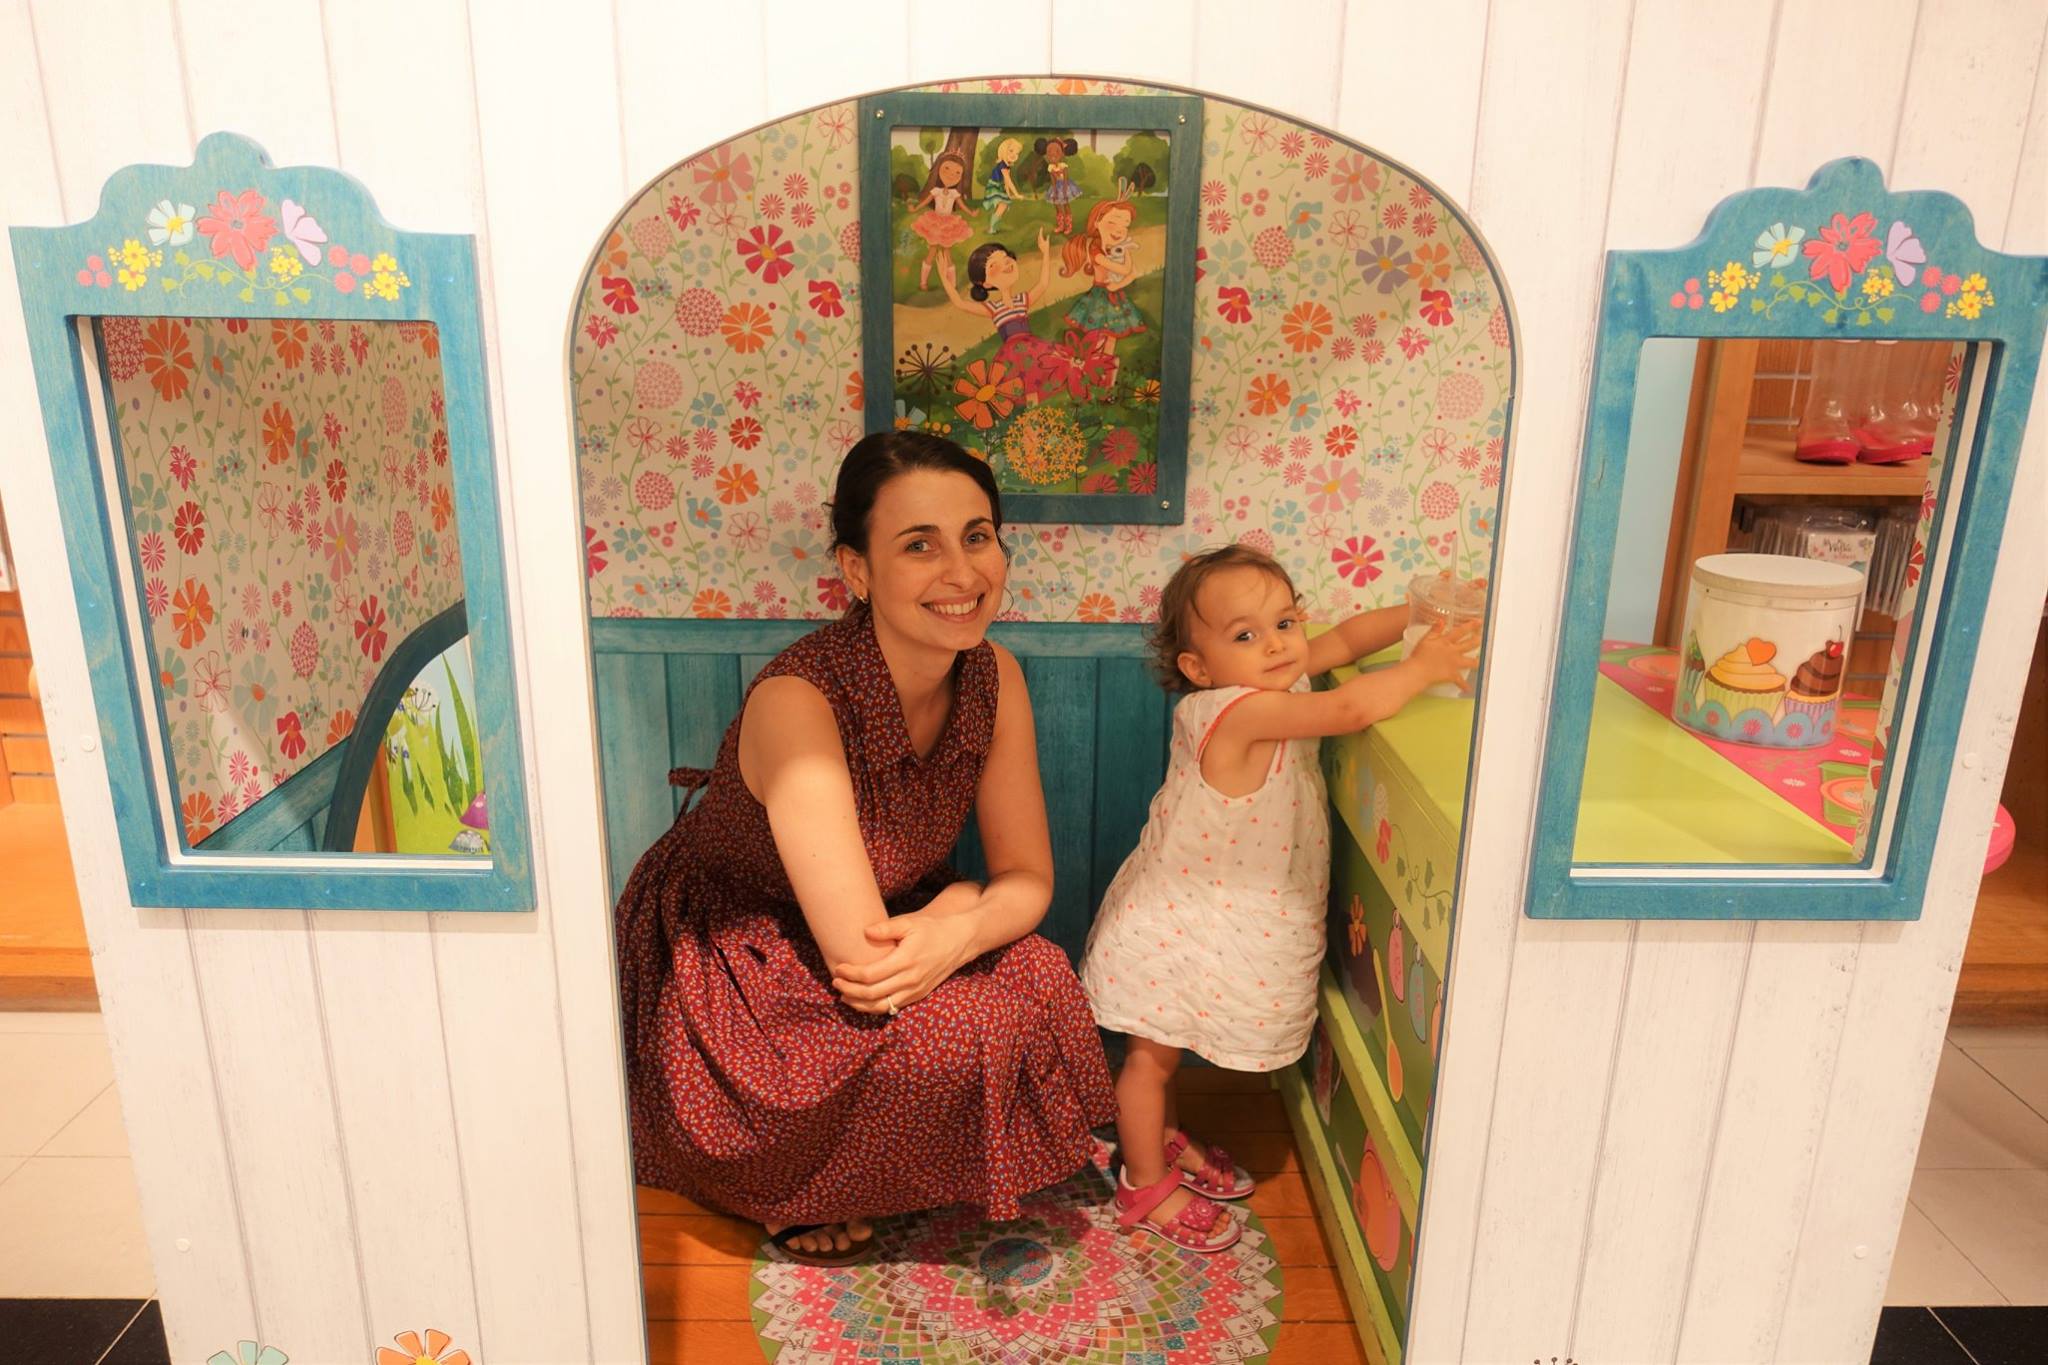
Our last stop was the American Girl Place, near Rockefeller Plaza. We don’t have these dolls in Australia, but I had heard about them. This store is two levels and features the American Girl dolls, Bitty Babies, Wellie Wishers and merchandise. There is also now a cafe on the bottom level.
I hoped to buy a look-alike doll for my daughter. Unfortunately, she was not interested in American girls or Bitty Babies. Instead, she rather wanted to play in the little house, that is set up for small children. Since they are pretty pricey and would take up a big place in my suitcase I decided not to get one for myself.
For dinner, Marco really wanted to eat in a New York American diner. I reluctantly gave in, since I wasn’t expecting diner food to be that great or healthy. He chose the Tick Tock Diner. It is the largest diner in New York and has a bright classic diner interior. The menu offers fried starters and sides, soups, mac & cheese, burgers, tacos, burritos, pancakes, french toast, crepes, waffles, egg dishes, sandwiches, salad bowls, pasta, pizza and desserts.
Marco and I decided to go with burgers. He got the Cheese Burger and Fries and I got the Turkey Burger and Sweet Potato Fries. To be honest we were a bit underwhelmed by both the presentation and the taste.
Well that’s my last day in New York. My post on the MET will be out soon and then we will move onto Washington DC.
Is your little one starting school this year? Or are you struggling plan what to give your kids for school? I may have a solution for you at or at least some inspiration.
My daughter is starting prep this year and I was a bit anxious about what I am going to give her for lunch. Until now she has spent most of the time with me and a couple of days at kindy, where all the kids are served the same kid-friendly meal. At home, she is pretty good at eating just about whatever I give her. However, when we eat out or she’s not with me, she’s very picky. So I thought we could create a meal plan for her, so she has a good breakfast in the morning and healthy meals throughout the school week. When I approached her with the idea she was really excited about it. Especially since she is excited to use her new Yumbox (bento lunch box) and Thermos lunch jar.
So one afternoon we sat down together and talking about foods she liked and what she is most likely to eat by herself at school. We browsed lots of pictures of lunchbox, kid-friendly foods and recipes. From that, we came up with a variety of breakfasts, lunches, sides and snacks that interested her. From there we looked for pictures that represented the foods and easy recipe that I could meal prep in advance. Next, I made up an A4 poster for breakfast and an A3 poster for lunch, as well as another document with a collection of pictures of the foods we planned to use. Lastly, I had my posters and food images professional printed and laminated.
So this is the template that I came up with:
And this is the result of our template. I attached the pictures to the poster, with velcro tap, but you could also use blue tack. My side dishes and snacks are missing from my poster currently. I will probably attach them next to the main dishes with blue tack since I didn’t want to add more velcro strips.
If this is something you would like to try out with your little people and would like a copy of my meal plan templates simply private message me on my Live Eat Colour Facebook page or my Instagram page and I will email you the documents directly. You can feel free to alter the colours, font and meal breaks for your child’s school. Just note that I will be on holidays until the 26th of January, so I may not be able to send them until after that date.
If you want some recommendations for non-toxic lunch bags, lunch boxes and accessories, please see my previous posts:
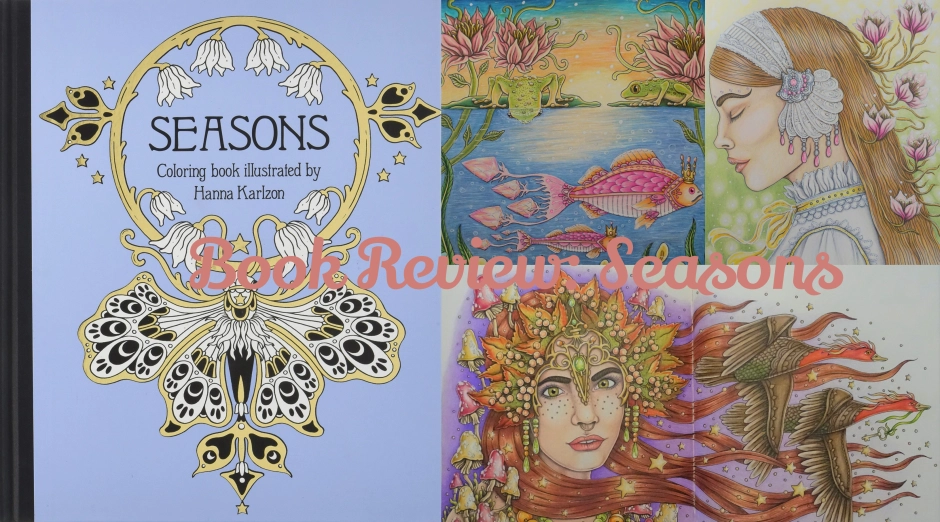
I hope you all had a restful holiday break. Today I can finally bring you my book review of Seasons and the completed pictures that I coloured at the end of 2019. I received a copy of the Seasons and Spirit Animal colouring books by Swedish artist, Hanna Karzlon back in August. Since then I have been trying to work through Hanna’s previous books in order, which I had yet to start.
Seasons is Hanna’s fifth colouring book, which came out in 2018. It originally came out in the Swedish edition, Tidevarv. The format of this book is the same as the rest of her books, which you can see from my other reviews of her first two books, Day Dreams and Summer Nights. You can also see my more recent reviews of Magical Dawn and Smyckeskrinet (Jewelery box).
This book has a light blue hardcover with a black and white design with the addition of gold foiling. The paper is high quality and off-white in colour. The pages are double-sided and there are 96 pages of line art.
The theme of this colouring book is the four seasons, which have been brilliantly divided within this book. It starts with Spring and ends with Winter, following the seasons of the northern hemisphere. At the beginning of each section, there is a design with a magical potion of the essence of the season that will follow. True to Hanna’s style, there are plenty of exotic flowers, mushroom caps, bejewelled birds, insects and furry friends, pretty ladies, forest and water scenes. There are also quite a few pages dedicated to Halloween and Christmas.
I absolutely love the artwork in this book. I especially love that the book was divided by seasons, as I was able to easily choose colour palettes for the time of year. There are plenty of Halloween and Christmas inspired pages that you can refer to in the year or beautiful designs which reflect the current season your experiencing. I wanted to do at least one page for each season, as a few for the holiday season at the end of 2019. In total, I was able to complete 11 pages with a variety of media, which I have detailed below. I also made a video flip through with all the current completed pages. Future completed pictures will be added to my Seasons gallery.
The Nameplate page for this book is very pretty and detailed. It was a bit tricky for me to pick colours since I wanted to illustrate all of the seasons. I’m not sure I nailed that, but I am very happy with the colour I used. I only used Prismacolour Premier pencils and a white gel pen for details.
This Spring lassy was one of my most enjoyable to pages to colour. I love how delicate her face and clothing are. I normally go for gold or silver metallic headdresses for Hanna’s girls, but this one needed some soft lace, satin ribbon and soft spring colours. I was inspired by this French model and this spring colour palette. For the background, I did more of a bokeh effect, since there were quite a few small circled that decorated it. I tried to white them out as best I could, to keep the design nice and soft. I only used Prismacolour Premier pencils and a white gel pen for details.
The Summer sundown was a fun one to colour and use a bright summer palette. I’m not usually a fan of water scenes, as I never find mine very convincing. However, turning it into a sunset gave the opportunity to create a reflective effect on the water. Summer colour pallets are so vast, but I limited my inspiration to these two summer palettes: Blue-Pink and Orange sunset. I tried to reuse the same colours as much as possible, so it looked more cohesive. However, it also has so much going on, which also makes it more interesting to look at completed. My sky came out very smooth and vibrant with the Prismacolours. The water is a bit more course, as the muted blues don’t blend as smoothly. Again I used Prismacolour Premier pencils and a white gel pen.
The Autumn beauty is my favourite page of the bunch. I worked very hard on this double-page spread and it is probably the best face I have ever coloured in one of Hanna’s books. Colour choice was pretty easy since Autumn has probably one of the most defined palettes of all the seasons. I used these autumn leaves as my inspiration and purple ombre as a contrasting colour for the background. To give the stars, mushrooms and dots a more sparkly effect I only partly outlined or dotted each object. I think this is much more effective, then completely outlining them, which is something I usually do in these books. Again I used Prismacolour Premier pencils and a white gel pen.
The Wicked witch was completed for Halloween Colouring 2019. There are so many versions of this page by many other colourists. I wanted to use unconventional colours for this Halloween and I was inspired by this red-headed witch. I loved the smokey green background, which I tried to reproduce in my version. I used Prismacolor pencils for the main image, as well as a white gel pen for details and a black Tombow brush pen for the background
This Christmas giving double-page spread was revisited for Christmas Colouring 2019, in the winter section of this book. As I mentioned in my previous post, I started off really enjoying this page, until I got to the background. Then I took out my watercolours paints and things didn’t turn out as planned. I first used Winsor & Newton watercolour paints to add black-grey and purple background. It looked pretty terrible so I went over it with Prismacolour pencils, as well as gold and white gel pens. I am really not happy with the turn out of this page and probably should of used a different colour palette as well.
The Scandinavian winter was my major page for the winter section. I really wanted this page to be magical and reflect the Northern lights. I was inspired by this photograph of Finland by night. To get a smooth sky I did many soft layers and blended with white and pastel colours. I also used a Prismacolor blender pencil for the darker blue, which otherwise still look a little chalky. I coloured the darker objects last, to not smudge the lighter sections of the page. I used Prismalcolor Premier pencils and a white gel pen to cover black lines, stars and sparkles.
The Tiny decorator is another one I coloured for my Christmas Colouring 2019. I’m not quite happy with this page either. I envisioned using more pastel colours. I used Prismacolour pencils, which always work well on this paper. I then tried out my Winsor & Newton watercolour paints for a contrasting background. It also came out a little patchy, so I went over with a bit of pencil. This page also had a lot of small stars and spots, so perhaps if I didn’t cover them with so much gel pen it would have looked better.
The Folksy Christmas bird is my favourite page that I coloured in this book for the Christmas season. I switched to Polychromos pencils for the main objects, since the design was more intricate and needed a sharper point. They came out quite nice and smooth on this paper. For the background, I tried my Winsor & Newton watercolour paints again, which was much more effective then my previous attempts. I then used white and gold gel pens for the bell and the circular shape.
Seasons and Hanna’s other books can be purchased from:
I hope you all had a wonderful holiday celebration and start to the New Years. I can’t believe its already 2020, it seems like just yesterday 2000 upon us. When we think about the people we were and the world we lived in, it completely mind-blowing. I’m feeling pretty optimistic about 2020. Not just for the world but also for myself.
Whats coming in 2020
So before I look back at the past year this blog, I thought I would do an update on what’s coming up in this year.
So my baby boy is coming in late May. I am 20 weeks today! I just had my 2nd-trimester ultrasound, which went really well. It made me feel better seeing that he’s still alive in there because he either kicks me for hours or is completely still. He was quite well behaved for the sonographer and she was easily about to capture all his important bits. He is kicking quite a lot now and finally hard enough for my family to just feel him from the outside. I’ve had quite mixed feelings about this pregnancy because I know exactly what to expect in terms of birth and all the sleep recently gained is going to be clawed back off me. But I’m also excited about meeting the little guy and having lots of fun baby time. Things will also be so different now that I can drive, have a few more parenting hacks up my sleeve and more confidence as a mother.
Before the baby comes I wanted to do another little trip with my family. So in a couple of weeks, we are heading to Tasmania! I’ve never been before, so I’m super excited to see what’s it all about and taste all the fresh produce.
I’ve already put together the itinerary for our 7-day road trip. It will begin and end in Hobart. But every day we will stay in a different town and visit others along the way. Some of the stops include Queenstown, Cradle Mountain, East Devonport, Launceston, Campbell Town, Oatlands, Richmond and Port Arthur. So it’s going to be quiet a fast pace road trip, with plenty of sites to see and cafes and restaurants to try. I won’t be able to do any hiking as I had originally hoped. This second pregnancy is a bit more difficult and I can only do 2 hrs walks in an air-conditioned shopping centre at this stage. But who knows, my usual travel boost may power me up so I can go for longer. Normally when I travel I only sleep 4 hours a night and don’t feel like I’ve had a great day unless I’ve been walking for 10-14 hrs. But it’s a lot different carrying a baby in my belly then in a baby carrier or in a pram.
As for the rest of the year ahead, I have no idea what is going to happen. I intend on being focused on my family, doing lots of activities and outings for the kids and trying my hand at meal prepping and new recipes. I’ve already been trying many new recipes from my Christmas present, Dinner: Changing the Game, by Melissa Clarke. So far I’ve made Black Bean Skillet Dinner, Sesame Chicken with Cashews and Dates, Zucchini Corn Cakes with Mint Coriander Pesto, Pomegranate Quinoa with Crunchy Chickpeas, Stir-Fried Tofu with Summer Squash, Basil and Coconut, and Fusilli & Roasted Cauliflower with Capers. And yes, they all taste just as amazing as they sound. Many are similar recipes that I have put together before, but just have that extra kick of flavour. So far my family have been a huge fan of all the recipes. Especially the Sesame Chicken, which has been requested to return weekly. I also really loved the Black Beans Skillet, which is so easy to put together and really satisfying. I recommend this book for you or as a present for any of your foodie friends. Its definitely going to be my go-to gift for upcoming birthdays this year.
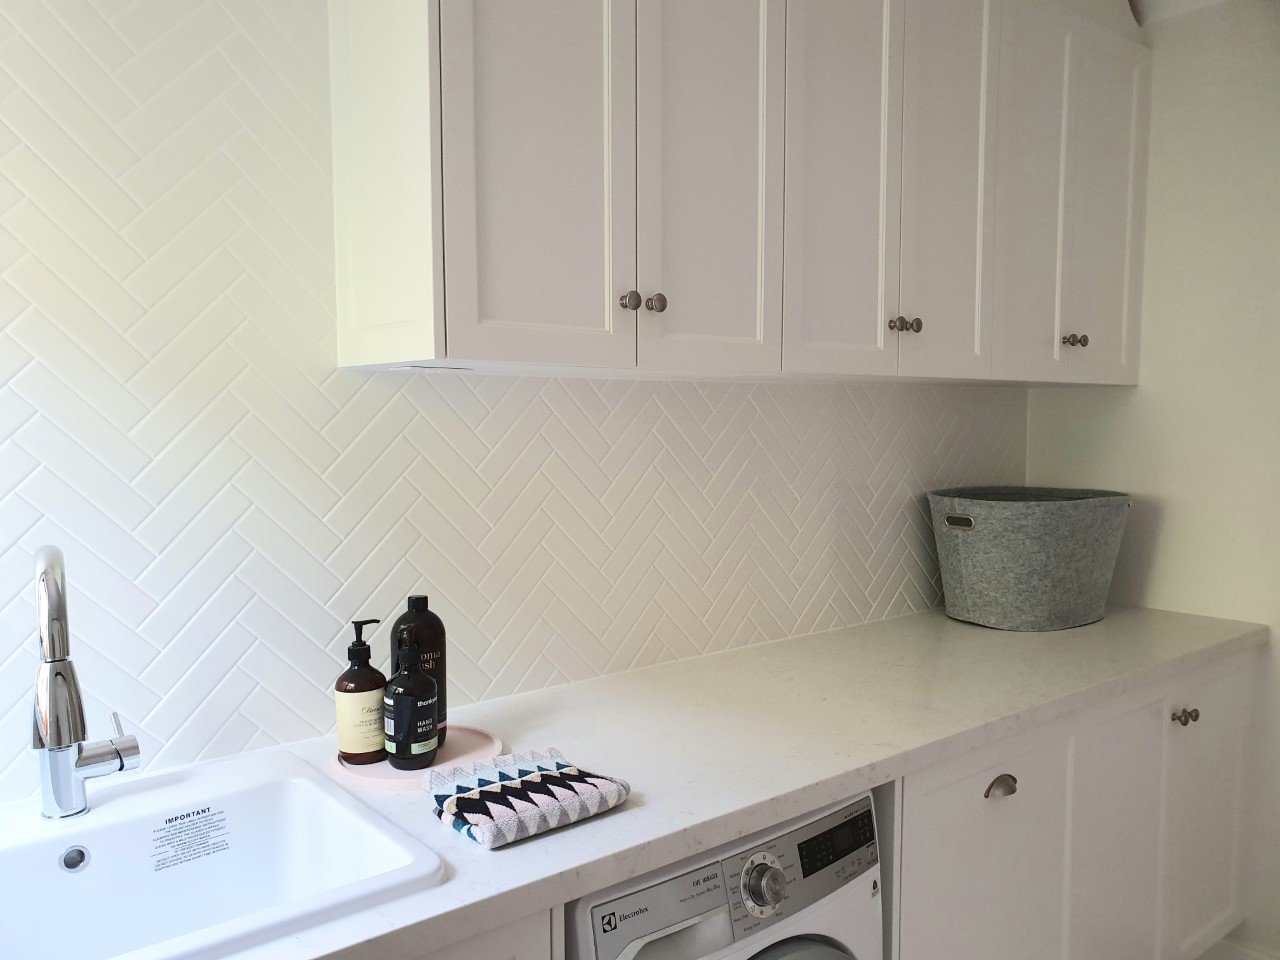
The last big thing for 2020 will be renovations. At the end of last year, we completely re-tiled downstairs and began renovations on the downstairs bathroom/laundry. It’s pretty much complete, except plaster from the top cupboards to the ceiling and finding a mirror. The toilet, shower and barn door are also done. Marco did quite a bit of work by himself for this renovation. He removed the existing attachments, walls and floor tiles, sprayed the bronze windows black and painted and attached barn door. His father also did the electrical, which also saved us a bit.
Next, we will move onto my en suite and walk-in-robe, the second upstairs bathroom/toilet and lastly the kitchen. I’m most excited about getting a new kitchen, which I have been waiting for nearly 7 years. Since its the most expensive renovation and will have to outsource most of the labour, we may not do this until 2021. But I’m optimistic! We will use the same Carpentry business who did our laundry. They offer exactly the style that I wanted, use good quality materials and do an amazing job.
Look back at 2019
In 2019, I was a bit all over the place with blogging, especially towards the end of the year. The first half of the year was dedicated to my museum internship and the second half I was suffering 1st trimester morning/all day sickness. But I thought I would give you the highlights of all the major posts I wrote, in case you want to go back and check them out.
For the Live section of my blog, I continued writing about our Nordic trip. This 3-week trip took me nearly a year to write about in my off-time because we covered so much. I then began writing about my travels to the USA. It was a few years ago, but it is the only major trip that I hadn’t documented. I haven’t finished this, so I will continue writing about it this year. So far you can read about my first 6 days in New York and some of my older posts Eating through…each city, we well my Tips and guide for the Florida Disney parks and each Disney park in Pictures. Other things I covered this year was my Ancestry DNA results, which have since changed, so I intend to write about this in the future. And also O’s Unicorn Party.
For the Eat section of my blog, I mostly included posts from my travels and a few new recipes. I was pretty lazy in terms of recipe development in 2019. I found myself cooking a lot of the same old meals week to week. They were healthy but also familiar to my difficult child. Here are some of the recipes I did post:
For the Colour section of my blog, I was also quite slack this year. Although, I did spend a lot more time on the pages I coloured and I have improved a lot. Below are some of the book reviews I did with completed pictures and video flip through, as well as my special seasonal colour from a variety of my books.